Patching Native Libraries for Frida Detection Bypass
26 min read
October 27, 2024


Introduction
In the previous chapter, we took a closer look at native libraries and how Frida can be used to bypass detection mechanisms even when the detection functions are implemented within native code. We demonstrated that while using native functions for detection makes bypassing more challenging, Frida’s flexibility can still overcome these security measures in many cases.
In today’s chapter, we’re shifting our focus to directly patching the native library itself. This approach allows us to modify the detection logic at its source, bypassing the detection code without relying on external workarounds. We’ll go through the process of decompiling the APK, analyzing the native code to locate detection functions, and implementing a patch that disables the Frida detection. By the end of this chapter, you’ll understand how to interact with native code directly, gaining insight into native-level security and reverse-engineering techniques.
Updating the Native Library: Adding a Frida Detection Function
In this section, we’ll explore how to enhance our native library code to include a more sophisticated Frida detection function. In contrast to simpler detection methods that return a boolean value, which Frida scripts can easily hook and override, this approach will instead exit the application immediately upon detecting Frida. This method is more robust, making it harder to bypass with typical Frida-based hooking.
Below is the code implementation for our detectFridaAndExit function, which checks for the presence of Frida using multiple methods and immediately exits the application if any Frida-related indicators are detected.
DetectFridaAndExit
#include <jni.h>
#include <string>
#include <dirent.h>  // To scan directories
#include <unistd.h>  // For access function
#include <fstream>   // To check for Frida processes
#include <sys/types.h>
#include <sys/stat.h>
#include <stdlib.h>  // For exit()

extern "C" JNIEXPORT jstring JNICALL
Java_com_example_localauth_MainActivity_stringFromJNI(
        JNIEnv* env,
        jobject /* this */) {
    std::string hello = "Hello from C++";
    return env->NewStringUTF(hello.c_str());
}

extern "C"
JNIEXPORT void JNICALL
Java_com_example_localauth_MainActivity_detectFridaAndExit(
        JNIEnv* env,
        jobject /* this */) {

    // 1. Check for Frida-related libraries in the process
    const char* suspiciousLibs[] = {
            "frida-agent",
            "frida-gadget",
            "libfrida-gadget.so"
    };

    for (const char* lib : suspiciousLibs) {
        // Check if the Frida library is loaded
        if (access(lib, F_OK) != -1) {
            exit(0);  // Frida detected, exit the application
        }
    }

    // 2. Check for Frida processes
    std::ifstream procList("/proc/self/maps");
    std::string line;
    while (std::getline(procList, line)) {
        if (line.find("frida") != std::string::npos) {
            exit(0);  // Frida detected, exit the application
        }
    }

    // 3. Check if Frida server is running on common ports
    std::ifstream netstat("/proc/net/tcp");
    while (std::getline(netstat, line)) {
        if (line.find("127.0.0.1:27042") != std::string::npos ||  // Default Frida port
            line.find("127.0.0.1:27043") != std::string::npos) {  // Alternative Frida port
            exit(0);  // Frida detected, exit the application
        }
    }
}
In this implementation:
- Library Scanning checks for known Frida libraries (
frida-agent,frida-gadget, andlibfrida-gadget.so). If any of these are detected, the app terminates. - Process Scanning reads from
/proc/self/mapsto find any memory mappings related to Frida, closing the app if they’re detected. - Port Scanning inspects
/proc/net/tcpfor connections to default Frida server ports (27042and27043), which would suggest that Frida is attempting to connect to the app.
Integrating the Detection in MainActivity
In this example, we’ll integrate the Frida detection function at the start of onCreate in MainActivity to immediately check for Frida when the app launches. In a real-world scenario, however, the detection code could be spread across multiple activities, with obfuscated names, making it harder to detect and bypass. For the sake of this example, though, we’ll keep it simple by placing the detection code at the beginning of onCreate in a single location. This setup will ensure that if Frida is detected, the app terminates before fully loading.
Here’s the updated MainActivity class, with detectFridaAndExit() called within the onCreate method:
Main Activity Code
package com.example.localauth

import android.content.Intent
import android.app.AlertDialog
import android.content.DialogInterface
import android.os.Bundle
import android.util.Base64
import android.widget.Button
import android.widget.Toast
import androidx.appcompat.app.AppCompatActivity
import androidx.biometric.BiometricPrompt
import androidx.core.content.ContextCompat
import java.security.KeyStore
import javax.crypto.Cipher
import javax.crypto.KeyGenerator
import javax.crypto.SecretKey
import android.security.keystore.KeyGenParameterSpec
import android.security.keystore.KeyProperties
import android.util.Log
import javax.crypto.spec.GCMParameterSpec

class MainActivity : AppCompatActivity() {

    private lateinit var cipher: Cipher
    private lateinit var keyStore: KeyStore
    private val keyAlias = "test"
    val expectedData = "PASSWORD".toByteArray()

    companion object {
        init {
            System.loadLibrary("native-lib") // sin "lib" y sin ".so"
        }
    }
    external fun detectFridaAndExit(): Boolean
    external fun stringFromJNI(): String

    override fun onCreate(savedInstanceState: Bundle?) {
        super.onCreate(savedInstanceState)
        setContentView(R.layout.activity_main)
        val messageFromNative = stringFromJNI()
        Log.d("JNI", "Message from C++: $messageFromNative")

        detectFridaAndExit()

        createKey()

        val btnEncrypt: Button = findViewById(R.id.btn_encrypt)
        btnEncrypt.setOnClickListener {
            showBiometricPromptForEncryption("PASSWORD")
        }

        val btnReset: Button = findViewById(R.id.btn_reset)
        btnReset.setOnClickListener {
            resetEncryptedData()
        }

        val btnAuthenticate: Button = findViewById(R.id.btn_authenticate)
        btnAuthenticate.setOnClickListener {
            showBiometricPrompt()
        }
    }


    // Create Key in Keystore
    private fun createKey() {
        val keyGenerator = KeyGenerator.getInstance(KeyProperties.KEY_ALGORITHM_AES, "AndroidKeyStore")
        val keyGenParameterSpec = KeyGenParameterSpec.Builder(
            keyAlias,
            KeyProperties.PURPOSE_ENCRYPT or KeyProperties.PURPOSE_DECRYPT
        ).setBlockModes(KeyProperties.BLOCK_MODE_GCM)
            .setEncryptionPaddings(KeyProperties.ENCRYPTION_PADDING_NONE)
            .setUserAuthenticationRequired(true)
            .setInvalidatedByBiometricEnrollment(true)
            .setUserAuthenticationValidityDurationSeconds(-1)  // Require biometric every time
            .build()

        keyGenerator.init(keyGenParameterSpec)
        keyGenerator.generateKey()
    }

    // Initialize the cipher for encryption/decryption
    private fun initCipher(mode: Int, iv: ByteArray? = null): Boolean {
        return try {
            keyStore = KeyStore.getInstance("AndroidKeyStore")
            keyStore.load(null)

            val key = keyStore.getKey(keyAlias, null) as SecretKey
            cipher = Cipher.getInstance("${KeyProperties.KEY_ALGORITHM_AES}/${KeyProperties.BLOCK_MODE_GCM}/${KeyProperties.ENCRYPTION_PADDING_NONE}")

            if (mode == Cipher.ENCRYPT_MODE) {
                cipher.init(Cipher.ENCRYPT_MODE, key)  // Generate new IV
            } else if (mode == Cipher.DECRYPT_MODE && iv != null) {
                val gcmSpec = GCMParameterSpec(128, iv)
                cipher.init(Cipher.DECRYPT_MODE, key, gcmSpec)  // Use provided IV
            }
            true
        } catch (e: Exception) {
            e.printStackTrace()
            false
        }
    }

    // Show biometric prompt and tie it to the cipher object
    private fun showBiometricPrompt() {
        val executor = ContextCompat.getMainExecutor(this)
        val biometricPrompt = BiometricPrompt(this, executor, object : BiometricPrompt.AuthenticationCallback() {
            override fun onAuthenticationSucceeded(result: BiometricPrompt.AuthenticationResult) {
                super.onAuthenticationSucceeded(result)
                val cryptoObject = result.cryptoObject
                if (cryptoObject != null && cryptoObject.cipher != null) {
                    try {
                        val decryptedData = decryptData(cryptoObject)
                        if (decryptedData == null || !isValidData(decryptedData)) {
                            Toast.makeText(this@MainActivity, "Decryption failed or invalid data!", Toast.LENGTH_SHORT).show()
                        } else {
                            showSuccess()
                        }
                    } catch (e: Exception) {
                        e.printStackTrace()
                        Toast.makeText(this@MainActivity, "Decryption error!", Toast.LENGTH_SHORT).show()
                    }
                } else {
                    Toast.makeText(this@MainActivity, "Authentication succeeded but CryptoObject is missing!", Toast.LENGTH_SHORT).show()
                }
            }
            override fun onAuthenticationFailed() {
                super.onAuthenticationFailed()
                Toast.makeText(this@MainActivity, "Authentication failed", Toast.LENGTH_SHORT).show()
            }
        })

        if (initCipher(Cipher.DECRYPT_MODE, retrieveStoredIV())) {
            val cryptoObject = BiometricPrompt.CryptoObject(cipher)
            val promptInfo = BiometricPrompt.PromptInfo.Builder()
                .setTitle("Biometric Authentication")
                .setSubtitle("Log in using your fingerprint")
                .setNegativeButtonText("Use password")
                .build()

            biometricPrompt.authenticate(promptInfo, cryptoObject)
        }
    }

    // Updated: Fixing how cipher is used after biometric authentication completes
    private fun showBiometricPromptForEncryption(plainText: String) {
        val executor = ContextCompat.getMainExecutor(this)
        val biometricPrompt = BiometricPrompt(this, executor, object : BiometricPrompt.AuthenticationCallback() {
            override fun onAuthenticationSucceeded(result: BiometricPrompt.AuthenticationResult) {
                super.onAuthenticationSucceeded(result)
                val cryptoObject = result.cryptoObject
                if (cryptoObject != null) {
                    try {
                        // Encrypt after biometric authentication
                        val encryptedData = cryptoObject.cipher?.doFinal(plainText.toByteArray())
                        if (encryptedData != null) {
                            val iv = cryptoObject.cipher?.iv  // Get the generated IV
                            storeEncryptedDataAndIV(Base64.encodeToString(encryptedData, Base64.DEFAULT), iv!!)
                            Toast.makeText(this@MainActivity, "Encryption successful!", Toast.LENGTH_SHORT).show()
                        }
                    } catch (e: Exception) {
                        e.printStackTrace()
                        Toast.makeText(this@MainActivity, "Encryption error!", Toast.LENGTH_SHORT).show()
                    }
                }
            }

            override fun onAuthenticationFailed() {
                super.onAuthenticationFailed()
                Toast.makeText(this@MainActivity, "Authentication failed", Toast.LENGTH_SHORT).show()
            }
        })

        if (initCipher(Cipher.ENCRYPT_MODE)) {
            val cryptoObject = BiometricPrompt.CryptoObject(cipher)
            val promptInfo = BiometricPrompt.PromptInfo.Builder()
                .setTitle("Biometric Authentication for Encryption")
                .setSubtitle("Use your fingerprint to encrypt data")
                .setNegativeButtonText("Use password")
                .build()

            biometricPrompt.authenticate(promptInfo, cryptoObject)
        }
    }

    // Check if decrypted data is valid
    private fun isValidData(decryptedData: ByteArray): Boolean {
        return decryptedData.contentEquals(expectedData)  // Example validation
    }

    // Decrypt data using the CryptoObject
    private fun decryptData(cryptoObject: BiometricPrompt.CryptoObject): ByteArray? {
        return try {
            val encryptedData = Base64.decode(retrieveEncryptedData(), Base64.DEFAULT)
            val iv = retrieveStoredIV()  // Retrieve the stored IV
            if (initCipher(Cipher.DECRYPT_MODE, iv)) {  // Use the retrieved IV
                val decryptedData = cryptoObject.cipher?.doFinal(encryptedData)
                decryptedData
            } else {
                null
            }
        } catch (e: Exception) {
            e.printStackTrace()
            null
        }
    }

    private fun encryptAndStoreData(plainText: String) {
        if (initCipher(Cipher.ENCRYPT_MODE)) {
            try {
                val encryptedData = cipher.doFinal(plainText.toByteArray())
                val iv = cipher.iv  // Get the generated IV
                storeEncryptedDataAndIV(Base64.encodeToString(encryptedData, Base64.DEFAULT), iv)
            } catch (e: Exception) {
                e.printStackTrace()
                Toast.makeText(this, "Encryption failed", Toast.LENGTH_SHORT).show()
            }
        }
    }

    // Simulate storing encrypted data and IV (replace with actual storage logic)
    private fun storeEncryptedDataAndIV(encryptedData: String, iv: ByteArray) {
        val sharedPreferences = getSharedPreferences("biometric_prefs", MODE_PRIVATE)
        val editor = sharedPreferences.edit()
        editor.putString("encrypted_data", encryptedData)
        editor.putString("iv", Base64.encodeToString(iv, Base64.DEFAULT))  // Store the IV as Base64 string
        editor.apply()
    }

    // Retrieve encrypted data and IV
    private fun retrieveEncryptedData(): String {
        val sharedPreferences = getSharedPreferences("biometric_prefs", MODE_PRIVATE)
        return sharedPreferences.getString("encrypted_data", "") ?: ""
    }

    private fun retrieveStoredIV(): ByteArray {
        val sharedPreferences = getSharedPreferences("biometric_prefs", MODE_PRIVATE)
        val ivString = sharedPreferences.getString("iv", null)
        return Base64.decode(ivString, Base64.DEFAULT)
    }

    private fun showSuccess() {
        Toast.makeText(this, "Authentication successful!", Toast.LENGTH_SHORT).show()
        val intent = Intent(this, SuccessActivity::class.java)
        startActivity(intent)
        finish()  // Optionally finish MainActivity to prevent going back without re-authentication
    }
    private fun resetEncryptedData() {
        val sharedPreferences = getSharedPreferences("biometric_prefs", MODE_PRIVATE)
        val editor = sharedPreferences.edit()
        editor.remove("encrypted_data")  // Remove encrypted data
        editor.remove("iv")  // Remove IV
        editor.apply()
        Log.d("Reset", "Encrypted data and IV reset.")
        Toast.makeText(this, "Encrypted data reset.", Toast.LENGTH_SHORT).show()
    }

    // Show a message to the user when Frida is detected and close the app
    private fun showFridaDetectedDialog() {
        val builder = AlertDialog.Builder(this)
        builder.setTitle("Security Warning")
        builder.setMessage("Frida or another tampering tool has been detected. The app will now close for security reasons.")
        builder.setCancelable(false)
        builder.setPositiveButton("OK") { dialog: DialogInterface, _: Int ->
            dialog.dismiss()
            closeApp()
        }
        val dialog: AlertDialog = builder.create()
        dialog.show()
    }

    // Method to close the app
    private fun closeApp() {
        Toast.makeText(this, "Closing app...", Toast.LENGTH_SHORT).show()
        finishAffinity()  // Close the app completely
    }
}
Explanation of Changes
- Immediate Frida Detection:
We calldetectFridaAndExit()at the beginning ofonCreate(). This approach checks for Frida as soon as the app starts, terminating it immediately if any suspicious libraries or processes are detected. - Native Function Call Setup:
ThedetectFridaAndExit()function relies on the native library loaded in the companion object (System.loadLibrary("native-lib")), which ensures our Frida detection logic is ready to execute upon launch.
Building the Release Version of the APK
In this section, we’re going to create a release APK so we can later reverse-engineer it, simulating the process of analyzing an app as if it were in a real-world scenario.
Now, with the code set up, we’ll enable obfuscation with ProGuard (or R8, its default replacement). Obfuscation adds a layer of complexity by renaming classes, methods, and variables to make the code harder to interpret if someone tries to reverse-engineer it. This is especially useful here since our example includes Frida detection code in the native library, and we want to see how that looks after the obfuscation process.
To enable ProGuard, go to the build.gradle file for the app module and locate the release build type. Here, we’ll set minifyEnabled to true. For this example, we’ll keep things simple and leave the proguard-rules.pro file as-is, allowing Android Studio to apply its default obfuscation rules.
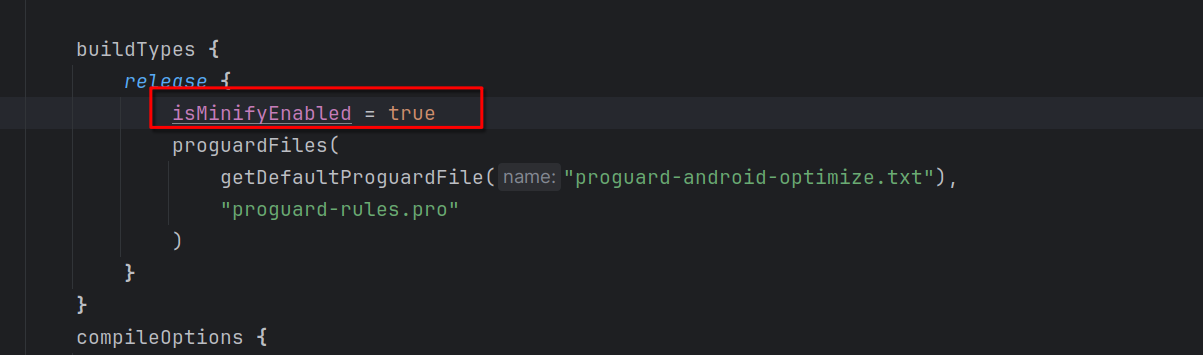
Proguard set up
With obfuscation configured, we need to create a signing key. In Android Studio, go to Build > Generate Signed Bundle / APK… and choose APK. If you don’t have a keystore yet, select Create new… and fill in the required details: the keystore location, password, key alias, and key-specific password. This signing key will serve as the app’s unique digital signature, verifying its authenticity. Make sure to store the keystore file securely, as it’s essential for future APK versions.
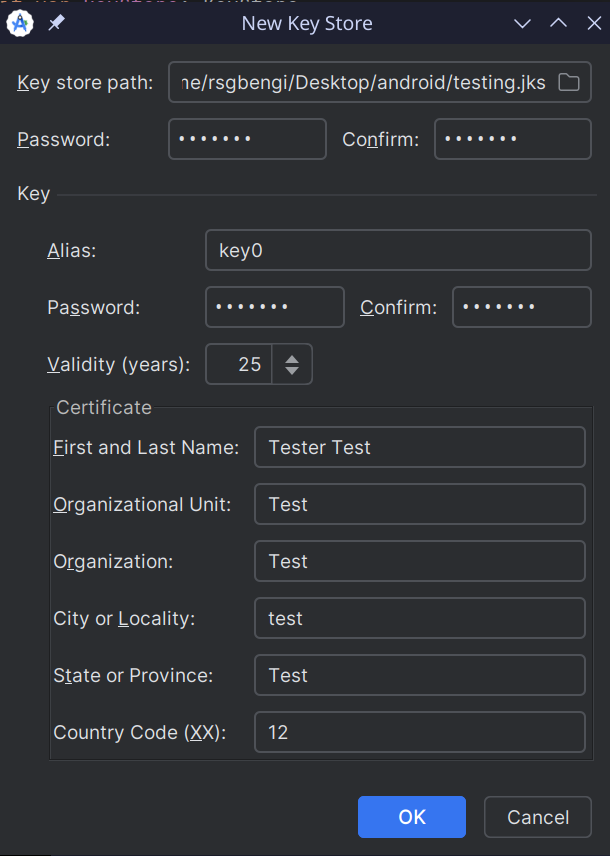
Keystore set up
Finally, let’s build the APK. Go back to Build > Generate Signed Bundle / APK…, select release as the build type, enter your keystore details, and let Android Studio handle the compilation and signing process. The resulting APK will be stored in the app/build/outputs/apk/release folder.
Verifying Frida Detection in the Release APK
Now that we’ve built the release APK with Frida detection enabled, let’s test it by attempting to attach Frida to the app. If our detection code is working as expected, the app should terminate as soon as Frida attempts to connect, signaling that the detection mechanism is actively blocking the debugger.
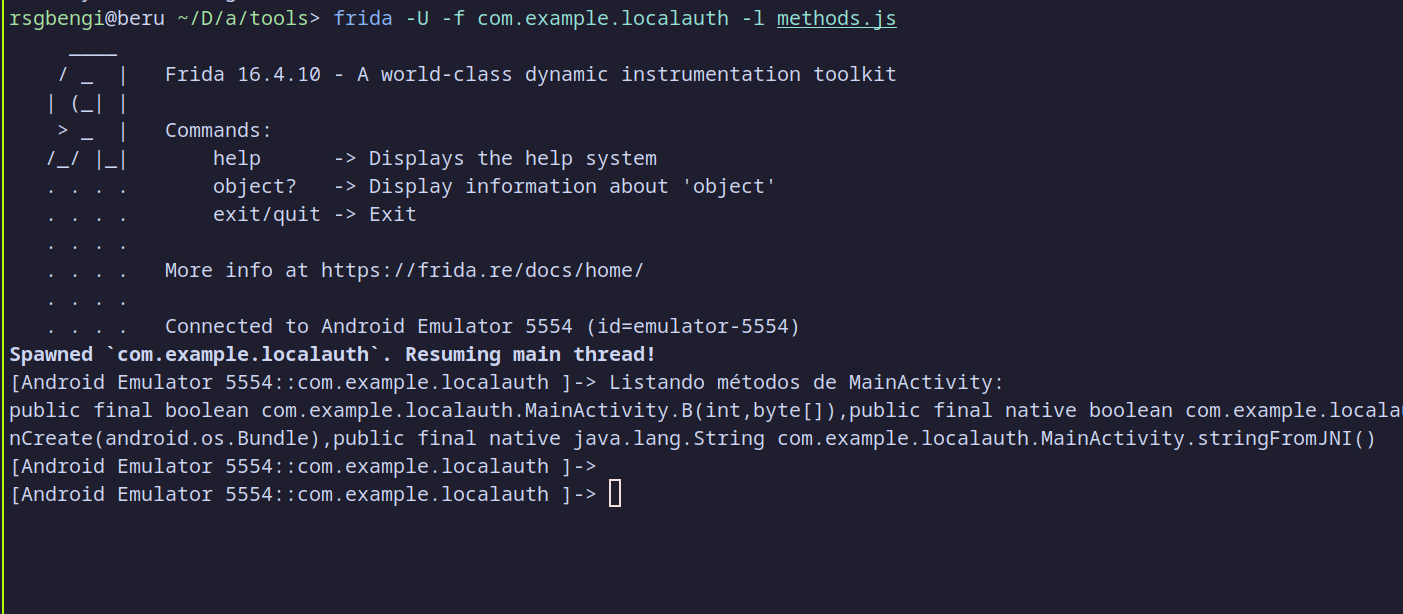
To test this, run Frida with the following command:
frida -U -f com.example.localauth -l methods.js
Methods.js
Java.perform(function() {
    var MainActivity = Java.use('com.example.localauth.MainActivity');
    console.log("Listando métodos de MainActivity:");
    console.log(MainActivity.class.getDeclaredMethods());
});
This command tells Frida to attach to the app with the specified package name (com.example.localauth) and load a JavaScript file (methods.js) to interact with the app. Once executed, Frida will attempt to spawn the app and connect to it.
As seen in the output, Frida successfully lists the methods in MainActivity, indicating it’s connected. However, immediately afterward, the Process terminated message appears. This confirms that the Frida detection mechanism in the detectFridaAndExit function is working correctly. The detection code recognizes the presence of Frida and forces the app to exit, terminating the session.
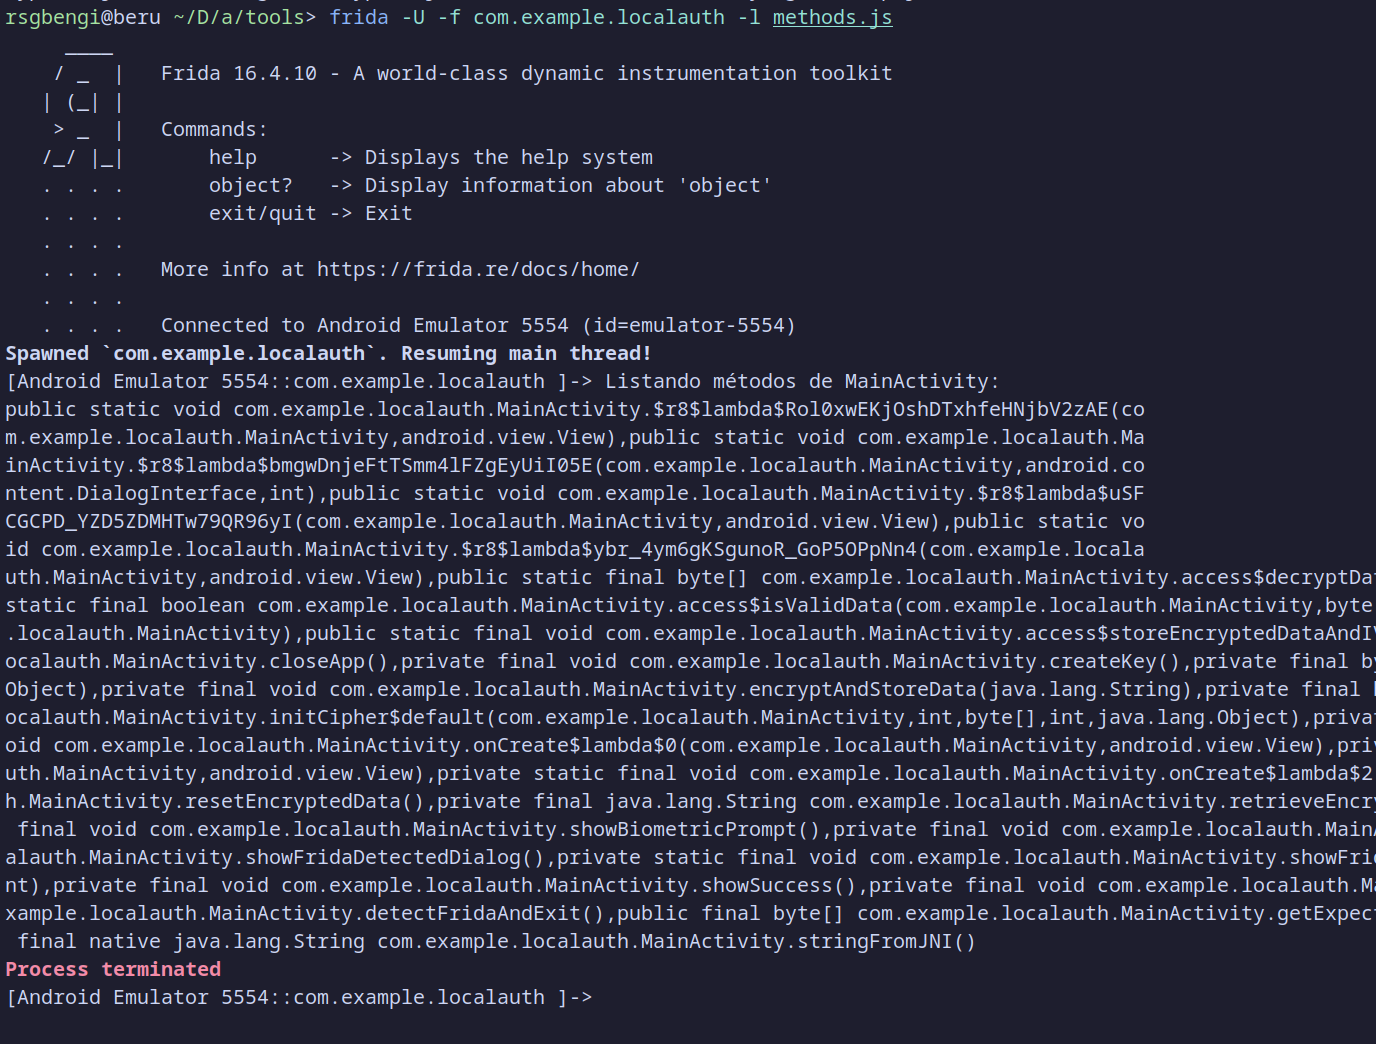
Frida Detection
Limitations of Basic Obfuscation in Hiding Detection Functions
After generating the release APK with basic obfuscation enabled, we can see one of the limitations of leaving ProGuard (or R8) with default settings. Many developers rely on these default settings, but as shown in the images, the Frida detection function detectFridaAndExit is still easily identifiable in the code. Even with obfuscation, the function name is readable, making it relatively straightforward for someone analyzing the APK to locate it.
In this case, a reverse engineer could quickly search for “Frida” or similar keywords and easily find this function (in this case I have used Jadx). Once located, they could bypass the detection by modifying the APK to remove or comment out this function, rendering the Frida detection ineffective. This demonstrates how default obfuscation offers only a basic level of protection and may not be sufficient for apps that require robust security measures.
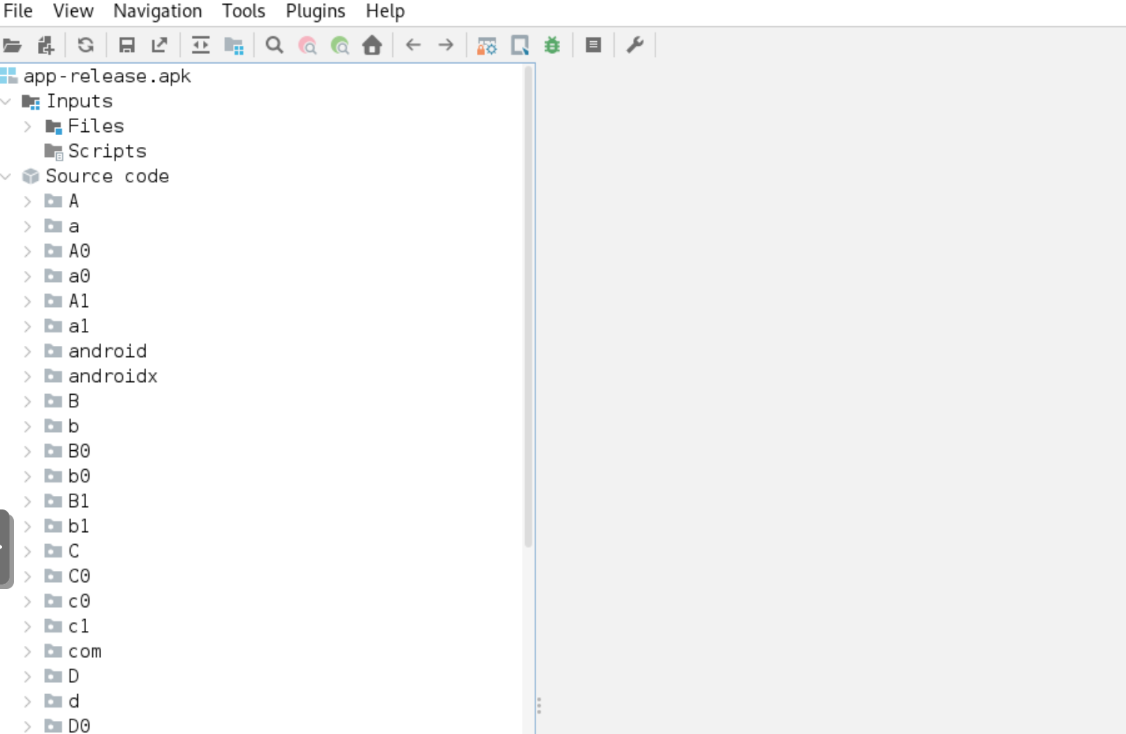
Code obfuscated
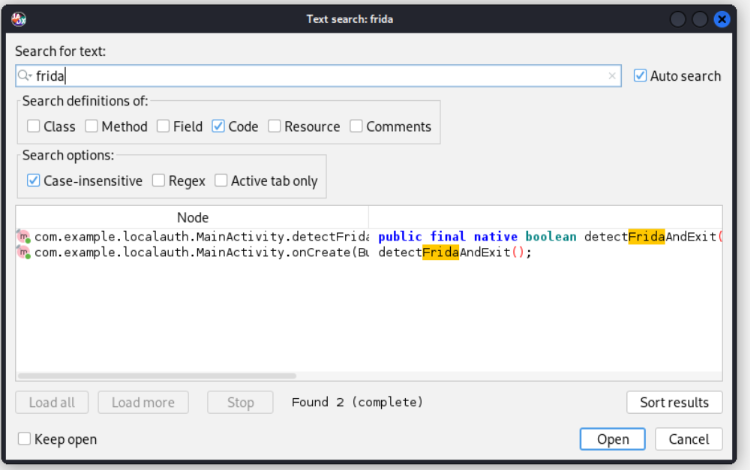
Searching for Frida
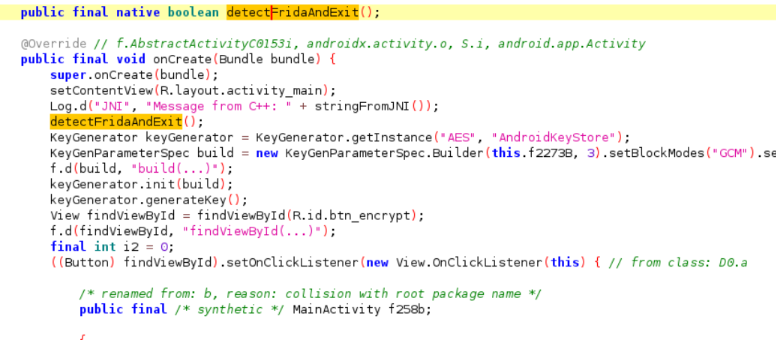
Detection of the function
In more advanced setups, developers might apply custom obfuscation rules, rename critical functions to obscure names, or distribute detection checks throughout the code in non-obvious ways. This would make the detection mechanism much harder to identify and bypass. For example, spreading detection logic across various activities and randomizing function names would increase the difficulty significantly for anyone attempting to reverse-engineer the app.
In our example, we left obfuscation in its simplest form for demonstration purposes. However, for real-world applications requiring high levels of security, more tuned and advanced obfuscation would be necessary to effectively protect detection mechanisms like this one.
Decompiling the APK to Access the Native Library
Shifting from obfuscation and with our release APK now prepared, the next step is to decompile it to access the files within, focusing on extracting the native library. This will allow us to inspect the Frida detection code and prepare for reverse-engineering. We’ll use APKTool, a powerful tool widely used in Android reverse engineering, to unpack APK files and access their resources and code.
Start by running APKTool on the release APK. The command below will decompile the APK and place the output in a directory called testing:
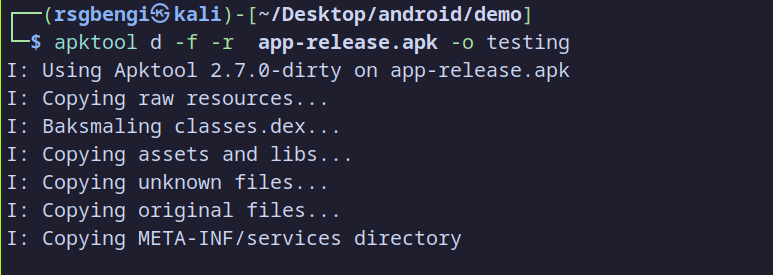
Decompiling the application
Let’s break down the command:
dstands for “decompile.”-fforces overwriting any existing output directory.-rtells APKTool to skip decoding resources, which speeds up the decompilation and, in this case, prevents resource issues that can arise when modifying native libraries. By avoiding resource decoding, we can later make changes to the native library without APKTool trying to recompile resources, which could potentially cause compatibility issues.-o testingspecifies the output directory, where APKTool will place the decompiled files.
After running this command, APKTool will extract the APK contents into the testing directory, as shown in the screenshot, copying files like classes.dex, assets, and libraries.
Next, navigate to the lib folder in the decompiled directory. Here, you’ll see subdirectories for each supported architecture, such as x86_64, armeabi-v7a, etc. In this case, we’ll be focusing on x86_64 because we plan to test the APK on an emulator, which typically uses the x86_64 architecture for compatibility. You should find libnative-lib.so within the lib/x86_64 directory.

Libnative-lib
Analyzing the Native Library with Radare2
With our libnative-lib.so extracted from the decompiled APK, the next step is to analyze this native library to locate and understand the Frida detection logic. For this, we’ll use Radare2 (often referred to as r2), a powerful open-source reverse-engineering tool. Radare2 will help us disassemble the library, search for specific functions, and inspect the code in detail.
Start by launching Radare2 in write mode on the native library file with the following command:
r2 -w libnative-lib.so
Radare2 will load the library, displaying initial warnings about unknown entry points. This is common, as Radare2 might struggle to identify the exact start point without additional configuration. However, we can still proceed with our analysis.
Once inside Radare2, run a preliminary analysis with:
aaa
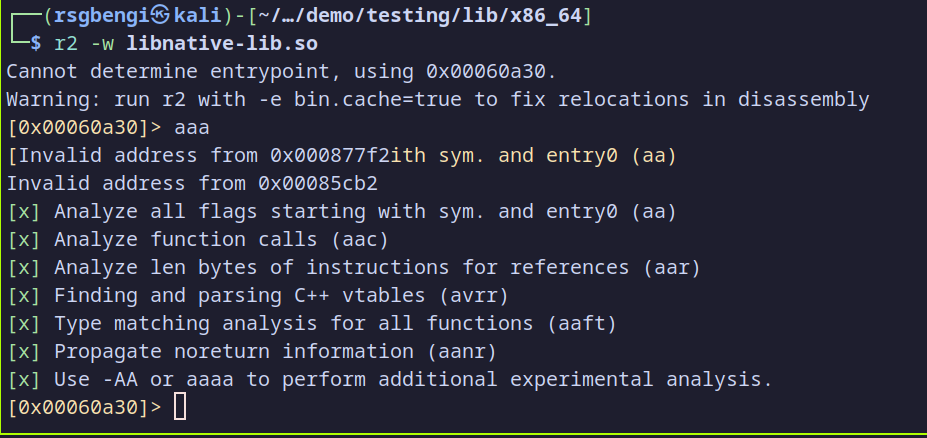
Analyzing the binary
This command performs an in-depth analysis, which includes identifying functions, cross-references, and other important structures in the binary. You may see warnings about invalid addresses or incomplete analysis; Radare2 often needs to interpret these files without all the metadata available, but it still provides a functional disassembly.
To locate our Frida detection function, let’s search for references to “frida” within the binary:

Detecting the function
This command looks through the symbol information and filters for any mention of “frida,” which helps us quickly pinpoint relevant functions or symbols. As shown in the screenshot, the search reveals a function called Java_com_example_localauth_MainActivity_detectFridaAndExit at address 0x00060b50. This is our target function containing the Frida detection logic we implemented in the native code.
Now, we can disassemble this function to analyze it more closely. Use the following command:
pd @ 0x00060b50
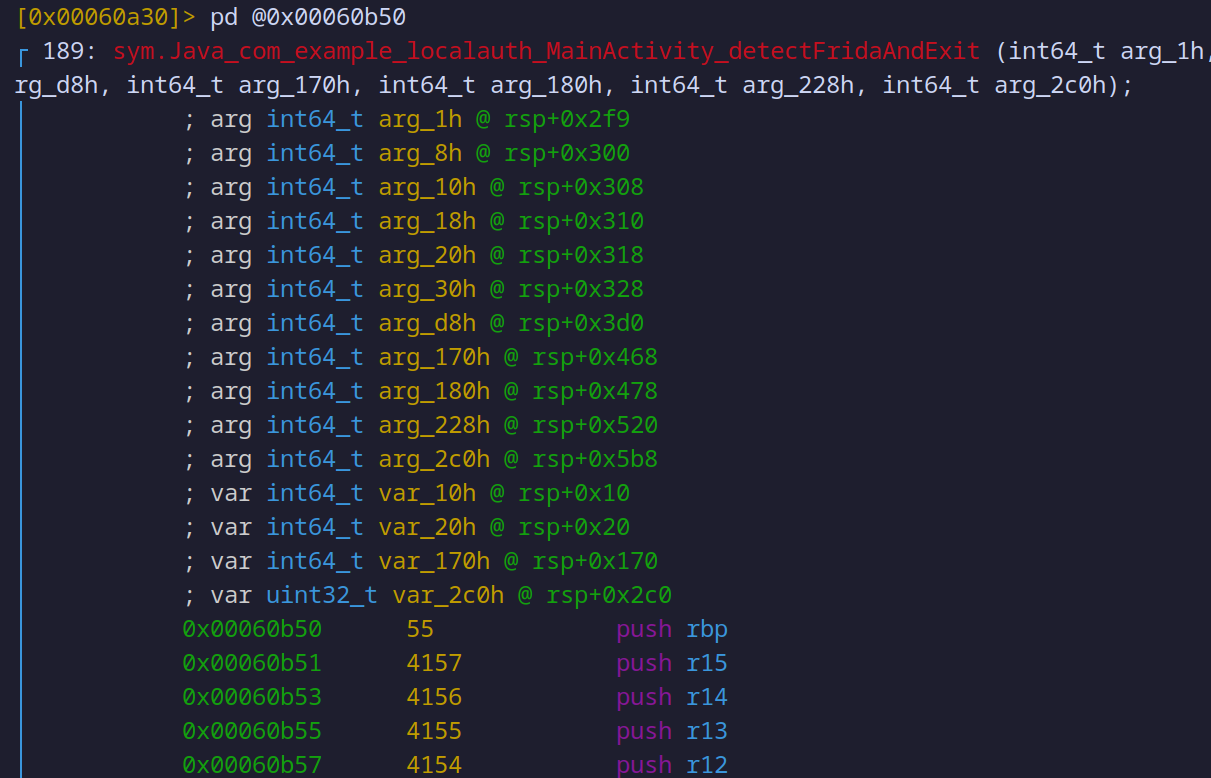
Assembly’s code of detectfridaandexit
The pd command disassembles the code at the specified address, revealing the actual instructions within detectFridaAndExit. In the disassembly, you’ll see the low-level operations that implement our Frida checks, such as loading suspicious strings into memory, comparing addresses, and pushing values onto the stack.
Here, we can begin to see how Radare2 interprets our C++ code in assembly language, showing how each check within detectFridaAndExit is translated into machine-level instructions. This disassembly provides a detailed view of the function’s behavior and allows us to verify that the detection checks we coded (such as searching for Frida libraries and processes) are present and functioning as expected.
If interpreting the assembly code becomes too complex, you can simplify the analysis by using the Ghidra decompiler plugin for Radare2. This plugin integrates Ghidra’s powerful decompiler directly into Radare2, allowing you to convert assembly code into a more readable, C-like structure within the Radare2 environment. This can be incredibly helpful for understanding complex functions at a higher level, as it provides pseudocode instead of raw assembly instructions, making intricate code easier to interpret.
pdg @0x00060b50
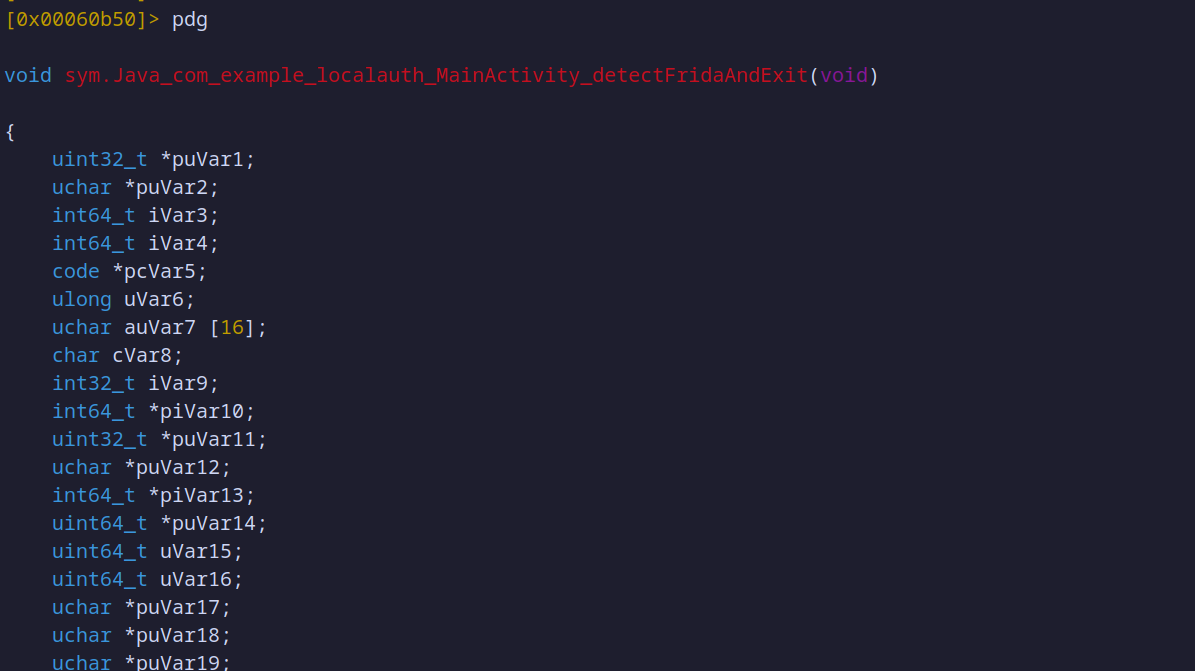
Using the command of the Ghidra plugin
Decompiled assembler code with ghidra plugin
void sym.Java_com_example_localauth_MainActivity_detectFridaAndExit(void)

{
    uint32_t *puVar1;
    uchar *puVar2;
    int64_t iVar3;
    int64_t iVar4;
    code *pcVar5;
    ulong uVar6;
    uchar auVar7 [16];
    char cVar8;
    int32_t iVar9;
    int64_t *piVar10;
    uint32_t *puVar11;
    uchar *puVar12;
    int64_t *piVar13;
    uint64_t *puVar14;
    uint64_t uVar15;
    uint64_t uVar16;
    uchar *puVar17;
    uchar *puVar18;
    uchar *puVar19;
    uchar *puVar20;
    uchar *puVar21;
    uchar *puVar22;
    uchar *puVar23;
    uchar *puVar24;
    uchar *puVar25;
    uchar *puVar26;
    uchar *puVar27;
    uchar *puVar28;
    uchar *puVar29;
    uchar *puVar30;
    uchar *puVar31;
    uint64_t *puVar32;
    int64_t in_FS_OFFSET;
    bool bVar33;
    ulong uStack_300;
    uchar auStack_2f8 [16];
    ulong auStack_2e8 [2];
    uchar auStack_2d8 [336];
    uchar auStack_188 [336];
    ulong uStack_38;

    uStack_38 = *(in_FS_OFFSET + 0x28);
    uStack_300 = 0x60b80;
    iVar9 = sym.imp.access("frida-agent", 0);
    puVar21 = &stack0xfffffffffffffd08;
    if (iVar9 == -1) {
        *(&stack0xfffffffffffffd08 + -8) = 0x60b97;
        iVar9 = sym.imp.access(0x42ee8, 0);
        puVar21 = *0x20 + -0x2f8;
        if (iVar9 == -1) {
            *(*0x20 + -0x300) = 0x60bae;
            iVar9 = sym.imp.access(0x42de5, 0);
            puVar21 = &stack0xfffffffffffffd08;
            if (iVar9 == -1) {
                iVar3 = *0x20 + -0x188;
                *(&stack0xfffffffffffffd08 + -8) = 0x60bd3;
                fcn.00061040(iVar3, "/proc/self/maps", 8);
                puVar21 = *0x20 + -0x2f8;
                auVar7._8_8_ = 0;
                auVar7._0_8_ = 0;
                *(*0x20 + -0x2f8) = auVar7;
                *(&stack0xfffffffffffffd08 + 0x10) = 0;
                puVar2 = &stack0xfffffffffffffd08 + 0x20;
code_r0x00060c11:
                do {
                    iVar4 = *(*(puVar21 + 0x170) + -0x18);
                    *(puVar21 + -8) = 0x60c28;
                    fcn.000c9380(puVar2, iVar3 + iVar4);
                    puVar17 = puVar21;
                    *(puVar21 + -8) = 0x60c37;
                    piVar10 = fcn.000c9390(puVar2, _reloc.std::__ndk1::ctype_char_::id);
                    pcVar5 = *(*piVar10 + 0x38);
                    puVar18 = puVar17;
                    *(puVar17 + -8) = 0x60c45;
                    cVar8 = (*pcVar5)(piVar10, 10);
                    puVar19 = puVar18;
                    *(puVar18 + -8) = 0x60c4f;
                    fcn.000c93a0(puVar2);
                    *(puVar19 + -8) = 0x60c5e;
                    piVar10 = fcn.000611b0(iVar3, *0x20 + -0x2f8, cVar8);
                    puVar21 = puVar19;
                    puVar20 = puVar19;
                    if ((*(piVar10 + *(*piVar10 + -0x18) + 0x20) & 5) != 0) {
                        *(puVar19 + -8) = 0x60d38;
                        fcn.00061040(puVar19 + 0x20, 0x422f8, 8);
                        puVar21 = puVar19;
                        puVar2 = puVar19 + 0x18;
                        goto code_r0x00060d71;
                    }
                    if ((*puVar19 & 1) == 0) {
                        uVar15 = *puVar19 >> 1;
                        puVar31 = puVar19 + 1;
                        if (SBORROW8(uVar15, 5) == uVar15 + -5 < 0) goto code_r0x00060ca1;
                    }
                    else {
                        uVar15 = *(puVar19 + 8);
                        puVar31 = *(puVar19 + 0x10);
                        if (SBORROW8(uVar15, 5) == uVar15 + -5 < 0) {
code_r0x00060ca1:
                            puVar1 = puVar31 + uVar15;
                            puVar12 = puVar31;
                            do {
                                *(puVar20 + -8) = 0x60cc1;
                                puVar11 = sym.imp.memchr(puVar12, 0x66, uVar15 - 4);
                                puVar21 = puVar20;
                                if (puVar11 == NULL) break;
                                if ((*(puVar11 + 1) ^ 0x61 | *puVar11 ^ 0x64697266) == 0) {
                                    if (puVar11 != puVar1) {
                                        if (puVar11 - puVar31 == -1) goto code_r0x00060c11;
                                        goto code_r0x00060d04;
                                    }
                                    break;
                                }
                                puVar12 = puVar11 + 1;
                                uVar15 = puVar1 - puVar12;
                            } while (SBORROW8(uVar15, 5) == uVar15 + -5 < 0);
                        }
                    }
                } while (true);
code_r0x00060d04:
                if (*(in_FS_OFFSET + 0x28) == *(puVar21 + 0x2c0)) {
    // WARNING: Subroutine does not return
                    *(puVar21 + -8) = 0x60d22;
                    sym.imp.exit(0);
                }
                goto code_r0x00061034;
            }
        }
    }
    if (*(in_FS_OFFSET + 0x28) == *(puVar21 + 0x2c0)) {
    // WARNING: Subroutine does not return
        *(puVar21 + -8) = 0x60fc6;
        sym.imp.exit(0);
    }
    goto code_r0x00061034;
code_r0x00060d71:
    do {
        iVar3 = *(*(puVar21 + 0x20) + -0x18);
        *(puVar21 + -8) = 0x60d8a;
        fcn.000c9380(puVar2, puVar21 + 0x20 + iVar3);
        puVar22 = puVar21;
        *(puVar21 + -8) = 0x60d99;
        piVar10 = fcn.000c9390(puVar2, _reloc.std::__ndk1::ctype_char_::id);
        pcVar5 = *(*piVar10 + 0x38);
        puVar23 = puVar22;
        *(puVar22 + -8) = 0x60da7;
        cVar8 = (*pcVar5)(piVar10, 10);
        *(puVar23 + -8) = 0x60db1;
        fcn.000c93a0(puVar2);
        *(puVar23 + -8) = 0x60dc0;
        piVar13 = fcn.000611b0(puVar21 + 0x20, puVar23, cVar8);
        piVar10 = _reloc.VTT_for_std::__ndk1::basic_ifstream_char__std::__ndk1::char_traits_char___;
        puVar21 = puVar22 + 0;
        puVar24 = puVar22 + 0;
        if ((*(piVar13 + *(*piVar13 + -0x18) + 0x20) & 5) != 0) {
            iVar3 = *_reloc.VTT_for_std::__ndk1::basic_ifstream_char__std::__ndk1::char_traits_char___;
            iVar4 = _reloc.VTT_for_std::__ndk1::basic_ifstream_char__std::__ndk1::char_traits_char___[3];
            *(puVar23 + 0x20) = iVar3;
            *(puVar23 + *(iVar3 + -0x18) + 0x20) = iVar4;
            puVar26 = puVar22 + 0;
            *(puVar22 + -8) = 0x60f17;
            fcn.000c93d0(puVar23 + 0x30);
            puVar27 = puVar26;
            *(puVar26 + -8) = 0x60f28;
            fcn.000c93e0(puVar22 + 0x20, piVar10 + 1);
            *(puVar27 + -8) = 0x60f35;
            fcn.000c93f0(puVar26 + 0xd8);
            puVar28 = puVar27;
            if ((*puVar27 & 1) != 0) {
                uVar6 = *(puVar27 + 0x10);
                *(puVar27 + -8) = 0x60f45;
                fcn.000c9350(uVar6);
                puVar28 = puVar27 + 0;
            }
            *(puVar28 + 0x170) = iVar3;
            *(puVar28 + *(iVar3 + -0x18) + 0x170) = iVar4;
            puVar29 = puVar28;
            *(puVar28 + -8) = 0x60f66;
            fcn.000c93d0(puVar28 + 0x180);
            puVar30 = puVar29;
            *(puVar29 + -8) = 0x60f76;
            fcn.000c93e0(puVar28 + 0x170, piVar10 + 1);
            *(puVar30 + -8) = 0x60f83;
            fcn.000c93f0(puVar29 + 0x228);
            puVar21 = puVar30;
            if (*(in_FS_OFFSET + 0x28) == *(puVar30 + 0x2c0)) {
                return;
            }
            goto code_r0x00061034;
        }
        uVar15 = puVar22[0] >> 1;
        bVar33 = (puVar22[0] & 1) == 0;
        puVar31 = *(puVar23 + 0x10);
        if (bVar33) {
            puVar31 = puVar23 + 1;
        }
        if (!bVar33) {
            uVar15 = *(puVar23 + 8);
        }
        if (SBORROW8(uVar15, 0xf) == uVar15 + -0xf < 0) {
            puVar32 = puVar31 + uVar15;
            puVar12 = puVar31;
            uVar16 = uVar15;
            while( true ) {
                *(puVar24 + -8) = 0x60e21;
                puVar14 = sym.imp.memchr(puVar12, 0x31, uVar16 - 0xe);
                puVar21 = puVar24;
                puVar25 = puVar24;
                if (puVar14 == NULL) break;
                if ((*(puVar14 + 7) ^ 0x32343037323a312e | *puVar14 ^ 0x2e302e302e373231) == 0) {
                    if ((puVar14 != puVar32) && (puVar14 - puVar31 != -1)) goto code_r0x00060ed3;
                    break;
                }
                puVar12 = puVar14 + 1;
                uVar16 = puVar32 - puVar12;
                if (SBORROW8(uVar16, 0xf) != uVar16 + -0xf < 0) break;
            }
            puVar12 = puVar31;
            if (SBORROW8(uVar15, 0xf) == uVar15 + -0xf < 0) {
                do {
                    *(puVar25 + -8) = 0x60e84;
                    puVar14 = sym.imp.memchr(puVar12, 0x31, uVar15 - 0xe);
                    puVar21 = puVar25;
                    if (puVar14 == NULL) break;
                    if ((*(puVar14 + 7) ^ 0x33343037323a312e | *puVar14 ^ 0x2e302e302e373231) == 0) {
                        if (puVar14 != puVar32) {
                            if (puVar14 - puVar31 == -1) goto code_r0x00060d71;
                            goto code_r0x00060ed3;
                        }
                        break;
                    }
                    uVar15 = puVar32 - (puVar14 + 1);
                    puVar12 = puVar14 + 1;
                } while (SBORROW8(uVar15, 0xf) == uVar15 + -0xf < 0);
            }
        }
    } while (true);
code_r0x00060ed3:
    if (*(in_FS_OFFSET + 0x28) == *(puVar21 + 0x2c0)) {
    // WARNING: Subroutine does not return
        *(puVar21 + -8) = 0x60ef1;
        sym.imp.exit(0);
    }
code_r0x00061034:
    // WARNING: Subroutine does not return
    *(puVar21 + -8) = 0x61039;
    sym.imp.__stack_chk_fail();
}
As an extra tip, if you still find it challenging to interpret the assembly or decompiled pseudocode, you can copy the assembly code and paste it into ChatGPT. ChatGPT can analyze the code and provide a more understandable pseudocode version, breaking down each part of the function and explaining it in simpler terms. This combination of tools allows for a comprehensive understanding, making even complex native code more approachable.
ChatGPT pseudocode
function detectFridaAndExit()

    // Stack setup and saving current state
    save_current_stack_state()

    // Check if the "frida-agent" string is found in the system
    if access("frida-agent") != -1 then
        exit_program()
    end if

    // Check if the "frida-gadget" string is found in the system
    if access("frida-gadget") != -1 then
        exit_program()
    end if

    // Check if the "libfrida-gadget.so" library is found in the system
    if access("libfrida-gadget.so") != -1 then
        exit_program()
    end if

    // Read and parse the "/proc/self/maps" to look for Frida-related strings
    maps_data = read_file("/proc/self/maps")
    for each line in maps_data do
        // Look for "frida" or related patterns in the process memory
        if line contains "frida" then
            exit_program()
        end if
    end for

    // Additional check: inspect "/proc/net/tcp" for Frida's presence
    tcp_data = read_file("/proc/net/tcp")
    if tcp_data contains "127.0.0.1:27042" or "127.0.0.1:27043" then
        exit_program()
    end if

    // Final integrity check of the stack
    if stack_modified() then
        exit_program()
    end if

    // Security stack check failed
    stack_security_check_fail()

end function
Modifying and Repacking the APK for Testing
To bypass the Frida detection in our modified APK, we’ll use a simple but effective technique. When reverse-engineering native libraries, we often have several options for modifying the flow of the code. For instance, we could locate conditional jumps that trigger exit() calls and modify them, or try to change the direction of code execution at key points. However, a reliable and straightforward approach—one that works in many cases—is to jump directly to the end of the function right at the start. This effectively skips all detection logic, allowing the function to “complete” without actually running its checks.
Step 1: Modifying the Function in Radare2
With Radare2 open, navigate to the start of the detectFridaAndExit function. Here, we’ll add a jump instruction that goes directly to the return (ret) instruction at the end of the function, bypassing all detection logic. This modification allows the app to continue running even if Frida is attached.
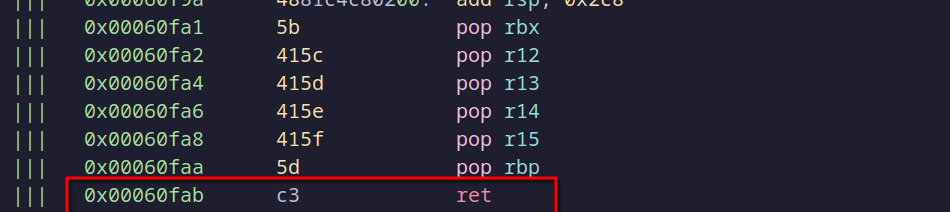
Ret address
In Radare2, use the following command to write an unconditional jump to the return instruction’s address:
wa jmp 0x60fab
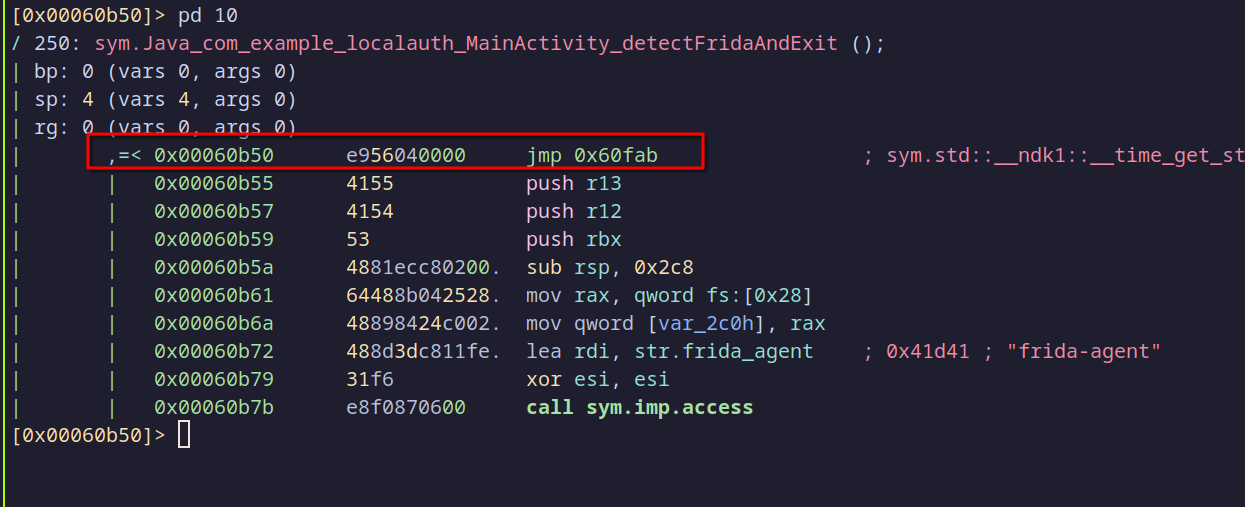
Jumping to the ret address
This command tells Radare2 to add a jmp instruction to 0x60fab, which is where the function naturally returns. As a result, when detectFridaAndExit is called, it will skip all Frida detection code and go directly to the end.
Step 2: Recompiling the APK with APKTool
After modifying libnative-lib.so, we need to recompile the APK with the updated library. Use APKTool to rebuild the APK:
apktool b testing -o app-cracked.apk
Here, testing is the directory where we previously decompiled the APK, and app-cracked.apk is the name of the rebuilt APK. This command packages the APK with our modified native library, creating an APK file that’s ready for the next steps.
Step 3: Aligning, Signing, and Installing the APK
Once the native library has been modified, we need to repackage the APK to include the edited libnative-lib.so. This involves re-aligning, signing, and reinstalling the APK.
Align the APK:
First, run zipalign to ensure the APK is properly aligned, which is necessary for Android to install it:
~/Android/Sdk/build-tools/34.0.0/zipalign -p -f 4 ./app-cracked.apk ./app-align.apk
Sign the APK:
Use apksigner to sign the APK with your keystore. This step authenticates the APK for installation:
~/Android/Sdk/build-tools/34.0.0/apksigner sign --ks /home/rsgbengi/Desktop/android/testing.jks --out ./myapp-cracked-signed.apk ./app-align.apk
Install the APK:
Finally, install the modified APK on your emulator:
adb install ./myapp-cracked-signed.apk
Step 4: Testing the Bypass with Frida
To verify that the detection has indeed been bypassed, attach Frida to the app and see if it stays active instead of exiting. Run the following command to spawn the app with Frida:
Frida working correctly
Bypassing Frida Detection
If everything worked, Frida should attach to the app without triggering an exit, and you should be able to interact with the app normally. The app will continue running even with Frida attached, confirming that the modified detectFridaAndExit function no longer executes its detection logic.
This method—redirecting the start of the function to jump directly to the end—provides a simple yet effective way to bypass security checks within native libraries, and it’s a reliable approach for many similar bypass scenarios.
Conclusions
This chapter has demonstrated how patching native libraries can be an effective method to bypass security measures embedded within an application’s code. By diving directly into the native library, we not only located and analyzed the Frida detection logic but also modified it to allow Frida to attach without triggering the app’s security response.
Here are the key takeaways:
- Native Code Adds Complexity: Implementing detection in native code increases the complexity for attackers, but as we’ve seen, it’s still possible to bypass these measures with tools like Radare2 and APKTool.
- Limitations of Basic Obfuscation: While obfuscation can help hide detection functions, relying on default ProGuard settings may not be sufficient to prevent a determined reverse engineer from finding critical functions. Custom obfuscation and strategic distribution of detection code across multiple activities can offer a more robust defense.
- Direct Patching as a Powerful Technique: Modifying the execution flow by redirecting jumps or altering return points within the native library proved to be a straightforward and effective way to neutralize security checks. This approach, though powerful, is challenging to implement in apps with more advanced obfuscation and layered defenses.
Understanding these techniques not only broadens our knowledge of Android app security but also highlights the importance of layered, well-implemented security measures. For developers, this serves as a reminder to go beyond default obfuscation and use more advanced techniques if the application’s security demands it. For reverse engineers, this chapter provides valuable tools for navigating and modifying native code, offering insights into how to analyze and neutralize embedded security mechanisms in real-world scenarios.
Resources
- APKTool - A Tool for Reverse Engineering Android APK Files. “APKTool.” Available at: https://ibotpeaches.github.io/Apktool/
- Radare2 - Open-source Reverse Engineering Framework. “Radare2.” Available at: https://rada.re/n/radare2.html
- Ghidra - Software Reverse Engineering Framework. “NSA Cybersecurity.” Available at: https://ghidra-sre.org/
- Frida - Dynamic Instrumentation Toolkit. “Frida.” Available at: https://frida.re
- Android ProGuard and R8 Guide. “Android Developers.” Available at: https://developer.android.com/studio/build/shrink-code
- [INSTALL_FAILED_INVALID_APK: Failed to extract native libraries, res=-2] after Compile. “GitHub - Apktool Issue #1626.” Available at: https://github.com/iBotPeaches/Apktool/issues/1626
- Ghidra Decompiler Plugin for Radare2. “r2ghidra-dec GitHub Repository.” Available at: https://github.com/radareorg/r2ghidra-dec
- Jadx - Dex to Java Decompiler. “Jadx GitHub Repository.” Available at: https://github.com/skylot/jadx
Chapters

Previous chapter
💬 Comments Available
Drop your thoughts in the comments below! Found a bug or have feedback? Let me know.