Transparent Proxies: The Key to Upgradeable Contracts Without Breaking a Sweat
21 min read
January 26, 2025

Proxies: The Art of Staying Upgradeable Without Losing Your Address
Welcome to the next stop on your Web3 journey—where we explore the not-so-hidden magic behind upgradeable smart contracts. Imagine this: you’ve deployed a smart contract, and everything seems perfect… until someone points out a vulnerability, or worse, you realize you forgot a crucial feature. In traditional deployment, you’d be stuck. But with proxies, you’ve got a lifeline. No need to panic, no need to redeploy—just upgrade the logic while keeping everything else intact. It’s like swapping out the engine of a car without asking the driver to leave.
In this chapter, we’re cracking open Transparent Proxies, the simplest tool in the upgradeable smart contract arsenal. They’re straightforward, efficient, and designed to make upgrades seamless without breaking the contract’s address. Why does this matter? Because keeping the address stable is critical—your users, dApps, and auditors rely on that consistency. Proxies allow you to iterate on your code while preserving state and relationships. In short: they give you flexibility while reducing chaos.
Here’s the plan. We’ll start by demystifying how Transparent Proxies work, walking through their architecture and key components (storage slots, delegation, admin control—you name it). Then, we’ll jump into the fun part: deploying a proxy, connecting it to an implementation, and even upgrading it with new logic. Along the way, we’ll break down the code so you can see exactly how everything operates under the hood. This isn’t just a theory session—it’s hands-on, and by the end, you’ll be armed with the knowledge to understand how upgradeable contracts work and how to spot potential security issues.
So, if you’ve ever wondered how a smart contract can evolve without breaking everything around it—or if you’re itching to get a deeper look into how the upgrade process can go wrong (or right)—this chapter has you covered. Let’s dive in and see why proxies are the unsung heroes of upgradeable architectures. 🚀
What Are Proxies? The Magic Trick Behind Upgradeable Smart Contracts
Imagine you own a restaurant, and suddenly you realize the menu is full of mistakes (who thought “screw soup” was a good idea?). Instead of shutting down the restaurant, demolishing the building, and starting over, you simply update the menu. That’s essentially how proxies work in the world of smart contracts!
A proxy is like the manager of that restaurant: it doesn’t hold the menu (the actual logic of your smart contract) but knows exactly where to find it. When a customer (or in this case, a user) comes in and places an order (calls a function), the proxy takes the request and sends it to the kitchen (the implementation contract) to get it done.
Here’s the fun part: if your kitchen (contract logic) has an issue—say, it serves burnt toast as a delicacy—you can build a shiny new kitchen (deploy a new implementation contract) and tell your manager (the proxy) to send all future orders there instead. And voilà, your restaurant (contract address) remains the same for customers, but now you’ve got a better kitchen running the show.
Proxies are the superheroes of blockchain development because they allow smart contracts to be upgraded without changing their address. This means users don’t need to hunt for a new contract every time you improve the logic or fix a bug. It’s like getting a software update for your favorite app, but on the blockchain.
So, next time someone mentions “proxies,” just think of them as that magical restaurant manager who keeps everything running smoothly, even when the menu gets a makeover. Bon appétit, blockchain style! 🍽️✨
Transparent Proxies: The Simplest Tool for Upgradeable Smart Contracts
When it comes to upgradeable smart contracts, transparent proxies are like the minimalist’s dream: simple, efficient, and highly functional. They allow you to swap out your smart contract’s logic (the implementation) without ever changing its address. That means your users don’t have to worry about keeping track of new contract addresses—they can keep interacting with the same one as if nothing changed.
The key feature of transparent proxies? They manage the upgrade logic directly within the proxy contract. Unlike more advanced patterns (like UUPS proxies), where the implementation contract might handle its own upgrades, a transparent proxy centralizes everything. This makes it perfect for straightforward use cases where simplicity is a priority.
Let’s break this down using an example.
TransparentProxy code
// SPDX-License-Identifier: MIT
pragma solidity ^0.8.0;

contract TransparentProxy {
    // Storage slot for the implementation address (EIP-1967-compliant)
    bytes32 private constant IMPLEMENTATION_SLOT = keccak256("proxy.implementation");
    // Storage slot for the admin address (EIP-1967-compliant)
    bytes32 private constant ADMIN_SLOT = keccak256("proxy.admin");

    event UpgradeAttempt(address sender, address admin, address newImplementation);

    // Constructor to initialize the implementation and admin
    constructor(address initialImplementation, address initialAdmin) {
        require(initialImplementation != address(0), "Implementation cannot be zero address");
        require(initialAdmin != address(0), "Admin cannot be zero address");

        _setImplementation(initialImplementation);
        _setAdmin(initialAdmin);
    }

    // Function to update the implementation address
    function upgradeTo(address newImplementation) external {
        emit UpgradeAttempt(msg.sender, _getAdmin(), newImplementation);
        require(msg.sender == _getAdmin(), "Not authorized");
        require(newImplementation != address(0), "New implementation cannot be zero address");

        _setImplementation(newImplementation);
    }

    // Fallback function to delegate calls to the implementation
    fallback() external payable {
        _delegate();
    }

    // Receive function to handle plain Ether transfers
    receive() external payable {
        _delegate();
    }

    function getAdmin() public view returns (address)  {
      return _getAdmin();
    }

    // Internal function to perform the delegatecall to the implementation
    function _delegate() internal {
        address impl = _getImplementation();
        require(impl != address(0), "Implementation not set");

        assembly {
            // Copy calldata to memory
            calldatacopy(0, 0, calldatasize())

            // Delegate call to the implementation contract
            let result := delegatecall(gas(), impl, 0, calldatasize(), 0, 0)

            // Copy returndata to memory
            returndatacopy(0, 0, returndatasize())

            // Return or revert based on the result
            switch result
            case 0 { revert(0, returndatasize()) }
            default { return(0, returndatasize()) }
        }
    }

    // Internal function to retrieve the implementation address
    function _getImplementation() internal view returns (address impl) {
        bytes32 slot = IMPLEMENTATION_SLOT;
        assembly {
            impl := sload(slot)
        }
    }

    // Internal function to set the implementation address
    function _setImplementation(address newImplementation) internal {
        bytes32 slot = IMPLEMENTATION_SLOT;
        assembly {
            sstore(slot, newImplementation)
        }
    }

    // Internal function to retrieve the admin address
    function _getAdmin() internal view returns (address adm) {
        bytes32 slot = ADMIN_SLOT;
        assembly {
            adm := sload(slot)
        }
    }

    // Internal function to set the admin address
    function _setAdmin(address newAdmin) internal {
        bytes32 slot = ADMIN_SLOT;
        assembly {
            sstore(slot, newAdmin)
        }
    }
}
The Transparent Proxy in Action
Here’s a basic implementation of a transparent proxy. Don’t worry—I’ll walk you through each part to make it as clear as possible.
Defining Storage Slots
The proxy needs two key storage slots:
- The implementation slot: This holds the address of the contract with the actual logic.
- The admin slot: This stores the address of the admin, who has the power to upgrade the implementation.
// Storage slot for the implementation address (EIP-1967-compliant)
bytes32 private constant IMPLEMENTATION_SLOT = keccak256("proxy.implementation");
// Storage slot for the admin address (EIP-1967-compliant)
bytes32 private constant ADMIN_SLOT = keccak256("proxy.admin");
These slots follow the EIP-1967 standard, which ensures that the storage layout won’t accidentally clash with the implementation contract’s variables. Think of these as clearly labeled drawers in the proxy’s filing cabinet, so you always know where things are.
Initializing the Proxy
When deploying the proxy, you need to set:
- The initial implementation contract (where the logic lives).
- The admin address (who’s in charge of upgrades).
constructor(address initialImplementation, address initialAdmin) {
    require(initialImplementation != address(0), "Implementation cannot be zero address");
    require(initialAdmin != address(0), "Admin cannot be zero address");

    _setImplementation(initialImplementation);
    _setAdmin(initialAdmin);
}
The constructor checks that both addresses are valid (not address(0)) and then stores them securely in their respective slots. This is like appointing a manager (admin) and telling them where the kitchen (implementation) is located.
Handling Upgrades
The upgradeTo function is the heart of the proxy’s admin-only control. Here’s how it works:
function upgradeTo(address newImplementation) external {
    emit UpgradeAttempt(msg.sender, _getAdmin(), newImplementation);
    require(msg.sender == _getAdmin(), "Not authorized");
    require(newImplementation != address(0), "New implementation cannot be zero address");

    _setImplementation(newImplementation);
}
- Authorization Check: It ensures only the admin (stored in the
ADMIN_SLOT) can call this function. - Validation: It verifies the new implementation address isn’t empty.
- Update: It sets the new implementation address in the
IMPLEMENTATION_SLOT.
This function also emits an event, UpgradeAttempt, to log who tried to upgrade and what the new implementation address is.
Delegating Calls
The proxy itself doesn’t execute any logic. Instead, it forwards all incoming calls to the implementation contract using a fallback function. Here’s the magic:
fallback() external payable {
    _delegate();
}

receive() external payable {
    _delegate();
}
The fallback function handles all calls except plain Ether transfers, while the receive function deals with Ether-only transactions. Both call _delegate, which is where the real action happens.
The _delegate Function
This is where the proxy forwards calls to the implementation contract:
function _delegate() internal {
    address impl = _getImplementation();
    require(impl != address(0), "Implementation not set");

    assembly {
        // Copy calldata to memory
        calldatacopy(0, 0, calldatasize())

        // Delegate call to the implementation contract
        let result := delegatecall(gas(), impl, 0, calldatasize(), 0, 0)

        // Copy returndata to memory
        returndatacopy(0, 0, returndatasize())

        // Return or revert based on the result
        switch result
        case 0 { revert(0, returndatasize()) }
        default { return(0, returndatasize()) }
    }
}
Let’s break it down:
- Get the Implementation Address: The proxy retrieves the current implementation address from the
IMPLEMENTATION_SLOT. - Forward the Call: It uses the
delegatecallopcode to execute the function on the implementation contract. - Return Results: The proxy copies any return data back to the caller or reverts if the call failed.
This process makes the proxy behave exactly like the implementation contract for external users. They’ll never know the difference.
Setting and Retrieving Slots
Finally, the proxy includes helper functions to read and write to the ADMIN_SLOT and IMPLEMENTATION_SLOT. These are used internally to manage the admin and implementation addresses.
function _getImplementation() internal view returns (address impl) {
    bytes32 slot = IMPLEMENTATION_SLOT;
    assembly {
        impl := sload(slot)
    }
}

function _setImplementation(address newImplementation) internal {
    bytes32 slot = IMPLEMENTATION_SLOT;
    assembly {
        sstore(slot, newImplementation)
    }
}

function _getAdmin() internal view returns (address adm) {
    bytes32 slot = ADMIN_SLOT;
    assembly {
        adm := sload(slot)
    }
}

function _setAdmin(address newAdmin) internal {
    bytes32 slot = ADMIN_SLOT;
    assembly {
        sstore(slot, newAdmin)
    }
}
These functions use low-level assembly to interact directly with the contract’s storage slots, ensuring that the proxy always knows where to find the admin and implementation addresses.
A Simple Implementation to Test the Proxy
To test our transparent proxy in action, we’ll use a straightforward contract: ImplementationV1. This contract includes a few basic functions, such as storing and retrieving a value, as well as a version identifier.
Here’s the code for ImplementationV1:
pragma solidity ^0.8.0;

contract ImplementationV1 {
    uint256 public storedValue;

    function getVersion() public pure returns (string memory) {
        return "v1";
    }

    function setStoredValue(uint256 value) external {
        storedValue = value;
    }

    function getStoredValue() external view returns (uint256) {
        return storedValue;
    }
}
What’s Happening Here?
**getVersion()**: This function simply returns the version of the contract (in this case,"v1"). It’s a quick way to confirm which implementation the proxy is pointing to after an upgrade.setStoredValue(): This allows us to store a value in the contract. It demonstrates how state is preserved across upgrades, as the state lives in the proxy, not the implementation.getStoredValue(): This retrieves the stored value, giving us an easy way to test the logic and verify that everything is working as expected.
What Comes Next?
When we decide to upgrade, we’ll replace ImplementationV1 with a new version (e.g., ImplementationV2) that includes additional functionality or fixes. For example, we might update the getVersion() function to return "v2". This allows us to see the proxy’s magic in action—changing the logic without losing access to the stored data.
Stay tuned, because next, we’ll deploy ImplementationV1, connect it to our proxy, and demonstrate how to upgrade seamlessly!
Testing the Transparent Proxy: Deploying and Interacting
Now that we’ve built our Transparent Proxy and ImplementationV1 contracts, it’s time to see them in action. For this, we’ll deploy the contracts and interact with them using Foundry, an excellent toolkit for Ethereum developers. To simulate the blockchain environment, we’ll rely on Anvil, Foundry’s local testnet. The following script takes care of deploying both the implementation and proxy contracts while ensuring everything is initialized properly.
The Deployment Script
The deployment starts with the run() function. This function uses Foundry’s scripting utilities to deploy the contracts to the blockchain.
contract Deploy is Script {
    function run() external {
        // Start broadcasting transactions
        vm.startBroadcast(vm.envUint("ADMIN_KEY"));

        // Step 1: Deploy the ImplementationV1 contract
        ImplementationV1 implementation = new ImplementationV1();
        console.log("ImplementationV1 deployed at:", address(implementation));

        // Step 2: Deploy the Transparent Proxy contract
        TransparentProxy proxy = new TransparentProxy(address(implementation), vm.envAddress("ADMIN_ADDR"));
        console.log("TransparentProxy deployed at:", address(proxy));

        // End broadcasting transactions
        vm.stopBroadcast();
    }
}
The script first broadcasts transactions by calling vm.startBroadcast() and using the admin’s private key (ADMIN_KEY), which is securely passed via environment variables. This allows the admin to deploy and manage the contracts on the blockchain.
The first task is deploying ImplementationV1, which contains the logic for storing and retrieving values. The line ImplementationV1 implementation = new ImplementationV1(); creates a new instance of this contract and logs its address to the console for reference. This contract acts as the “kitchen” we discussed earlier—the place where all the logic lives.
Next, the script deploys the Transparent Proxy by creating a new instance of it and passing two critical parameters: the address of the implementation contract (address(implementation)) and the admin’s address (vm.envAddress("ADMIN_ADDR")). These parameters initialize the proxy, linking it to the implementation contract and setting the admin who will manage future upgrades. The proxy’s address is also logged for easy access.
Once both contracts are deployed, the script ends by calling vm.stopBroadcast(), signaling that no more transactions will be sent.
Running the Deployment Script
To deploy the contracts, you’ll first need to start Anvil. This creates a local Ethereum blockchain that mimics a real network, complete with accounts and transaction history. You can start Anvil by running:
anvil
Next, set up your environment variables to securely pass the admin’s private key and address to the script. These can be added to a .env file like so:
ADMIN_KEY=<your-private-key>
ADMIN_ADDR=<your-admin-address>
To make things simpler, you can configure the **foundry.toml** file to include your default RPC URL. This way, you won’t need to specify --rpc-url every time you interact with the blockchain. Add the following line to your foundry.toml file:
eth_rpc_url = "http://127.0.0.1:8545"
With Anvil running and the environment variables set, deploy the contracts using Foundry:
forge script script/Deploy.s.sol --broadcast
This command compiles the contracts, runs the deployment script, and deploys everything to your local Anvil network.
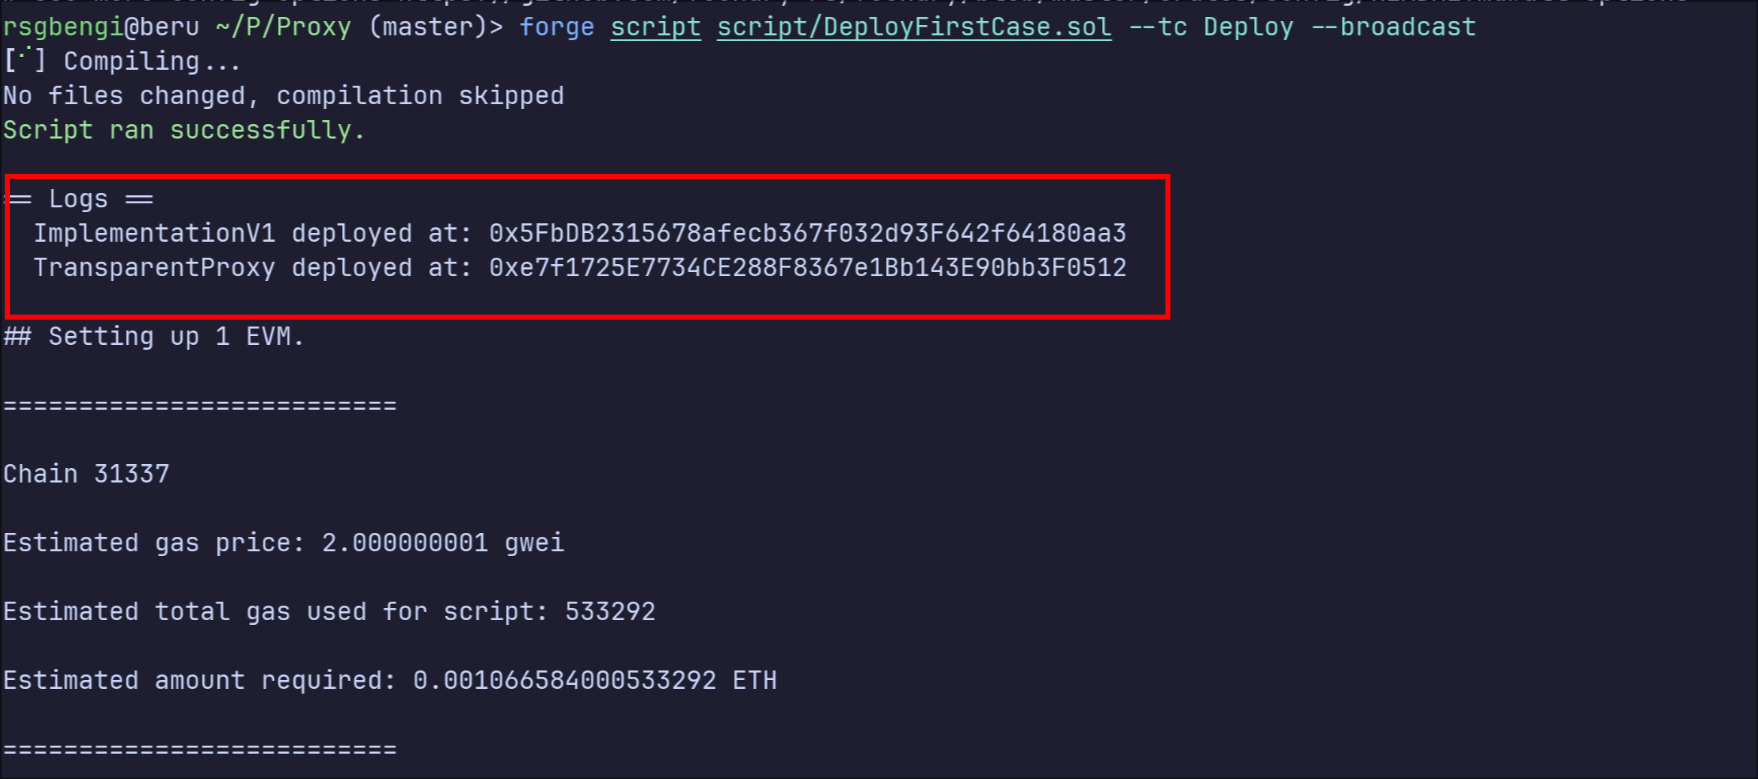
Deployment of the contracts
Interacting with the Transparent Proxy Using Foundry Scripts
Now that the Transparent Proxy is deployed, it’s time to interact with it and see how it handles calls to the implementation contract. For this, we’ll use a simple Foundry script. To keep things clean and modular, we’ll define an interface to specify the functions we want to call on the proxy. This is just a convenient way to interact with the contract without pulling in its entire codebase.
Here’s the script we’ll use:
// SPDX-License-Identifier: MIT
pragma solidity ^0.8.0;

import "forge-std/Script.sol";

interface ProxyInterface {
    function setStoredValue(uint256 value) external;
    function getStoredValue() external view returns (uint256);
    function upgradeTo(address newImplementation) external;
    function getVersion() external view returns (string memory);
}

contract Interacting is Script {
    // Reference the deployed Transparent Proxy
    ProxyInterface transparentProxy = ProxyInterface(0xe7f1725E7734CE288F8367e1Bb143E90bb3F0512);

    function run() external {
        vm.startBroadcast(vm.envUint("ADMIN_KEY"));

        transparentProxy.setStoredValue(150);
        console.log("Value set to 150");

        uint256 value = transparentProxy.getStoredValue();
        console.log("Retrieved Value: ", value);

        vm.stopBroadcast();
    }
}
In this script, the Transparent Proxy is referenced by its address, which is passed into the ProxyInterface. This address (0xe7f1725E7734CE288F8367e1Bb143E90bb3F0512) should be replaced with the actual address of the proxy from your deployment. The ProxyInterface gives us access to the functions we want to call, like setStoredValue and getStoredValue.
The action starts in the run function. It begins by broadcasting transactions using vm.startBroadcast with the admin’s private key. This step is crucial because interacting with the proxy requires valid blockchain transactions, which need to be signed by the admin. Once broadcasting is live, the script sets a value by calling setStoredValue(150) through the proxy. The call is routed to the implementation contract, and the new value is stored there. To confirm the operation, console.log is used to print a message to the console.
After setting the value, the script retrieves it using the getStoredValue function. This call also goes through the proxy, which forwards it to the implementation contract. The returned value is logged, allowing us to verify that the proxy is forwarding calls correctly and that the state has been updated as expected.
Finally, the script stops broadcasting with vm.stopBroadcast, marking the end of the interaction. The whole process demonstrates the proxy’s ability to forward function calls seamlessly while maintaining the state in the implementation contract.
Running this script is simple, and you’ll see the results directly in the console. It’s a straightforward way to test the functionality of the Transparent Proxy and ensure everything is working as intended. You can build on this script to test upgrades or add more complex interactions, but for now, it’s a solid foundation to understand how the proxy operates 😄
forge script script/DeployFirstCase.sol --tc Interacting --broadcast
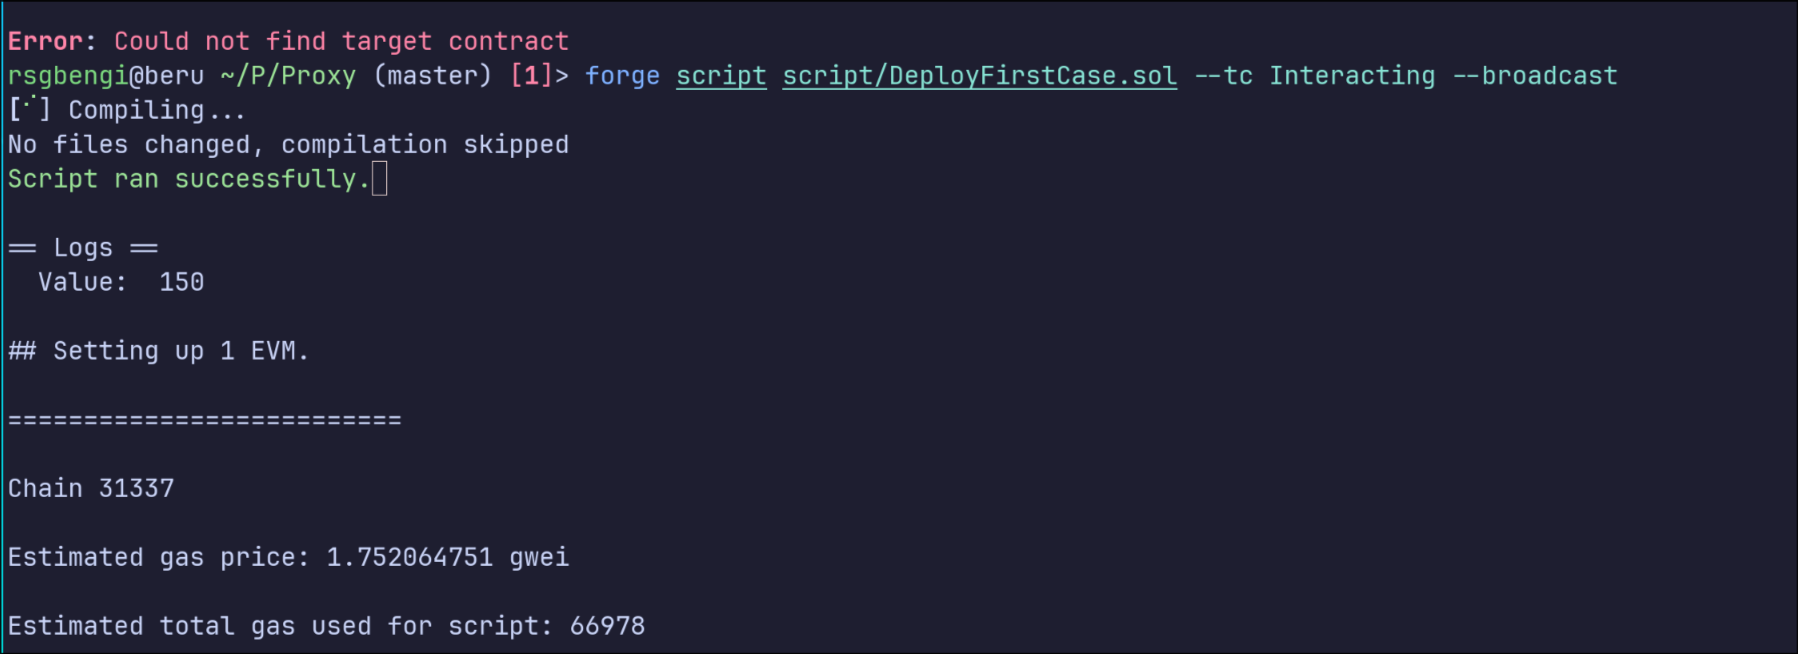
Interacting with the Proxy
Updating the Implementation: Upgrading the Transparent Proxy
Once the Transparent Proxy is deployed and working, the next step is to upgrade its underlying implementation. This process allows us to deploy a new version of the implementation contract and point the proxy to the updated version, ensuring the contract logic evolves while maintaining the same proxy address. Below is the Foundry script to perform the upgrade, along with a detailed explanation of how it works.
// SPDX-License-Identifier: MIT
pragma solidity ^0.8.0;

import "forge-std/Script.sol";

interface ProxyInterface {
    function setStoredValue(uint256 value) external;
    function getStoredValue() external view returns (uint256);
    function upgradeTo(address newImplementation) external;
    function getVersion() external view returns (string memory);
}

contract UpdatingImplementation is Script {
    // Reference the deployed Transparent Proxy
    ProxyInterface proxy = ProxyInterface(0xe7f1725E7734CE288F8367e1Bb143E90bb3F0512);

    function run() external {
        vm.startBroadcast(vm.envUint("ADMIN_KEY"));

        // Deploy the new implementation contract
        ImplementationV1 implementation = new ImplementationV1();
        console.log("ImplementationV1 deployed at:", address(implementation));

        // Display the current implementation version
        console.log("Current Version: ", proxy.getVersion());

        // Upgrade the proxy to use the new implementation
        proxy.upgradeTo(address(implementation));

        // Verify the new implementation version
        console.log("New Version: ", proxy.getVersion());

        vm.stopBroadcast();
    }
}
This script handles the upgrade process step by step, starting with the deployment of a new implementation contract and ending with a verification of the upgrade. Here’s how it works:
The ProxyInterface allows the script to interact with the proxy, specifically calling the upgradeTo and getVersion functions. The proxy is referenced by its deployed address (0xe7f1725E7734CE288F8367e1Bb143E90bb3F0512), which you should replace with the actual proxy address from your deployment.
The script begins by broadcasting transactions using vm.startBroadcast with the admin’s private key. This ensures that the transactions are properly signed and authorized. The admin then deploys the new implementation contract by creating an instance of ImplementationV1. The script logs the new implementation’s address for reference.
After deploying the new implementation, the script retrieves and logs the current implementation version by calling proxy.getVersion(). This confirms the current state of the proxy before the upgrade.
The upgradeTo function is then called on the proxy, passing the address of the newly deployed implementation contract. This updates the proxy to point to the new implementation. The script follows up by calling proxy.getVersion() again to confirm that the proxy is now using the updated implementation.
Finally, vm.stopBroadcast is called to end the transaction broadcasting, completing the upgrade process.
forge script script/DeployFirstCase.sol --tc UpdatingImplementation --broadcast
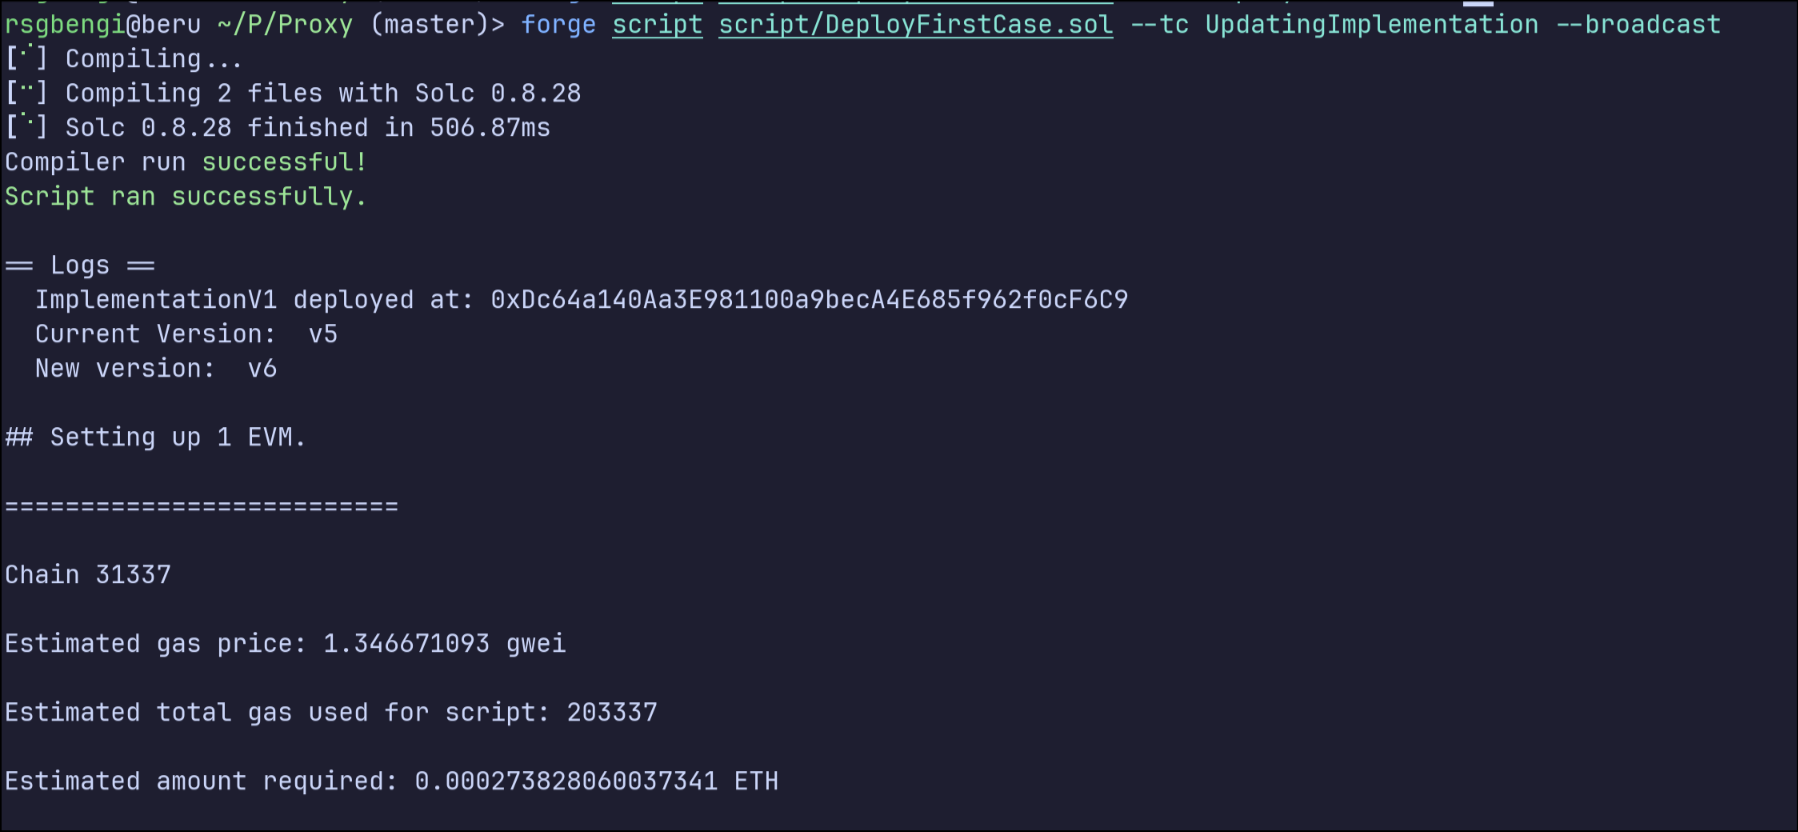
Upgrading the Implementation
Common Vulnerabilities in Transparent Proxies
Transparent Proxies are undeniably useful, but like any powerful tool, they come with their own set of risks. Knowing the common vulnerabilities in these proxies is essential for anyone looking to implement or audit them effectively.
One major issue often encountered is unrestricted upgrade access. If the upgradeTo function isn’t properly protected, a malicious actor could exploit it to deploy their own version of the implementation contract, potentially stealing funds or breaking functionality. This highlights the importance of tightly controlling the admin address and ensuring only authorized parties can manage upgrades. Multi-signature wallets are a great way to reduce the risk of a single point of failure.
Another critical vulnerability is storage collision. Transparent Proxies rely on specific storage slots, such as ADMIN_SLOT and IMPLEMENTATION_SLOT, to store critical data. If an implementation contract accidentally overlaps with these reserved slots, it can corrupt the proxy’s state and lead to unexpected behavior. Following the EIP-1967 standard for storage slots is a best practice to avoid these conflicts.
The implementation contract itself can also introduce vulnerabilities, such as through delegatecall exploits. Since the proxy uses delegatecall to execute functions in the implementation’s context, any malicious or poorly written code in the implementation can manipulate the proxy’s state. This makes thorough auditing of the implementation contract critical. Reentrancy attacks, unchecked inputs, or careless state manipulation in the implementation are common areas to scrutinize.
A subtle but devastating risk is losing admin privileges. If the admin address is ever set to address(0) or another unintended address, the proxy can no longer be managed, effectively freezing its state. This makes it essential to validate all admin changes and include recovery mechanisms, such as a time-lock or an emergency reset option.
Lastly, there’s the danger of malicious upgrades. Even when the upgrade process itself is secure, a poorly vetted or intentionally malicious new implementation can introduce backdoors, corrupt storage, or otherwise compromise the proxy’s integrity. Implementing validation checks and allowing time for audits before deploying upgrades is a good practice to avoid such scenarios.
Wrapping Up: Proxies in Action
Transparent Proxies, as we’ve seen, are a simple yet powerful tool for making smart contracts upgradeable. They act as the middleman, forwarding user calls to the implementation contract while ensuring the contract’s address and state remain stable. We’ve explored their inner workings, deployed them, interacted with them, and even upgraded them seamlessly. By now, you should have a solid understanding of how they operate and why they’re a go-to choice in the world of smart contracts.
From their admin-controlled upgrades to their ability to separate logic from storage, Transparent Proxies make the upgrade process straightforward. However, they’re not without their limitations. For instance, the reliance on centralized admin control can introduce risks if not properly secured. That’s where more advanced patterns like UUPS Proxies come into play, offering a slightly different approach to the upgrade process.
In the next chapter, we’ll dive into UUPS Proxies (Universal Upgradeable Proxy Standard). You’ll learn how they differ from Transparent Proxies, why they’re favored for reducing gas costs, and how their upgrade logic shifts from the proxy to the implementation contract itself. If you thought Transparent Proxies were cool, wait until you see UUPS in action.
So, buckle up, because we’re taking your knowledge of proxies to the next level. Until then, keep exploring, testing, and thinking critically about how these tools can be both a feature and a potential attack surface. Onward to UUPS! 🚀
References
- Foundry - A Blazing Fast, Modular, and Portable Ethereum Development Framework. “Foundry Documentation.” Available at: https://book.getfoundry.sh/
- Solidity - Understanding
delegatecalland Low-Level Functions. “Solidity Documentation.” Available at: https://docs.soliditylang.org/en/latest/introduction-to-smart-contracts.html#delegatecall-callcode-and-call - Trail of Bits - Common Pitfalls with
delegatecall. “Trail of Bits Blog.” Available at: https://blog.trailofbits.com/ - Storage in Solidity - Detailed Analysis of Solidity Storage Mechanics. “Solidity Documentation.” Available at: https://docs.soliditylang.org/en/latest/internals/layout_in_storage.html
- Ethereum - Open-Source Blockchain Platform for Smart Contracts. “Ethereum Whitepaper.” Available at: https://ethereum.org/en/whitepaper/
- Anvil - A Local Ethereum Development Node for Testing Smart Contracts. “Anvil Documentation.” Available at: https://book.getfoundry.sh/anvil/
- OpenZeppelin - Secure Smart Contract Libraries. “OpenZeppelin Contracts Documentation.” Available at: https://docs.openzeppelin.com/contracts
Chapters

Previous chapter
Next chapter

💬 Comments Available
Drop your thoughts in the comments below! Found a bug or have feedback? Let me know.