Understanding Ethereum Signatures - The Foundation of Web3 Security
23 min read
November 5, 2025

A Personal Note
I’ve been diving deep into Web3 security lately, and one thing keeps coming up in every exploit, every vulnerability, every attack vector. Signatures. They’re the foundation of everything in this space, yet most developers (myself included, until recently) don’t truly understand how they work under the hood.
So I decided to write a series of articles exploring signatures from every angle. How they work, how they break, and how to defend against attacks. This is the first of six posts where we’ll go from fundamentals to advanced exploitation techniques.
If you’ve ever wondered why a simple “sign to login” can drain your wallet, or how attackers bypass security measures, you’re in the right place. Let’s start at the beginning.
Introduction
Picture this. You walk into a bank, no ID required. No password. No security questions about your first pet’s name. Instead, you pull out a small mathematical proof, something only you could have created, and the bank instantly knows you’re you. No questions asked. No database to hack. No server to breach.
Sound like science fiction? Welcome to Web3.
Here’s the thing about traditional web security. It’s all about who you know. Servers, databases, session tokens, they all conspire to remember you. But what happens when that server gets hacked? Ask the 3 billion Yahoo accounts that were compromised. Ask LinkedIn’s 165 million users. The list goes on.
Web3 doesn’t play that game. In this world, you are your signature. Not your email. Not your username. Your cryptographic signature is the single source of truth about your identity. There’s no Google or Facebook acting as a middleman. No central authority deciding if you’re really you.
But here’s where it gets interesting and dangerous.
Every transaction you send, every NFT you mint, every smart contract you interact with gets signed with your private key. And if someone gets that key? Game over. No password reset email. No customer support hotline. Your funds are gone, and there’s no undo button.
Think about that for a second. In traditional finance, you can call your bank, freeze your card, dispute a charge. In Web3, your private key is your bank, your vault, and your identity rolled into one. Lose it or expose it, and you’re done.
So why should you care about signatures?
Because understanding how these signatures work isn’t just about building dApps or passing a security audit. It’s about understanding the single point of failure that makes or breaks Web3 security. It’s about knowing:
- Why a simple “Sign this message to login” can drain your wallet
- How attackers trick you into signing away your assets
- What actually happens when MetaMask asks you to approve a transaction
- The difference between a signature that proves ownership and one that authorizes theft
Let me be blunt. Every Web3 exploit you’ve read about (the $600M Poly Network hack, the countless phishing attacks, the endless rug pulls) all come down to one thing. Someone signed something they shouldn’t have.
Ready to understand the foundation of Web3 security? Let’s dive in.
Cryptographic Foundations (The Math That Protects Your Money)
ECDSA and secp256k1 (Your Digital DNA)
You know how you can scramble an egg but can’t unscramble it? That’s the basic idea behind Ethereum’s signature system.
Ethereum uses something called ECDSA (Elliptic Curve Digital Signature Algorithm) with the secp256k1 curve. Bitcoin uses the exact same system. If that sounds intimidating, don’t worry. The concept is beautifully simple.
Think of it like this. Imagine a magical machine with one door in and one door out. You put a number in the entrance, the machine does some complex math, and out comes a completely different number. Easy, right?
Here’s the magic part. You cannot go backwards. Ever. No matter how powerful your computer, no matter how much time you have, you cannot reverse the process. It’s mathematically impossible.
The journey from private key to your address looks like this
Private Key (256-bit random number)
    ↓ (Elliptic Curve multiplication - one-way function)
Public Key (x,y coordinates on the curve)
    ↓ (Keccak-256 hash + take last 20 bytes)
Ethereum Address (0x...)
Let me break this down in human terms.
Your Private Key is a 256-bit random number. Think of it as a 32-byte secret, essentially a really, really long password. But unlike passwords you create, this one is truly random. So random that the odds of someone generating the same one are smaller than finding a specific grain of sand on all the beaches on Earth. Never share this. Never transmit it. This is your key to everything.
Your Public Key gets derived from your private key using elliptic curve mathematics. It’s 64 bytes long. Here’s the beautiful part. Anyone can see your public key, but they can never work backwards to find your private key. The math simply doesn’t allow it.
Your Ethereum Address comes from taking that public key, running it through a Keccak-256 hash function (we’ll get to that), grabbing the last 20 bytes, slapping a 0x in front, and boom. That’s your wallet address. The one you share with everyone. The one on your Twitter profile.
The security here relies on something called the Elliptic Curve Discrete Logarithm Problem (ECDLP). Fancy name for a simple concept. Given a public key, it’s computationally impossible to figure out the private key that created it.
How impossible? Let’s put it this way. If you started trying to crack a single private key today, using all the computing power currently on Earth, the universe would end before you succeeded. That’s not an exaggeration. That’s math.
Keccak-256 (The Blender That Can’t Be Un-Blended)
Now let’s talk about the hash function Ethereum uses. Keccak-256.
Think of a hash function like a super-powered blender. You throw in ingredients (your data), hit the button, and out comes a smoothie (the hash). But here’s the thing. you can never separate that smoothie back into its original ingredients. Strawberries, bananas, spinach, once blended, they’re gone forever. All you have is the smoothie.
That’s what Keccak-256 does to your data. It takes any input, could be a message, could be your public key, could be an entire transaction, and spits out a unique 256-bit (32-byte) fingerprint.
Here’s what makes it special:
- Same input always produces the same output. Blend the same ingredients, get the same smoothie
- Different inputs produce wildly different outputs. Change one letter in your message, and the hash is completely unrecognizable
- One-way only. You can’t reverse it. Ever.
// Example. Generating an Ethereum address from a public key
const { keccak256 } = require('ethers');

// Public key (64 bytes, uncompressed, without 0x04 prefix)
const publicKey = "0x1234..."; // Your full public key here

// Hash and take last 20 bytes
const address = "0x" + keccak256(publicKey).slice(-40);
Quick reality check. Why does Ethereum use Keccak-256 and not SHA-256 like Bitcoin?
Because when Ethereum was being designed in 2014, Keccak had just won the SHA-3 competition but hadn’t been standardized yet. Ethereum adopted the original Keccak algorithm, while the final SHA-3 standard made some tweaks. So technically, Ethereum uses Keccak-256, not SHA3-256. They’re cousins, not twins.
Why does this matter for you as a security researcher? Because if you’re verifying signatures or reproducing exploits, using the wrong hash function will break everything. Always use Keccak-256 for Ethereum work.
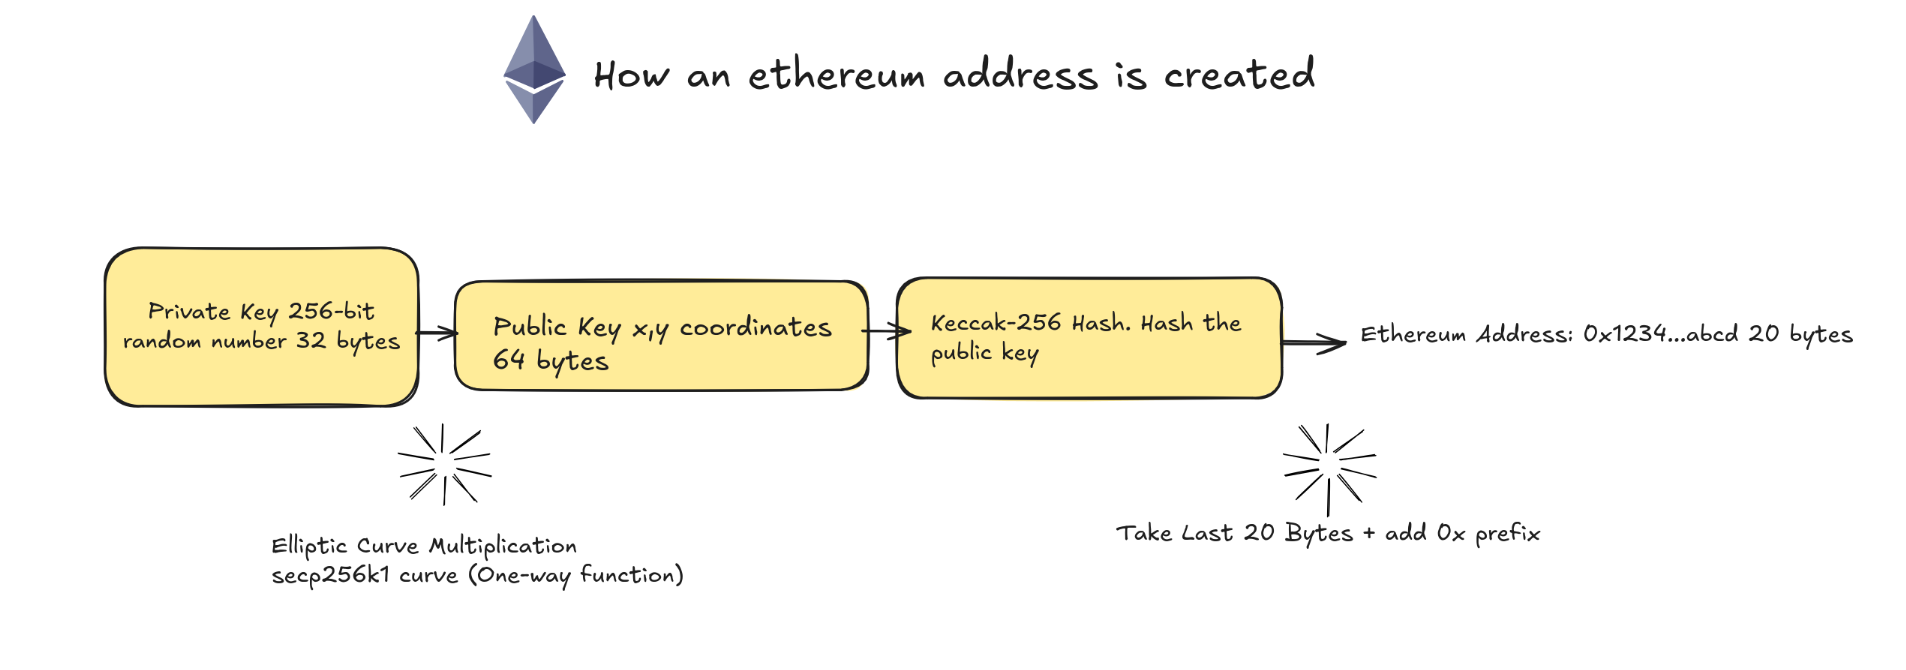
Diagram. The derivation flow from Private Key to Ethereum Address - note the one-way nature of each step
Ethereum Signature Anatomy. Breaking Down Your Digital Signature
Picture a signature on a check. One smooth motion of your pen, right? Simple.
Now imagine if that signature could do more than just prove you wrote it. What if, just by looking at it, someone could verify it came from you, figure out who you are, and confirm you actually meant to sign that specific check, all without ever asking you a single question?
That’s what an Ethereum signature does. And it’s made up of three pieces. r, s, and v.
The Three Components. r, s, v, Your Signature’s DNA
// A typical Ethereum signature
const signature = {
  r: "0x1234567890abcdef...", // 32 bytes
  s: "0xfedcba0987654321...", // 32 bytes
  v: 27 // or 28 (1 byte - recovery identifier)
};

// Often serialized as a single 65-byte hex string:
// "0x" + r (64 chars) + s (64 chars) + v (2 chars)
const compactSig = "0x1234...27";
Let’s demystify these three letters:
r - The Random Point. This is the x-coordinate of a random point on the elliptic curve. Think of it as the first half of your cryptographic proof. It’s 32 bytes of pure mathematical certainty.
s - The Signature Proof. This is where your private key comes into play. The ‘s’ value is derived from both the message hash AND your private key. It’s the part that says “Yes, the owner of this private key really did sign this message.” Another 32 bytes.
v - The Recovery ID. Here’s the clever bit. Remember how your public key can’t be derived from your address? Well, the ‘v’ value (either 27 or 28) is a tiny breadcrumb that lets anyone recover your public key from your signature. Just 1 byte, but it’s mighty important.
Together, these three components take up 65 bytes. That’s it. 65 bytes of mathematical proof that you, and only you, signed something.
Transaction Signatures vs Message Signatures. Two Flavors, Different Purposes
Here’s where things get interesting. Ethereum has two types of signatures, and confusing them is like mixing up a deposit slip with a blank check. Both involve your signature, but the consequences are very different.
1. Transaction Signatures. The Autopilot
Ever notice how when you send ETH or interact with a smart contract, MetaMask just… handles it? You click “Confirm,” and your wallet automatically signs the transaction.
That’s a transaction signature. It’s automatic, built into the process:
// When you send a transaction, it's automatically signed
const tx = await signer.sendTransaction({
  to: "0x742d35Cc6634C0532925a3b844Bc9e7595f0bEb",
  value: ethers.parseEther("1.0")
});

// The transaction object contains r, s, v internally
// You don't manually create the signature
What’s actually being signed here?
Your wallet takes all the transaction details (nonce, gas price, gas limit, recipient address, value, data, and chain ID) and packages them using RLP encoding (Recursive Length Prefix). RLP is Ethereum’s way to serialize data into a compact byte array. This RLP-encoded transaction gets hashed with Keccak-256, and that hash is what actually gets signed with your private key.
This signature goes on-chain. Ethereum nodes verify it automatically. If the signature is valid, the transaction executes. If not, it’s rejected. No human judgment involved.
2. Message Signatures. The Manual Handshake
Now, what if you just want to prove you own an address without spending any gas? What if a website wants you to log in with your wallet? What if you’re voting in a DAO?
Enter message signatures. These are explicit, manual, and dangerous if you don’t understand them.
// You explicitly sign a message
const message = "I authorize this action";
const signature = await signer.signMessage(message);

// What actually gets signed includes a prefix:
// "\x19Ethereum Signed Message:\n" + len(message) + message
Unlike transactions, message signatures:
- Don’t cost gas
- Don’t change the blockchain
- Are used for off-chain verification (authentication, proofs of ownership, etc.)
- Can be verified by anyone, anywhere, smart contracts, websites, backend servers
But here’s the critical part. message signatures are manually verified. A smart contract or backend has to explicitly check them. And if the checking code is buggy or malicious? You’re signing away your security.
The ETH Prefix. The Security Feature That Saves Your Assets
Now let me tell you about one of the most elegant security features in Ethereum, one that most people don’t even know exists.
When you sign a message, Ethereum doesn’t actually sign your message directly. Instead, it adds a special prefix as defined in EIP-191:
\x19Ethereum Signed Message:\n<length><message>Why does this matter? Because it prevents a clever attack.
Imagine this scenario. A website asks you to sign a message that says “I am the owner of this wallet.” Seems harmless, right? You’re just proving ownership, no money is moving.
But what if an attacker could take that same signature and use it as a transaction signature? What if they crafted a transaction that, when hashed, produced the exact same hash as your “harmless” message?
Without the prefix, they could. Your message signature could become a transaction signature. Your innocent proof of ownership could become authorization to drain your wallet.
The prefix makes this impossible.
By adding \x19Ethereum Signed Message:\n before your message, Ethereum ensures that:
- A message signature can never look like a transaction signature
- A transaction signature can never look like a message signature
- You can never accidentally sign a transaction when you think you’re just signing a message
Here’s what actually gets signed when you sign “Hello World”:
const message = "Hello World";
// Actual signed data:
// "\x19Ethereum Signed Message:\n11Hello World"
//                                 ^^
//                         length = 11 bytes
That \x19 is a special byte that tells Ethereum “this is a message signature, not a transaction.” The rest is human-readable. “Ethereum Signed Message” followed by the length (11 characters) and then your message.
Simple. Elegant. And it’s saved countless wallets from being drained.
But here’s the thing. not all signature schemes have this protection. As we’ll see in later posts, there are ways to trick users into signing things they shouldn’t. The prefix helps, but it’s not a silver bullet.

Key difference between Transaction and Message signature flows - note the ETH prefix in message signatures
Hands-on Demo. Time to Get Your Hands Dirty
Alright, enough theory. Let’s actually do this.
I’m going to walk you through four practical examples that will cement your understanding of how Ethereum signatures work. By the end, you’ll have working code that signs messages, verifies them, and even builds a complete authentication system.
Grab a coffee. Fire up your terminal. Let’s build.
Setup. Getting Your Tools Ready
First, you’ll need ethers.js, the Swiss Army knife of Ethereum development:
npm install ethersThat’s it. Now we’re ready to sign some messages.
Example 1. Creating Your First Signature
Let’s start simple. We’re going to create a wallet, sign a message, and see what a signature actually looks like under the hood.
const { ethers } = require('ethers');

async function signMessage() {
  // Create a random wallet (or use existing private key)
  const wallet = ethers.Wallet.createRandom();

  console.log("Address:", wallet.address);
  console.log("Private Key:", wallet.privateKey);

  // The message we want to sign
  const message = "I am the owner of this address";

  // Sign the message
  const signature = await wallet.signMessage(message);

  console.log("\nMessage:", message);
  console.log("Signature:", signature);

  // Break down the signature into r, s, v
  const sig = ethers.Signature.from(signature);
  console.log("\nSignature components:");
  console.log("r:", sig.r);
  console.log("s:", sig.s);
  console.log("v:", sig.v);

  return { wallet, message, signature };
}

signMessage();
Run this code and you’ll see something like:
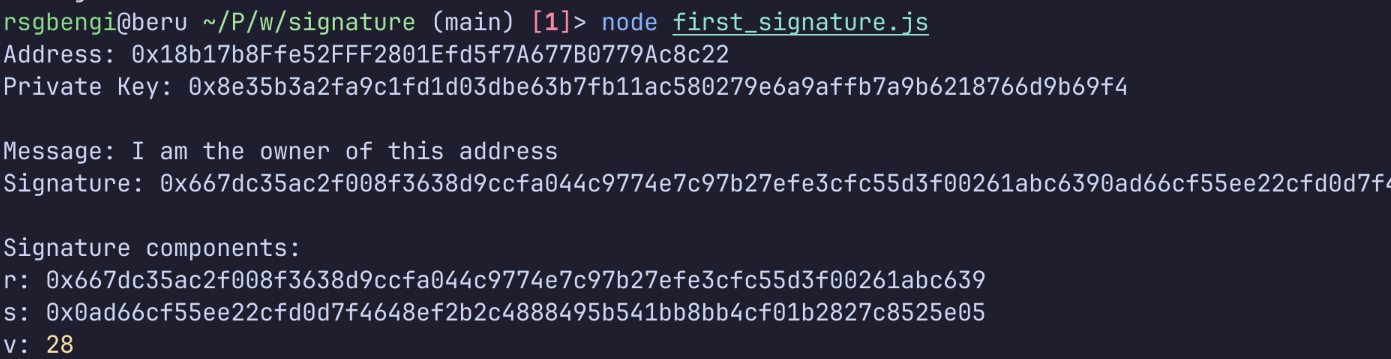
Showing all the data of a signature
Look at that. That long hexadecimal string is your signature, 65 bytes of cryptographic proof. The r, s, and v components we talked about earlier? There they are, broken down for you.
Here’s what just happened:
- We created a random wallet (never do this in production, obviously, use a secure key management system)
- We signed a simple message
- We broke the signature down into its components
This signature now proves that the owner of that address signed that exact message. Change a single character in the message, and the signature becomes invalid.
Example 2. The Magic of Signature Verification
Now let’s verify a signature. This is where the magic happens, where we can prove, without a doubt, that someone who controls a specific address signed a specific message.
const { ethers } = require('ethers');

async function verifySignature() {
  // Original signer
  const wallet = ethers.Wallet.createRandom();
  const message = "Authenticate me";
  const signature = await wallet.signMessage(message);

  console.log("Original signer:", wallet.address);

  // Verify signature by recovering the address
  const recoveredAddress = ethers.verifyMessage(message, signature);

  console.log("Recovered address:", recoveredAddress);
  console.log("Signature valid:", recoveredAddress === wallet.address);

  // Try with wrong message (should fail)
  const wrongMessage = "Different message";
  const recoveredWrong = ethers.verifyMessage(wrongMessage, signature);

  console.log("\nWith wrong message:", recoveredWrong);
  console.log("Signature valid:", recoveredWrong === wallet.address);
}

verifySignature();
The output tells the story:
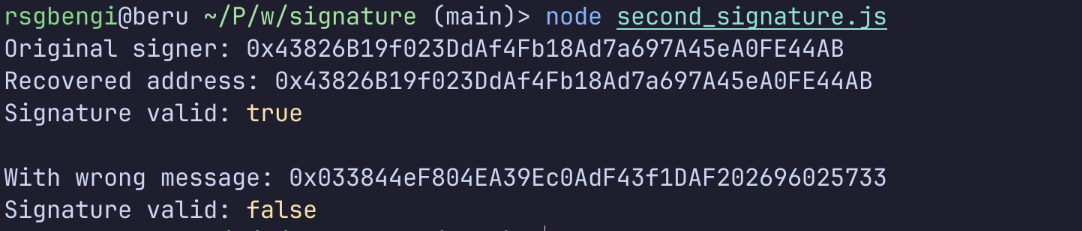
Try to verify the signature using other message
With the correct message, we recovered the exact address that signed it. Perfect match. Valid signature.
But when we tried to verify the same signature with a different message, we got a completely different address back, and the verification failed.
This is the beauty of cryptographic signatures. The signature is bound to both the message AND the private key. Change either one, and the math breaks. There’s no way to forge it, no way to modify the message after signing. The signature is proof of exactly what was signed, by exactly whom.
This is why phishing attacks in Web3 are so devastating. If an attacker tricks you into signing a malicious message, that signature is cryptographically valid. There’s no disputing it. The blockchain doesn’t care about your intentions, only about the math.
Example 3. Peeking Under the Hood, The Prefix in Action
Remember that ETH prefix I told you about? Let’s actually see it in action. This example shows you what Ethereum is really signing when you think you’re just signing “Hello”.
Let’s see what actually gets hashed when signing:
const { ethers } = require('ethers');

function demonstratePrefix() {
  const message = "Hello";

  // What ethers.js does internally:
  // 1. Create the prefixed message
  const prefix = "\x19Ethereum Signed Message:\n";
  const messageBytes = ethers.toUtf8Bytes(message);
  const prefixedMessage = ethers.concat([
    ethers.toUtf8Bytes(prefix),
    ethers.toUtf8Bytes(String(messageBytes.length)),
    messageBytes
  ]);

  console.log("Original message:", message);
  console.log("Message bytes:", ethers.hexlify(messageBytes));
  console.log("Prefixed message:", ethers.hexlify(prefixedMessage));

  // 2. Hash the prefixed message
  const messageHash = ethers.keccak256(prefixedMessage);
  console.log("\nFinal hash to sign:", messageHash);

  // Compare with ethers.js helper
  const expectedHash = ethers.hashMessage(message);
  console.log("ethers.hashMessage:", expectedHash);
  console.log("Match:", messageHash === expectedHash);
}

demonstratePrefix();
The output reveals the truth:
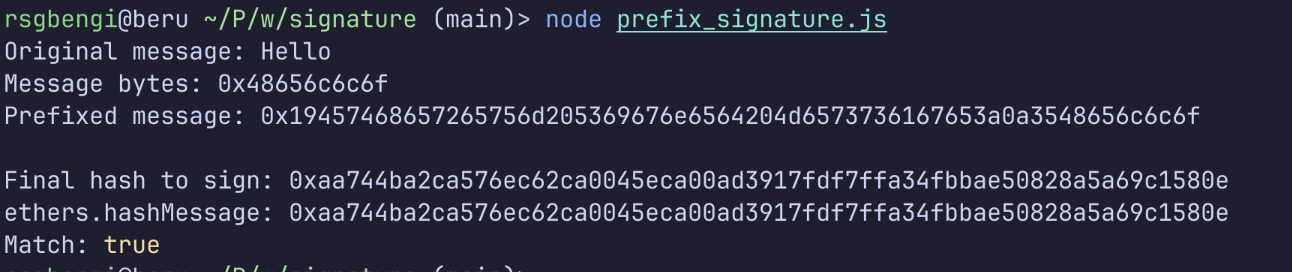
Verifying that the prefix is also signed
- Your original message.
"Hello"→ In hex.0x48656c6c6f - But Ethereum doesn’t sign that. It adds.
\x19Ethereum Signed Message:\n5(where 5 is the length) - The full prefixed message in hex.
0x19457468657265756d205369676e6564204d6573736167653a0a3548656c6c6f - That gets hashed with Keccak-256, producing your final hash
This is what actually gets signed. Not “Hello”, the whole prefixed string.
Why does this matter? Because if you’re ever building a system that verifies Ethereum signatures, you need to reconstruct this exact prefix. Miss it, and your signature verification will fail every time.
Example 4. Building a Real Authentication System
Now let’s put it all together. This is how sites like OpenSea and Uniswap let you “sign in with Ethereum” without passwords, databases, or any traditional auth infrastructure.
Here’s a practical example of how signatures are used for authentication:
const { ethers } = require('ethers');

// Simulated backend verification
class AuthenticationService {
  // Step 1. Generate a challenge (nonce)
  generateChallenge(address) {
    const nonce = Math.floor(Math.random() * 1000000);
    const timestamp = Date.now();
    const challenge = `Sign this message to authenticate:
Nonce: ${nonce}
Timestamp: ${timestamp}
Address: ${address}

This request will not trigger a blockchain transaction or cost any gas fees.`;

    // Store challenge for this address (in real app, use database)
    this.challenges = this.challenges || {};
    this.challenges[address] = { challenge, timestamp };

    return challenge;
  }

  // Step 2. Verify the signature
  async verifySignature(address, signature, challenge) {
    // Check if challenge exists and is recent (5 min timeout)
    const stored = this.challenges[address];
    if (!stored) {
      throw new Error("No challenge found for this address");
    }

    if (Date.now() - stored.timestamp > 300000) {
      throw new Error("Challenge expired");
    }

    if (stored.challenge !== challenge) {
      throw new Error("Challenge mismatch");
    }

    // Recover address from signature
    const recoveredAddress = ethers.verifyMessage(challenge, signature);

    // Verify it matches
    if (recoveredAddress.toLowerCase() !== address.toLowerCase()) {
      throw new Error("Signature verification failed");
    }

    // Clean up used challenge
    delete this.challenges[address];

    return true;
  }
}

// Simulated frontend
async function authenticateUser() {
  const wallet = ethers.Wallet.createRandom();
  const authService = new AuthenticationService();

  console.log("=== Web3 Authentication Demo ===\n");
  console.log("User address:", wallet.address);

  // Step 1. Request challenge from backend
  const challenge = authService.generateChallenge(wallet.address);
  console.log("\nChallenge from server:");
  console.log(challenge);

  // Step 2. User signs the challenge
  const signature = await wallet.signMessage(challenge);
  console.log("\nUser signature:");
  console.log(signature);

  // Step 3. Send signature to backend for verification
  try {
    const verified = await authService.verifySignature(
      wallet.address,
      signature,
      challenge
    );
    console.log("\n✓ Authentication successful!");
    console.log("User is now logged in");
  } catch (error) {
    console.log("\n✗ Authentication failed:", error.message);
  }
}

authenticateUser();
The beautiful, password-free dance:
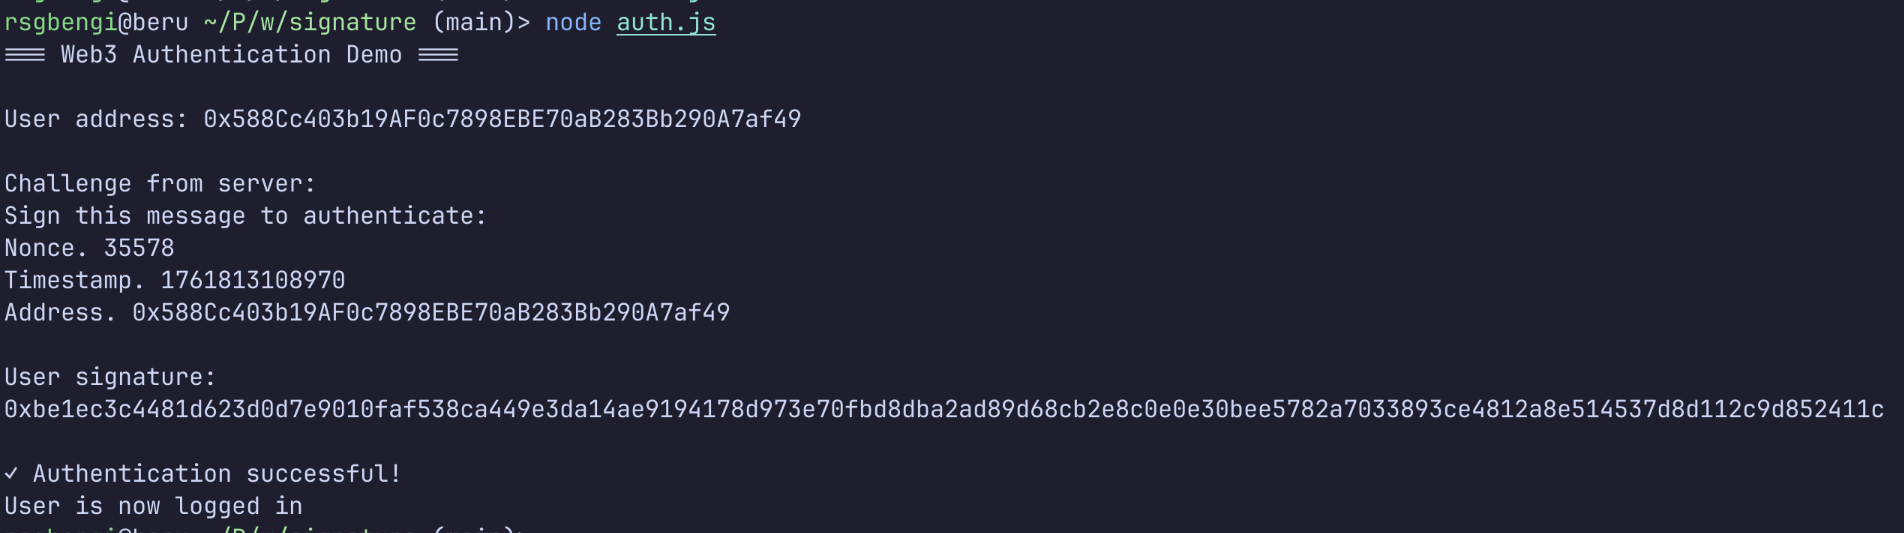
Basic authentication example
-
Server generates a unique challenge. It includes a random nonce and timestamp. This prevents replay attacks, someone can’t reuse an old signature to log in later.
-
User signs the challenge. Your wallet pops up, shows you the message, you click “Sign.” No password entered. No session cookie created. Just a signature.
-
Server verifies the signature. It uses
ethers.verifyMessage()to recover the address from the signature. If it matches the address you claimed to be, you’re in. If not, rejected.
No database of passwords to breach. No session tokens to steal. No password reset flow to exploit. Just pure cryptographic proof of identity.
This is the pattern used by OpenSea, Uniswap, ENS, and countless other dApps. It’s elegant, it’s secure, and it’s fundamentally different from traditional auth.
But here’s the catch: This entire system relies on users actually reading what they’re signing. If an attacker can trick you into signing a malicious message (maybe one that grants them token approvals), your authentication system becomes an attack vector.
We’ll dive deep into these attacks in future posts. For now, just remember. the signature is only as secure as what you’re signing.
Key Takeaways. What You Need to Remember
If you forget everything else from this post, remember these five things:
1. Your Signature IS Your Identity
There’s no password reset button in Web3. No customer support to call. Your private key is your identity, and your signature is proof you control it.
Think of it this way. In traditional apps, you prove who you are by knowing a secret (your password). In Web3, you prove who you are by being able to create a signature that only the owner of the private key could create. The difference? One can be guessed or stolen from a server. The other is mathematically impossible to forge.
- Your private key never leaves your wallet
- Your signature proves you control an address
- No central authority verifies you, only mathematics
- Lose your key, lose everything. No exceptions.
2. Two Types of Signatures, Two Different Worlds
| Aspect | Transaction Signatures | Message Signatures |
|---|---|---|
| Creation | Automatic (wallet handles it) | Manual (you explicitly sign) |
| Purpose | Change blockchain state | Prove ownership/authenticate |
| Encoding | RLP (complex, includes nonce) | ETH prefix (\x19Ethereum Signed Message:\n) |
| Verification | Automatic by network nodes | Manual by smart contracts or backends |
| Cost | Requires gas fees | Free (off-chain) |
| Risk | Clear, moving funds/executing code | Hidden, can be used for approvals |
Transaction signatures are obvious, you’re sending ETH, minting an NFT, doing something on-chain. Message signatures are sneaky, they look innocent but can authorize dangerous things.
3. The Prefix Saved Your Wallet (And You Didn’t Even Know It)
The \x19Ethereum Signed Message:\n prefix is a silent guardian. It ensures that a harmless “prove you own this wallet” signature can never be reused as a transaction signature.
Without it? An attacker could trick you into signing a message, then use that signature to drain your funds. With it? Those two worlds stay separate.
4. r, s, v, The DNA of Every Signature
Every signature has three components:
- r and s. The cryptographic proof (64 bytes total)
- v. The recovery hint that lets us figure out your public key (1 byte)
All three are needed. Miss one, and the signature is useless.
5. This is Just the Foundation
Everything we’ve covered, ECDSA, Keccak-256, signature anatomy, the prefix, this is the bedrock of Web3 security. Every exploit, every attack, every vulnerability in this space ultimately comes down to signatures.
Understanding this foundation means you can:
- Spot phishing attacks before you sign
- Understand why certain smart contract patterns are dangerous
- Build more secure dApps
- Audit code for signature-related vulnerabilities
And here’s the thing. most Web3 developers don’t understand this deeply enough. Most users certainly don’t. That’s why signature-based attacks are so common and so devastating.
Technical References
Ethereum Standards and Specifications
-
EIP-191 - Signed Data Standard The official Ethereum Improvement Proposal defining the
\x19Ethereum Signed Messageprefix and signed data format. This is the authoritative source for message signature standards. -
Ethereum Yellow Paper Gavin Wood’s formal specification of the Ethereum protocol, including the ECDSA signature scheme and transaction structure.
-
Ethers.js Documentation - Signing Official documentation for the ethers.js library used in all code examples. Covers wallet creation, message signing, and signature verification.
Cryptographic Standards
-
SEC 2 - secp256k1 Curve Parameters Standards for Efficient Cryptography Group specification of the secp256k1 elliptic curve used by both Bitcoin and Ethereum.
-
ECDSA - Elliptic Curve Digital Signature Algorithm Comprehensive explanation of the ECDSA signature algorithm and the Elliptic Curve Discrete Logarithm Problem (ECDLP).
-
NIST FIPS 202 - SHA-3 Standard Official SHA-3 specification. Note that Ethereum uses the original Keccak-256, not the final SHA3-256 standard.
-
Keccak Team - Original SHA-3 Submission Documentation from the Keccak team explaining the difference between the original Keccak and the final SHA-3 standard.
Security Research and Case Studies
-
Rekt.news Documented Web3 exploits and post-mortems. See real-world examples of signature-based attacks.
-
Trail of Bits - Smart Contract Security Security research from one of the leading blockchain security firms, including signature vulnerability research.
-
ConsenSys - Smart Contract Best Practices Security guidelines including signature verification patterns and common pitfalls.
Additional Resources
-
Bitcoin Wiki - secp256k1 Detailed explanation of the secp256k1 curve parameters and security properties.
-
Ethereum Stack Exchange - Keccak vs SHA-256 Community discussion explaining why Ethereum uses Keccak-256 and the technical differences.
Final Thoughts
Here’s the truth. signatures are simultaneously the most secure and most vulnerable part of Web3.
Secure because the math is unbreakable. No quantum computer is cracking ECDSA anytime soon. The cryptography is sound.
Vulnerable because humans are the weak link. We click “Sign” without reading. We trust interfaces that lie to us. We assume that “signing to authenticate” is always safe.
It’s not.
Every major Web3 exploit, from the $600M Poly Network hack to the countless phishing attacks draining wallets daily, exploits this gap between cryptographic perfection and human fallibility.
Understanding signatures isn’t just about passing an interview or building a dApp. It’s about survival in an ecosystem where a single mistaken signature can cost you everything you own.
So take this knowledge seriously. Test the code. Break things in your local environment. Build security into your mental models from day one.
Because in Web3, there’s no undo button.
Chapters

Previous chapter
Next chapter

💬 Comments Available
Drop your thoughts in the comments below! Found a bug or have feedback? Let me know.