Mastering Windows Remote Secrets: Techniques and Tools for Unveiling Hidden Realms
10 min read
February 3, 2023

Introduction: Unveiling Windows Secrets Remotely
Embarking on the vast domain of Windows requires not only knowledge but also the right tools to uncover its secrets. In this article, you will dive into techniques and tools that will unlock the doors of Windows machines remotely, granting you access to valuable information and empowering you to execute commands with finesse.
From exploration through LDAP to deploying advanced techniques such as SMB usage and accessing through RDP, each section of this article will guide you through a discovery journey, revealing methods that go beyond the conventional. Get ready to become a master of remote connection in the Windows universe.
Unlocking Windows Machine Secrets: A Journey through LDAP, NBTNS, and SMB
LDAP exploration
Ever wondered how to unlock a treasure trove of information in an Active Directory domain? Well, one way is to dive into the NTDS (Active Directory database) using the LDAP (Lightweight Directory Access Protocol) protocol. It’s like having a secret key to unlock doors, but in this case, you need a domain user to make it work. Imagine your Kali machine as a detective, equipped with the ldapsearch tool, sniffing out valuable clues.
┌──(rsgbengi㉿kali)-[~]
└─$ ldapsearch -H ldap://192.168.253.130 -x -LLL -W -D "[email protected]" -b "dc=shadow,dc=local" "(objectclass=computer)" "DNSHostName" "OperatingSystem"
Enter LDAP Password:
dn: CN=DC-SHADOW,OU=Domain Controllers,DC=SHADOW,DC=local
operatingSystem: Windows Server 2019 Standard Evaluation
dNSHostName: DC-SHADOW.SHADOW.local

dn: CN=PC-BERU,CN=Computers,DC=SHADOW,DC=local
operatingSystem: Windows 10 Enterprise Evaluation
dNSHostName: PC-BERU.SHADOW.local
Navigating with NBTNS
Picture this: you’re on a quest to discover Windows machines, but don’t have a domain user handy. Fear not! Enter the Netbios Name Services protocol (NBTNS), your trusty sidekick in this journey. Windows machines usually keep port 137 wide open, like a welcoming door. It’s like having a window into their world, and guess what? Most of them don’t even bother with a firewall on this port.
The beauty of NBTNS lies not just in its accessibility, but also in its power to translate IP addresses into hostnames. It’s like having a translator in a foreign land. To embark on this discovery adventure, scripts like nbtscan or nbtstat become your virtual tour guides, revealing the hidden gems in the Windows landscape.
┌──(rsgbengi㉿kali)-[~]
└─$ nbtscan 192.168.253.0/24
Doing NBT name scan for addresses from 192.168.253.0/24

IP address       NetBIOS Name     Server    User             MAC address
------------------------------------------------------------------------------
192.168.253.130  DC-SHADOW        <server>  <unknown>        42:5a:97:56:1e:f6
192.168.253.131  PC-BERU          <server>  <unknown>        1e:3a:58:0b:95:35
192.168.253.255	Sendto failed: Permission denied
Exploring SMB Magic
Let’s talk about unlocking the full potential of Windows machines in your domain, and my favorite method involves dancing with the Server Message Block (SMB) protocol. Picture it as a backstage pass to a concert; it uses port 445 and opens the door to a wealth of information. The secret sauce here? The NTLM authentication protocol, which adds an extra layer of access. Feel free to leverage tools like Nmap for this journey.
┌──(rsgbengi㉿kali)-[~]
└─$ sudo nmap --script smb-os-discovery 192.168.253.131
Starting Nmap 7.93 ( https://nmap.org ) at 2023-01-28 12:10 CET
Nmap scan report for 192.168.253.131
Host is up (0.000086s latency).
Not shown: 997 closed tcp ports (reset)
PORT    STATE SERVICE
135/tcp open  msrpc
139/tcp open  netbios-ssn
445/tcp open  microsoft-ds
MAC Address: 1E:3A:58:0B:95:35 (Unknown)

Host script results:
| smb-os-discovery:
|   OS: Windows 10 Enterprise Evaluation 19045 (Windows 10 Enterprise Evaluation 6.3)
|   OS CPE: cpe:/o:microsoft:windows_10::-
|   Computer name: PC-BERU
|   NetBIOS computer name: PC-BERU\x00
|   Domain name: SHADOW.local
|   Forest name: SHADOW.local
|   FQDN: PC-BERU.SHADOW.local
|_  System time: 2023-01-28T12:10:12+01:00

Nmap done: 1 IP address (1 host up) scanned in 1.45 seconds
Additionally, we can employ Python, specifically the Impacket library, to get intel from the machines. The SMBConnection class acts like your virtual tour guide, offering a backstage pass to information like operating systems and DNS names.
In [1]: from impacket.smbconnection import SMBConnection
In [2]: conn = SMBConnection("192.168.253.131", "192.168.253.131")
In [3]: conn.login("beruinsect", "Password2")
In [4]: conn.getServerOS()
Out[5]: 'Windows 10.0 Build 19041'
Important tip: Ensure your Domain Controller is up before launching connections; otherwise, the login may falter. Also, note that the Impacket class will spill more beans if we flirt with SMB version 1.
In [1]: from impacket.smbconnection import SMBConnection, SessionError
IN [2]: from impacket.smb import SMB_DIALECT
In [3]: conn = SMBConnection("192.168.253.131", "192.168.253.131", preferredDialect=SMB_DIALECT,)
In [4]: conn.login("vaan", "Password1")
In [5]: conn.getServerOS()
Out[5]: 'Windows 10 Enterprise Evaluation 19045'
In the code above, notice how we specifically identify the Windows 10 version in use. The term “preferredDialect” is our way of nudging the SMB version during the connection. If you peek into the Impacket SMB file, you’ll catch references to “NT LM 0.12.” This version game is also played by tools like nmap to denote the SMBv1 era.
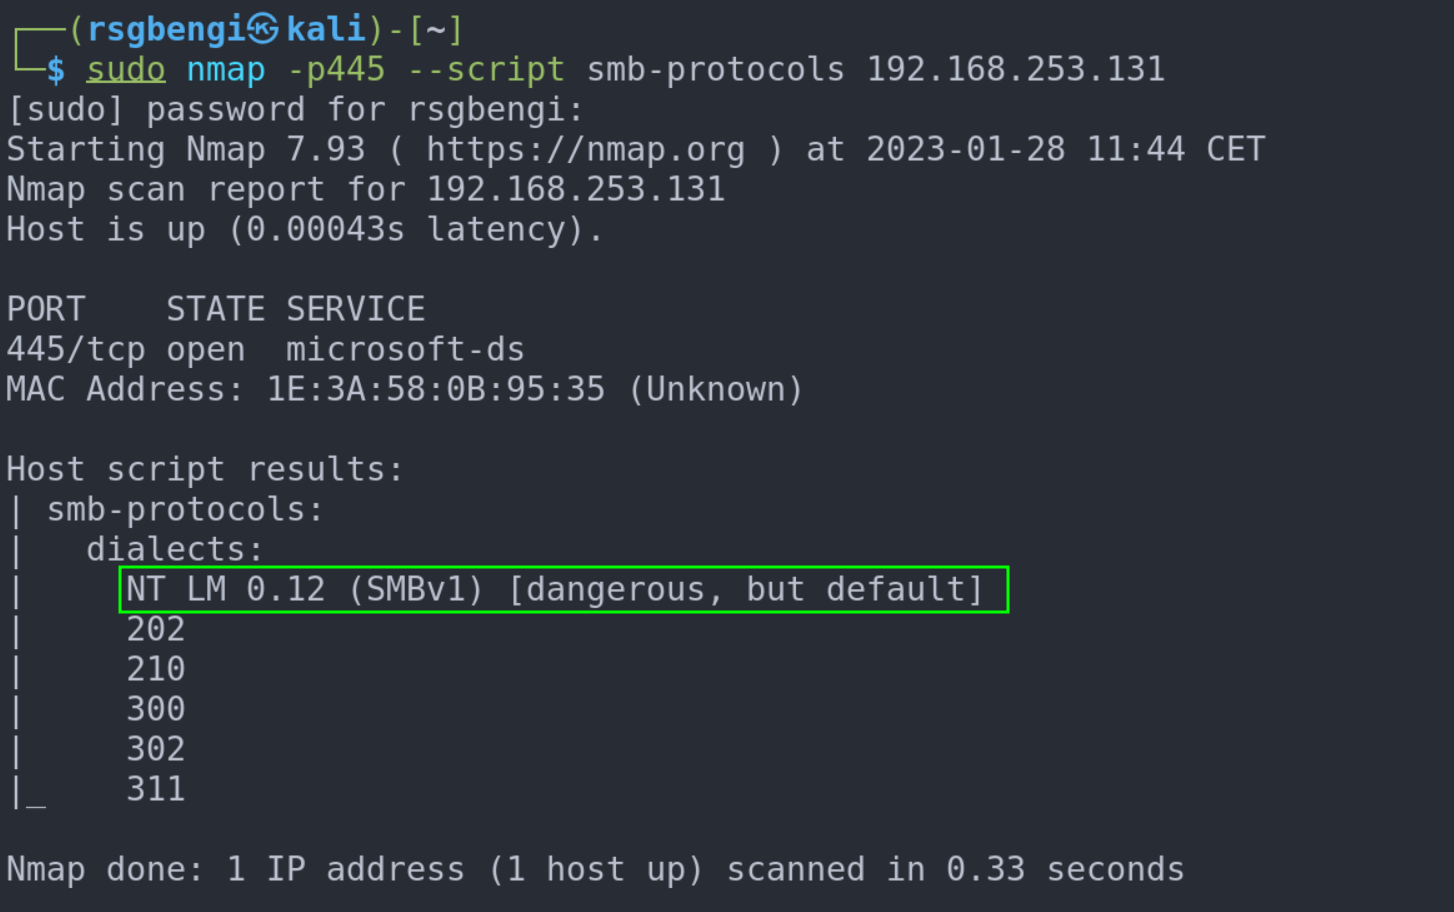
Identify SMBv1 enabled computers with nmap
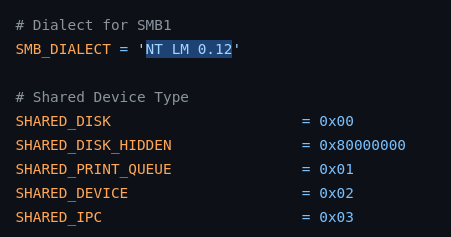
How impacket names SMBv1
If you’re looking to add some flavor to your exploration with SMBv1, take a detour to ‘Turn Windows Features on or off > SMB 1.0/CIFS File Sharing Support.’ This move is like tuning your instruments before a concert, preparing your machines for a rock-and-roll experience. Get ready to make them sing as you dive into the SMBv1 world!
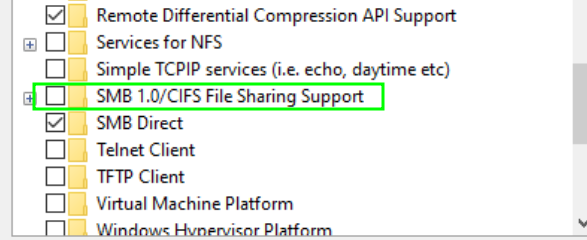
How to enable SMBv1
Windows Machine Interaction: Remote Access Strategies and Tools
Unleashing Psexec Magic on Windows Machines
Let’s delve into a personal favorite: Psexec, the wizard’s wand for remote code execution on Windows machines. This tool weaves its magic by sending your desired commands through Remote Procedure Call (RPC) and orchestrating the exchange of command input and output via SMB pipes. It may sound a bit mysterious, but fear not—I’ll unravel the intricacies of these protocols in future articles.
Before We Begin: To perform Psexec on a machine, here’s the golden rule: you must wield the powers of an administrator. Without these credentials, the gates to remote command execution remain firmly shut.
┌──(rsgbengi㉿kali)-[~]
└─$ impacket-psexec [email protected]
Impacket v0.10.0 - Copyright 2022 SecureAuth Corporation

Password:
[*] Requesting shares on 192.168.253.130.....
[*] Found writable share ADMIN$
[*] Uploading file HHRhnpKK.exe
[*] Opening SVCManager on 192.168.253.130.....
[*] Creating service xAaH on 192.168.253.130.....
[*] Starting service xAaH.....
[!] Press help for extra shell commands
Microsoft Windows [Version 10.0.17763.737]
(c) 2018 Microsoft Corporation. All rights reserved.

C:\Windows\system32>
Empowering Python: Psexec at Your Fingertips
Now, let’s bring the power of Python into the realm of Psexec with the pypsexec module. It’s like having a magical wand to implement remote code execution functionality. Witness the simplicity in action with this example:
In [1]: from pypsexec.client import Client
In [2]: c = Client("192.168.253.131", username="Administrator", password="P@$$w0rd!")
In [3]: c.connect()
In [4]: c.create_service()
In [5]: c.run_executable("cmd.exe", arguments="/c echo Hello World")
Out[6]: (b'Hello World\r\n', b'', 0)
In [7]: c.run_executable("cmd.exe", arguments="/c whoami.exe")
Out[8]: (b'shadow\\administrator\r\n', b'', 0)
Navigating Psexec Woes on Windows 10
In the magical world of Windows 10, Psexec might throw a curveball, manifesting as the dreaded “Access Denied” error. Fear not, for a simple incantation can dispel this enchantment. To conquer this issue, we must create a key and set its value to 1 for “LocalAccountTokenFilterPolicy.”
reg add HKLM\SOFTWARE\Microsoft\Windows\CurrentVersion\Policies\System /v LocalAccountTokenFilterPolicy /t REG_DWORD /d 1 /f
By uttering this command, we unlock the path to seamless Psexec execution on Windows 10 machines. The doors swing open, and you can now traverse the mystical realms without hinderance.

Being able to perform psexec in Windows 10
WinRM: Gateway to Remote Windows Management
Behold WinRM, the beacon of remote command execution in the Windows realm! WinRM, short for Windows Remote Management, is an innate utility ready to serve. By default, it listens on port 5985 via TCP. While it graciously opens its doors on Windows servers, workstations like Windows 10 may keep it hidden, requiring a gentle summons.
To connect to our Domain Controller, envision your Kali machine as a conjurer wielding the evil-winrm tool:
┌──(rsgbengi㉿kali)-[~/tools]
└─$ evil-winrm -i 192.168.253.130 -u administrator -p 'P@$$w0rd!'

Evil-WinRM shell v3.4

Warning: Remote path completions is disabled due to ruby limitation: quoting_detection_proc() function is unimplemented on this machine

Data: For more information, check Evil-WinRM Github: https://github.com/Hackplayers/evil-winrm#Remote-path-completion

Info: Establishing connection to remote endpoint

*Evil-WinRM* PS C:\Users\Administrator\Documents> whoami
shadow\administrator
*Evil-WinRM* PS C:\Users\Administrator\Documents>
In this mystical encounter, we use evil-winrm to establish a connection. The Windows console bows before our commands, echoing the identity of the administrator—truly a moment of triumph.
Empowering WinRM: Enabling the Unseen Forces
Unlocking the potential of WinRM requires a ritual, especially on workstations like Windows 10. Execute the following commands, invoking the PowerShell spirits:
PS C:\Users\Windows\system32> Enable-PSRemoting –force
PS C:\Users\Windows\system32> winrm quickconfig -transport:https
PS C:\Users\Windows\system32> Set-Item wsman:\localhost\client\trustedhosts *
PS C:\Users\Windows\system32> Restart-Service WinRM
As the unseen forces stir, WinRM emerges, ready to heed your commands. To verify this mystical transformation, wield the “Test-WSMan” tool. If it responds with protocol information and the allowed version, the spell has been cast successfully.
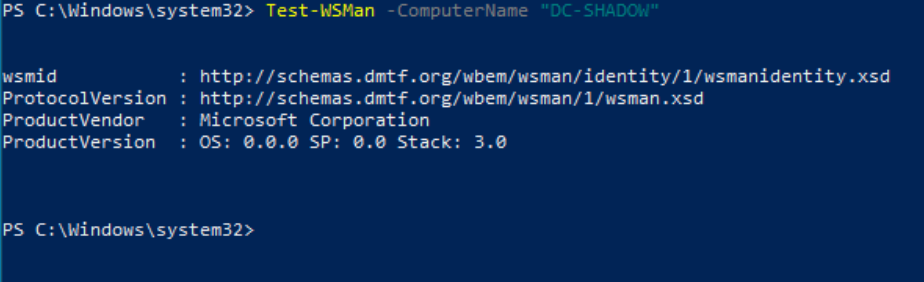
Verify that a machine supports WinRM
WinRS: Bridging Realms from Windows Machines
Enter WinRS, a gateway connecting Windows machines across the digital expanse! If you find yourself amidst the Window’s landscape, yearning to traverse its vast territories, WinRS is your trusty guide.
winrs -r:http://192.168.253.130 -u:<adminuser> -p:'<password>' cmd
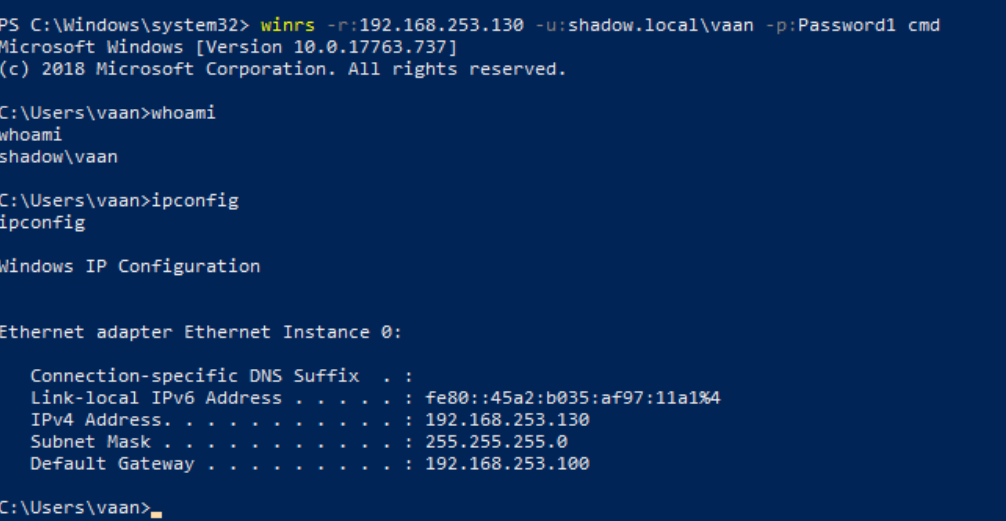
Using winrs to connect to other Windows machines
With this incantation, WinRS beckons from your Windows machine, communicating with the remote realm at 192.168.253.130. The response echoes the esteemed Administrator, a testament to the seamless connection forged.
RDP: Unlocking Windows Realms Remotely
Picture this: a remote gateway into the heart of Windows machines—the Remote Desktop Protocol (RDP). Whether you wield the default mstsc client on a Windows machine or opt for Linux companions like Remmina, the path to Windows domains is at your fingertips.
On Windows:
mstsc /d:domain /u:<username> /p:<password> /v:<IP>
For Linux adventurers embracing the xfreerdp:
xfreerdp /d:domain /u:<username> /p:<password> /v:<IP>
With RDP as your key, the digital gates swing open, revealing the Windows desktop. Navigate the graphical expanse remotely, unlocking the potential for seamless interactions.
Beyond Boundaries: AT and Schtasks
In the realm of Windows command execution, AT and Schtasks emerge as tools of ancient wisdom. While AT, considered obsolete post-Windows 8, can still be summoned for remote command execution:
at \\<REMOTE-MACHINE> HH:MM <PROGRAM>
Its successor, Schtasks, offers equal prowess for commanding both local and remote executions:
schtasks /create /tn <TASK-NAME> /tr <PROGRAM-TO-EXECUTE> /sc once /st 00:00 /S <REMOTE-PC> /RU System

schtasks /run /tn <TASK-NAME> /S <REMOTE-PC>
Engage these tools judiciously, unraveling the ancient threads of command execution across Windows domains.

Sample execution of schtasks
SC: Initiating Services Remotely
In the arsenal of remote manipulation, SC stands tall. With this tool, service initiation becomes a mere whisper:
sc <\\Hostname> create <Name of the service> binpath="cmd.exe /c path"
sc <\\Hostname> start <Name of teh service>
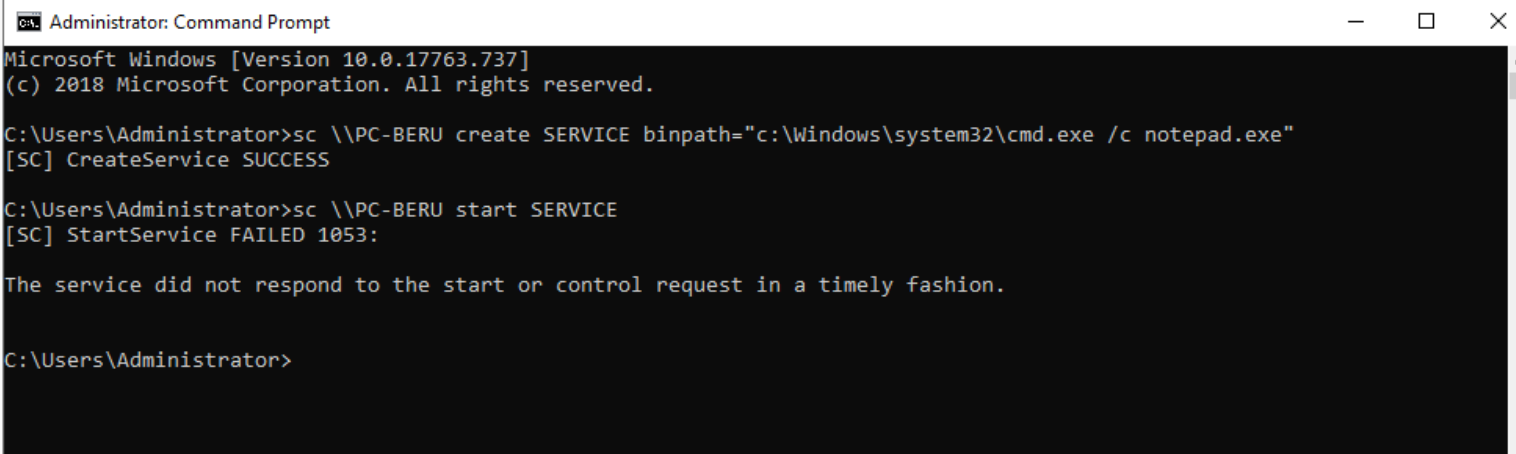
Sample executoin of SC
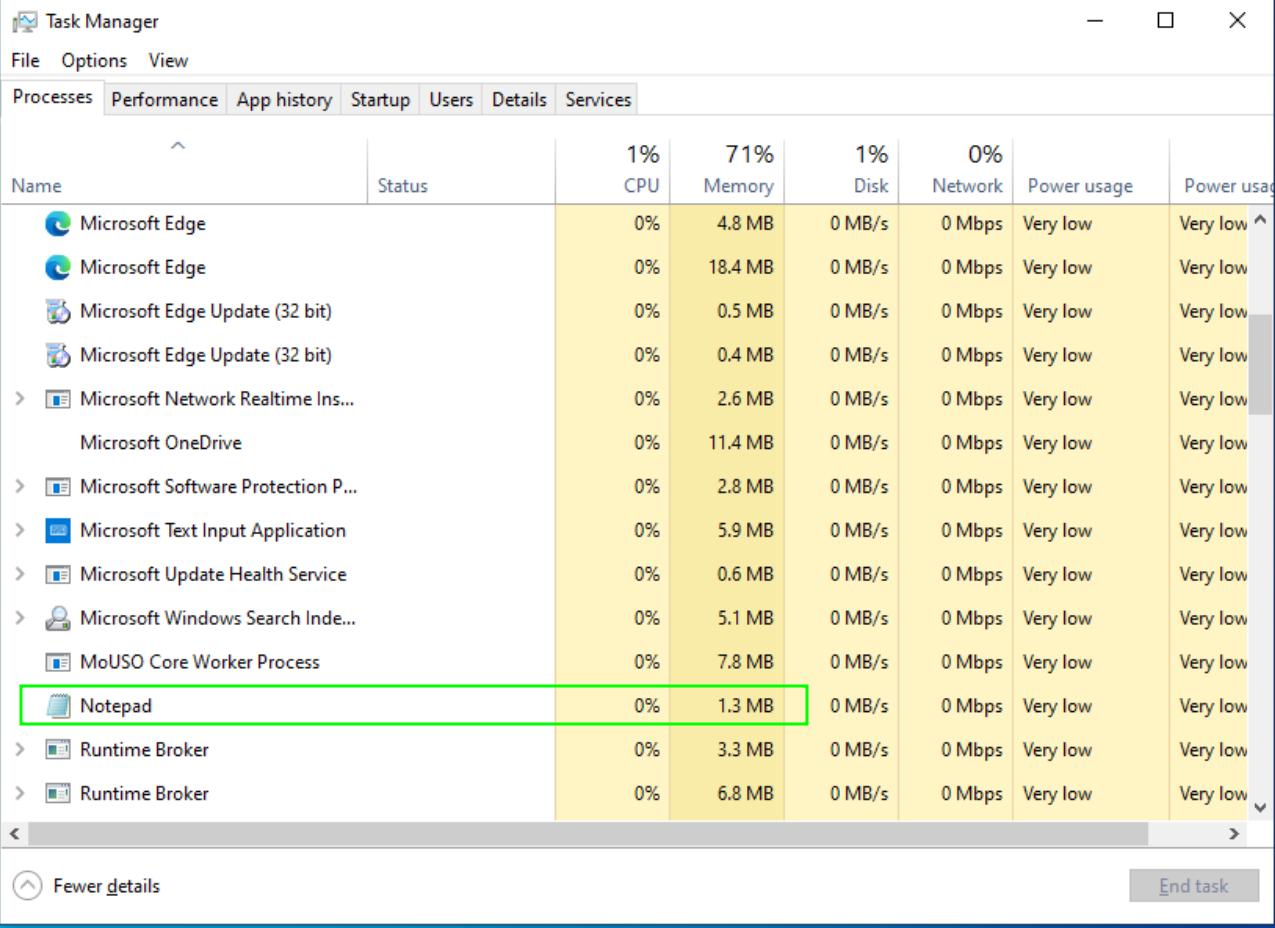
Sample of notepad background execution
Unleash SC strategically, and witness the initiation of services that echo across the Window’s expanse.
Conclusions: Unleashing Remote Power in the Windows Realm
As you conclude this journey, you have unlocked an arsenal of techniques and tools that grant you the power to explore and control Windows machines remotely. Whether through LDAP reconnaissance, SMB protocol mastery, or sophisticated RDP maneuvers, you now possess the knowledge to navigate the intricate landscape of Windows with confidence and expertise. The realm is yours to command.
References
Attacking Active Directory: 0 to 0.9 | zer1t0
WinRM Penetration Testing - Hacking Articles
Chapters

Previous chapter
Next chapter

💬 Comments Available
Drop your thoughts in the comments below! Found a bug or have feedback? Let me know.