Shellcode Mastery: Crafting, Optimizing, and Debugging Assembler Code
15 min read
May 26, 2023

Introduction: The Art and Science of Shellcode Development
Welcome to an enlightening exploration into the world of shellcode development, a critical component in the realm of software exploitation and cybersecurity. This chapter is designed to guide you through the intricate process of creating, optimizing, and troubleshooting shellcode - the powerful strings of bytes that turn code vulnerabilities into opportunities for system control.
In this journey, we will:
- Demystify Shellcode: Start by understanding what shellcode is and its pivotal role in exploiting software vulnerabilities. We’ll delve into how shellcodes function as conduits for executing commands on a target machine, potentially leading to access control or privilege escalation.
- Assemble with Assembler: Dive into the foundational aspects of shellcode creation using assembler programming. Learn how syscalls (system calls) work and how they are integral to shellcode functionality, setting the stage for your first hands-on experience in crafting a basic “Hello World” shellcode.
- Focus on Efficiency: Discover the importance of optimizing shellcode size. Learn why every byte matters and explore techniques to streamline your code, ensuring it fits within the constraints of the target program’s buffer space.
- Overcome Null Character Challenges: Address a common hurdle in shellcode development - avoiding null characters that can prematurely terminate the shellcode execution. We’ll discuss strategies to craft shellcode that is robust and uninterrupted.
- Utilize Diagnostic Tools: Equip yourself with powerful debugging tools like
radare2andstrace. These tools are invaluable in dissecting and understanding the behavior of your shellcode, helping you identify and resolve issues effectively.
By the end of this chapter, you will gain not just the technical know-how but also the analytical skills essential for proficient shellcode development. Whether you’re a budding security enthusiast or an experienced penetration tester, this guide aims to enhance your understanding and capabilities in the fascinating world of shellcode. Let’s embark on this journey of discovery and skill-building in the art of shellcode development.
Understanding Shellcodes
At its core, a shellcode is a sequence of bytes injected into a program’s memory due to a vulnerability. Its primary goal? To execute operating system commands, potentially granting the attacker access to or elevated privileges on the target machine. Shellcodes open a doorway to numerous possibilities, from simple command execution to complete system takeover.
While there are various methods to program a shellcode, we’ll focus on the classical approach: using assembler. Though initially challenging, this method provides a solid foundation for understanding the underlying mechanics of shellcodes. In upcoming chapters, we’ll explore different techniques for creating shellcodes and integrating them into exploits.
Syscalls: Direct Communication with the Operating System:
Typically, a C program utilizes functions like ‘write’ or ‘printf’ from the libc library, which facilitates OS-level operations such as writing, reading, and executing programs. However, shellcodes don’t have this luxury since they’re not loaded into memory by the OS but passed as vulnerable parameters to programs. Thus, managing system calls (syscalls) falls upon us.
In the context of x86 architecture, which we’ll be focusing on, syscalls are made using the “int 0x80” instruction. While this may seem complex at first, practical examples in the following sections will clarify its usage and application.
Decoding Syscalls for Assembler Mastery
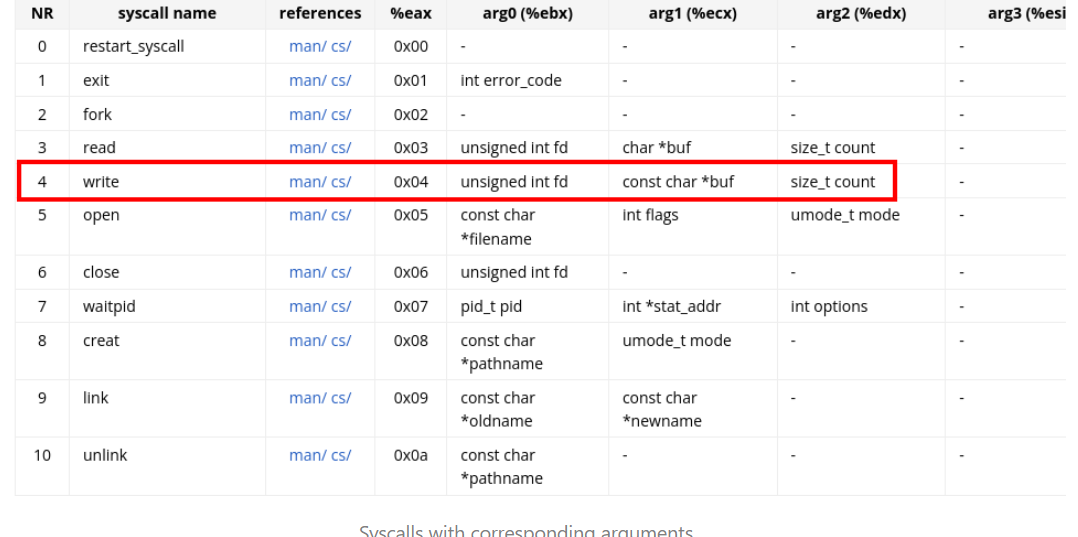
As you embark on assembler programming, having a syscall cheat sheet is invaluable. One such resource is the comprehensive list of x86 syscalls, which can be found here. For our “Hello World” program, the ‘write’ syscall is our focus.
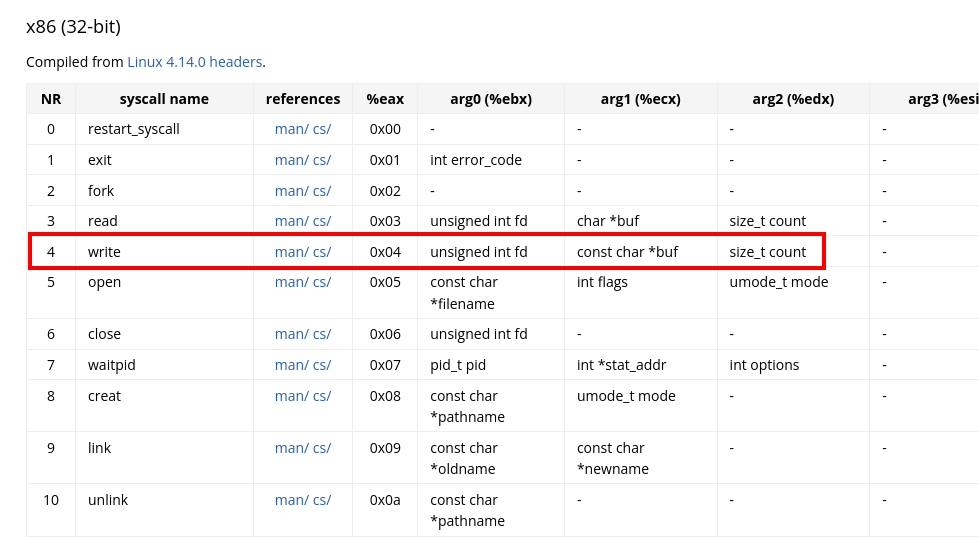
Syscalls with corresponding arguments
Here’s a quick breakdown of how syscalls work with registers in assembler:
eax-> Syscall number (0x04 for ‘write’)ebx-> First argument (File descriptor)ecx-> Second argument (String to print)edx-> Third argument (Number of characters)
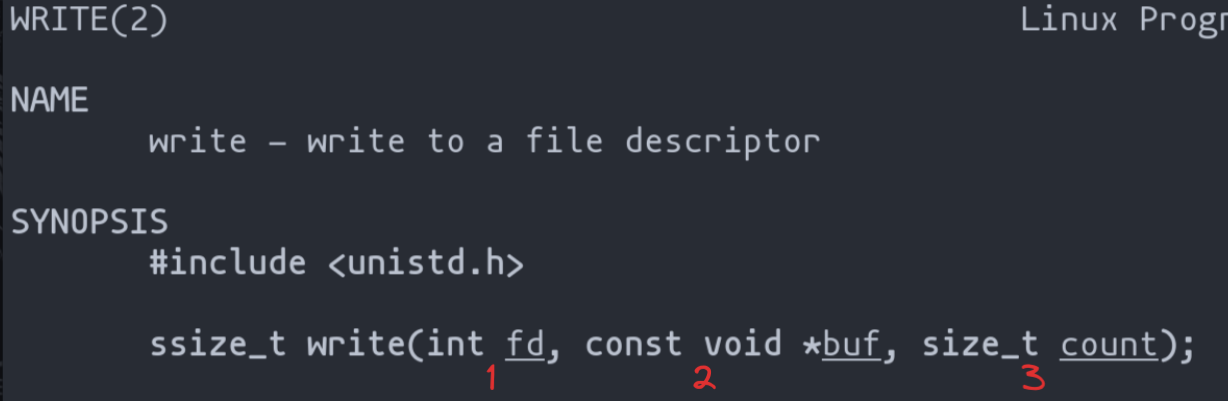
Understanding this structure is crucial, as each syscall requires specific register values. You can get more details on these arguments by running man 2 write in the terminal.
If you do not want to use the webpage, you can always see the different existing calls in the following file: “/usr/include/asm/unistd_32.h”.
#ifndef _ASM_UNISTD_32_H
#define _ASM_UNISTD_32_H

#define __NR_restart_syscall 0
#define __NR_exit 1
#define __NR_fork 2
#define __NR_read 3
#define __NR_write 4
Continuing Our Assembler Journey: Crafting “Hello World”
Following our exploration of syscalls and their roles in assembler programming, let’s apply these concepts by programming a classic “Hello World” message. This exercise is not merely an introduction to programming; it serves as a foundational step towards mastering assembler and understanding how syscalls interact with system architecture.
Laying the Foundation in the Data Segment
n the .data segment of our assembly code, we define a string named “message.” This string is terminated with a zero character, denoting the end of the message, and it’s here that we begin to put our syscall knowledge into practice.
section .data                  ; DATA segment
message db "Hello world", 0x0a
By initializing our “Hello world” message and appending a newline character (0x0a), we set up the text to be displayed correctly.
Setting Up the Execution in the Text Segment:
Transitioning to the .text segment, we establish _start as our program’s entry point. Here, the execution of our syscall sequence begins.
section .text                  ; TEXT segment
  global _start                ; ELF entry point
  _start:
    ; syscall write(1, message, 11)
    mov eax, 4                 ; 4 = write, syscall number
    mov ebx, 1                 ; 1 = stdout, file descriptor
    mov ecx, message           ; message in ecx
    mov edx, 11                ; message length (Hello world\n)
    int 0x80                   ; system call interrupt
This setup involves configuring the necessary registers for the write syscall, preparing our program to display the message.
Assembling and Linking the Code
To transform our code into an executable format, we use the nasm assembler and ld linker:
nasm -f elf HellowWorld.asm
ld -m elf_i386 -o helloworld HellowWorld.o
./helloworld

Sample exception after running the executable
Properly Exiting with the Exit Syscall:
To ensure a clean exit from our program, we implement the exit syscall, zeroing out the registers to set the stage for a graceful termination:
xor    ebx,ebx              ; ebx = 0, status code
xor    eax,eax
mov    al,0x1               ; 1 = exit, syscall
int    0x80
Applying this xor technique to zero the registers is a common practice in shellcode creation, making it an essential skill in low-level programming.
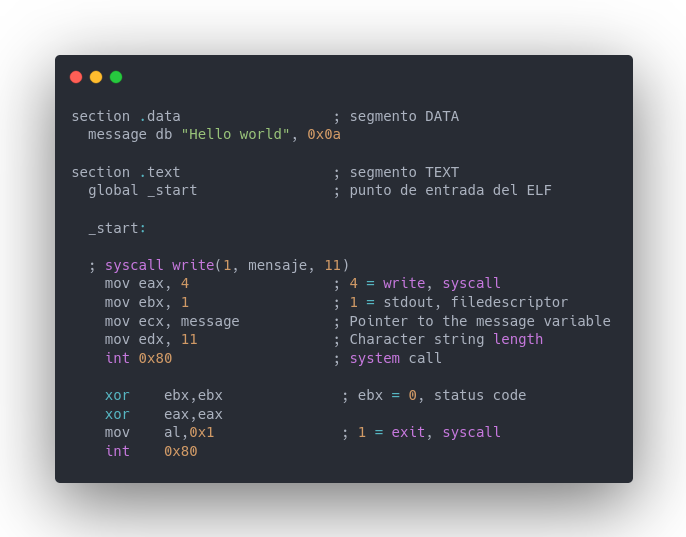
Sample assembler code
If we run the program, it should no longer show any segmentation fault errors.
Program code
section .data                  ; segmento DATA
  message db "Hello world", 0x0a

section .text                  ; segmento TEXT
  global _start                ; punto de entrada del ELF

  _start:

  ; syscall write(1, mensaje, 11)
    mov eax, 4                 ; 4 = write, nro syscall
    mov ebx, 1                 ; 1 = stdout, filedescriptor
    mov ecx, message           ; mensaje en ecx
    mov edx, 11                ; longitud del mensaje (Hola mundo\n)
    int 0x80                   ; interrupcion de llamado al sistema

    xor    ebx,ebx              ; ebx = 0, status code
    xor    eax,eax
    mov    al,0x1               ; 1 = exit, nro syscall
    int    0x80
Transforming Assembler Code into Shellcode: A Practical Guide
Transitioning from a basic assembler program to creating shellcode involves several critical modifications. Let’s adapt our “Hello World” assembler code into a functional shellcode, focusing on the constraints and techniques unique to shellcode programming.
Navigating the Absence of the .data Section:
In shellcode, the luxury of a .data section for defining variables is not available. This limitation requires us to find alternative methods to store and reference our desired string. A practical solution is to utilize the stack.
- Storing Strings on the Stack:
- We store the characters of our string in hexadecimal format directly onto the stack.
- It’s crucial to use the little endian format to ensure the string is read correctly and not in reverse order.
- Handling Odd-Length Strings:
- In cases where the string length is odd, an extra byte is needed to align the stack.
- We use a “NOP” instruction (
0x90) for this purpose, which effectively does nothing but helps in maintaining proper alignment.
- Setting up the Stack Pointer:
- The stack pointer (
esp) is utilized to reference the top of the stack, where our string begins.
- The stack pointer (
Graphical Overview of the Technique
The diagram illustrates how we organize our string in the stack, emphasizing the little endian format.

Diagram of stack usage for storing characters
Implementing the Write Syscall in Shellcode
To execute the write syscall within our shellcode, we employ the following steps:
- Preparing the Syscall:
- Push the syscall number (
4forwrite) and the file descriptor (1for stdout) onto the stack. - Pop these values into the
eaxandebxregisters respectively, setting them up for the syscall.
- Push the syscall number (
- Setting Up the Message and Length:
- Move the stack pointer (
esp) intoecx, pointing it to our message. - Push and pop the message length into
edx.
- Move the stack pointer (
- Executing the Syscall:
- Trigger the syscall with
int 0x80.
- Trigger the syscall with
Here’s the complete shellcode for the “Hello World” program, incorporating the discussed techniques:
/* Hello World */
push 0x90646c72
push 0x6f77206f
push 0x6c6c6568
/* Write syscall */
push 4
pop eax
push 1
pop ebx
mov ecx, esp
push 0xb
pop edx
int 0x80
Crafting Shellcode: Avoiding Null Characters
In shellcoding, a crucial consideration is the avoidance of null characters (\0x00). These characters can prematurely terminate the shellcode, particularly when passed as strings to functions like scanf, where \0 signifies the end of the string. Let’s explore how to craft shellcode while circumventing this pitfall.
The Challenge with Direct Register Loading:
One might wonder why not directly load values into registers using instructions like mov. The issue here is that such instructions can generate machine code containing null characters. These nulls arise because if the data being moved is smaller than the register size, the remaining space is filled with zeros.
Demonstrating the Difference with Pwntools:
Using the asm function from the pwntools library, we can compare the outputs of two shellcodes: one using mov and the other using stack operations.
#!/usr/bin/env python3
shellcode = """
    push 0x90646c72
    push 0x6f77206f
    push 0x6c6c6568
    mov eax, 0x4
    mov ebx, 1
    mov ecx, esp
    mov edx, 0xb
    int 0x80
"""
shellcode_stack = """
    push 0x90646c72
    push 0x6f77206f
    push 0x6c6c6568
    push 4
    pop eax
    push 1
    pop ebx
    mov ecx, esp
    push 0xb
    pop edx
    int 0x80
"""

print(asm(shellcode))
print(asm(shellcode_stack))

Machine code of the shellcode
The first string shows the output from the shellcode using mov, revealing several null characters. The second string, which uses stack operations, is free from such nulls.
Addressing the Null Character Issue
To avoid null characters, we can focus on moving the value to a specific part of the register. However, this approach can lead to unknown values in the rest of the register. A common solution is to use the xor instruction to zero out the entire register first
xor eax, eax ; Zero out eax
This instruction doesn’t contain \0x00 and can be safely used.
Streamlining Shellcode: Emphasizing Compactness
Following our focus on null character avoidance in shellcode, the next critical aspect to consider is minimizing the shellcode’s size. Ensuring our shellcode is compact enough to fit within the program’s buffer is essential. Oversizing could trigger a “Segmentation Fault,” halting the execution. This section delves into optimizing shellcode size, ensuring it snugly fits within the allocated space without compromising functionality.
Balancing Efficiency with Size
When it comes to shellcode, every byte counts. Let’s take the example of setting the value 1 in the eax register:
- Direct Assignment Approach:
- A straightforward method like
mov eax, 1is simple but may not be the most size-efficient.
- A straightforward method like
- Incremental Instruction Alternative:
- Using
inc eaxis a more subtle approach. It incrementseaxby1and typically results in smaller machine code.
- Using
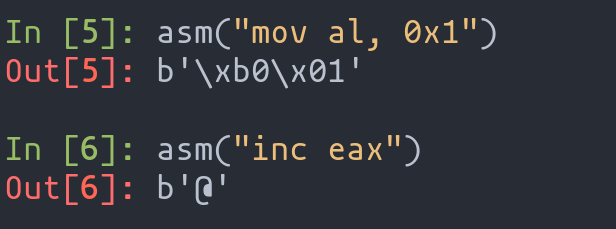
Alternatives for entering 0x1 in eax
In the comparison, inc eax is likely to result in a smaller machine code footprint than mov eax, 1. This difference can be crucial when working with limited buffer sizes.
Strategies for Reducing Shellcode Size:
To achieve the desired compactness in shellcode, consider the following strategies:
- Opt for Shorter Instructions: Seek out instructions that accomplish the same task but with a reduced footprint.
- Utilize Register Defaults: Make the most of the existing states of registers to minimize the need for explicit value assignments.
- Efficient Data Handling: Arrange data in a manner that reduces the need for extensive immediate values.
Navigating Shellcode Development: Troubleshooting with Tools
As we continue our journey in shellcode programming, it’s essential to acknowledge that encountering errors is part of the process. Understanding and resolving these errors is key to successful shellcode development. To aid in this, there are invaluable tools that provide insight into what’s happening under the hood of your code.
Leveraging radare2 for Dynamic Analysis:
One such tool is radare2, which we’ve previously explored for dynamic code analysis. It’s particularly useful in shellcode development for inspecting real-time execution and monitoring register values. This feature is vital in understanding how your shellcode behaves at each step and identifying where things might be going awry.
Consider the example of our “Hello World” shellcode. Using radare2, we can step through each instruction and observe the changes in register values, ensuring that our code executes as intended.
The image above demonstrates radare2 displaying the execution of the initial instructions of the “Hello World” shellcode, with visible updates in register values.
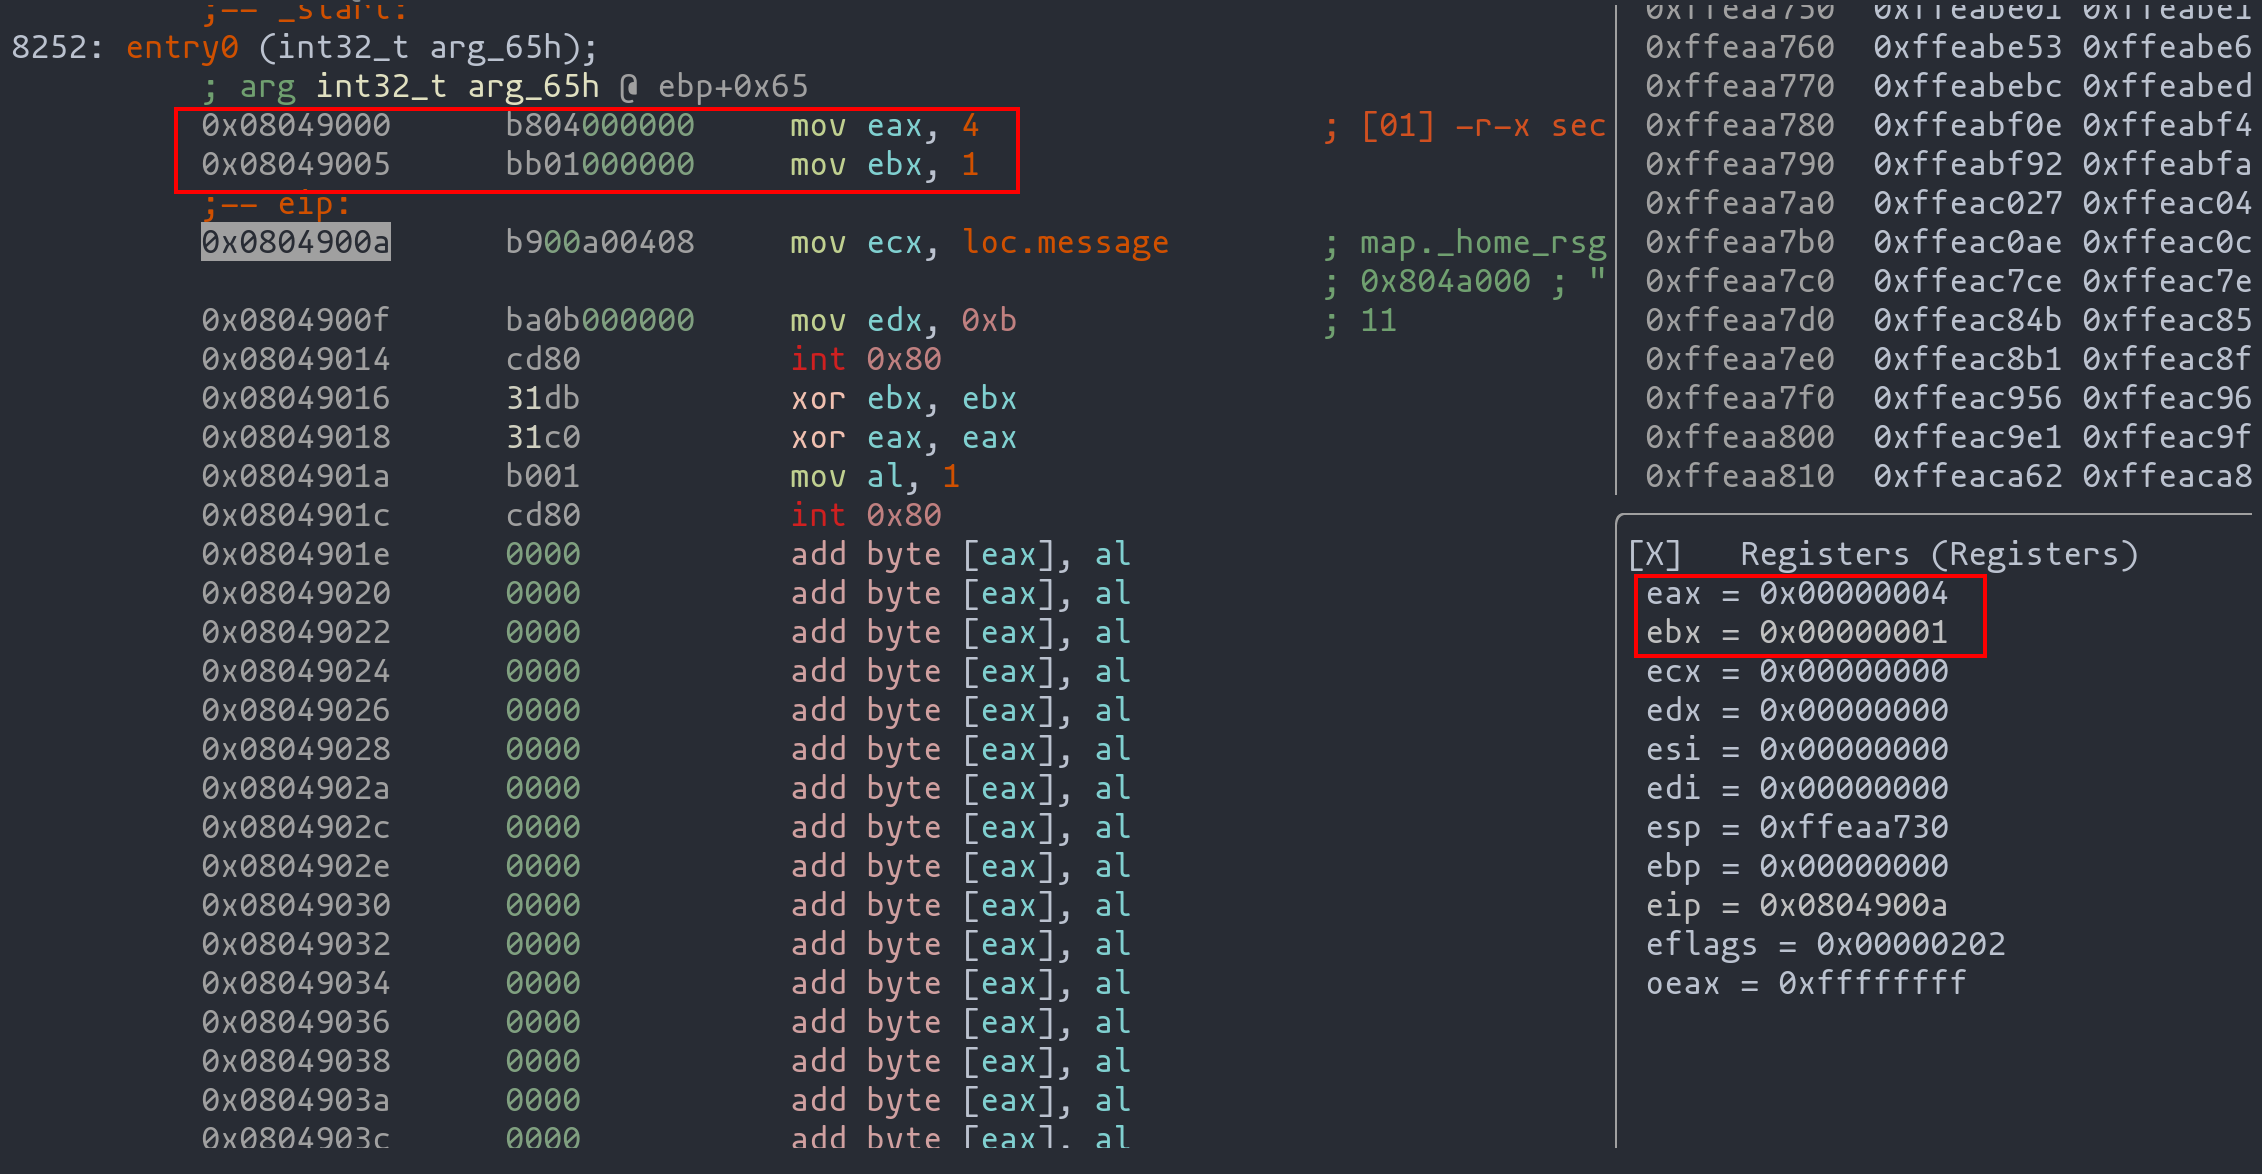
Dynamic analysis of our code with radare2
Utilizing strace for System Call Inspection:
Another powerful tool in our arsenal is strace. This utility allows us to monitor the system calls made by our shellcode. By using strace, we can verify whether these calls are executed correctly, a crucial step in debugging shellcode.
In the following image, we see strace in action, detailing the system calls made by the shellcode:
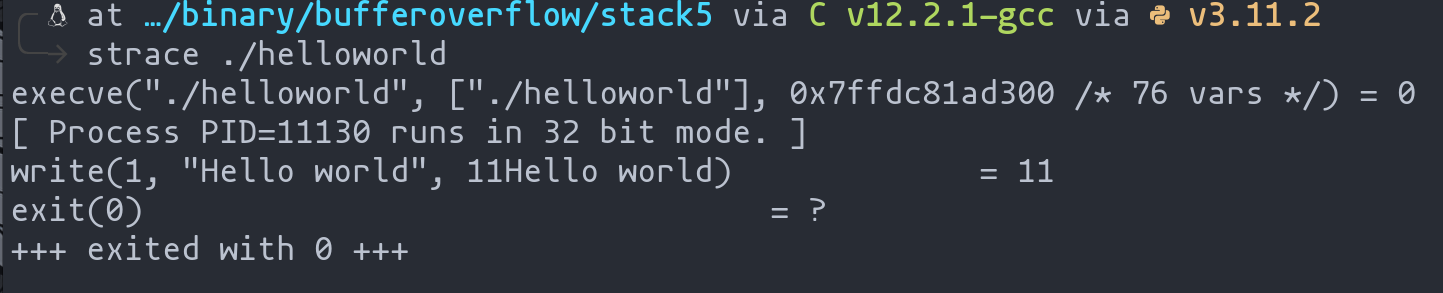
Study of syscalls with strace
Armed with radare2 and strace, most errors encountered during shellcode development can be effectively diagnosed and resolved. In the next chapter of this series, we’ll delve into another tool that aids in examining shellcode during runtime. As we progress, it’s clear that a combination of carefully crafted code and adept use of these analytical tools is essential in mastering the art of shellcode development.
Conclusion: Mastering Shellcode Development – Tools and Techniques
As we conclude this chapter on shellcode development, it’s evident that crafting effective shellcode is a blend of meticulous programming and strategic troubleshooting. The journey through assembler programming, optimizing for size, avoiding null characters, and ensuring seamless execution underscores the nuanced nature of shellcode development.
Key takeaways from this exploration include:
- Understanding Syscalls and Assembler: Delving into syscalls and their implementation in assembler lays the foundation for shellcode programming. Crafting a simple “Hello World” program is an essential step in grasping these core concepts.
- Optimizing for Compactness: Size optimization is crucial in shellcode design. Techniques like choosing shorter instructions and efficient register usage are vital to ensure the shellcode fits within the target program’s buffer.
- Navigating Null Character Pitfalls: Avoiding null characters in shellcode is imperative to prevent premature termination. Techniques such as stack manipulation and careful register handling are key to circumventing this issue.
- Leveraging Diagnostic Tools: Tools like
radare2andstraceare invaluable for debugging and understanding shellcode behavior. They offer insights into execution flow and system call processes, aiding in the identification and resolution of errors.
As we advance in shellcode development, it becomes clear that the process is as much about problem-solving and analysis as it is about coding. The integration of these skills not only enhances the efficacy of the shellcode but also elevates the expertise of the developer. Looking ahead, we will explore additional tools and methods to further refine our shellcode, continuing our journey in the dynamic and challenging world of exploitation and security research.
Tips of the article
Could you tell me in brief what is a shellcode ? What is its main use?
A shellcode is nothing more than a string of bytes that will be attempted to be injected into the memory of a program as a result of the existence of a vulnerability. The usual purpose of a shellcode is to execute commands of the underlying operating system. If successful, it can cause the attacker to gain access to the machine on which the vulnerable program is running or escalate privileges on it, among many other options.
What do we have to keep in mind about system calls and shellcodes ?
We have to think that the system calls will have to be made and programmed by us using assembler and not by the operating system to perform tasks such as writing, reading or deleting files.
What is the main feature that we will have to take into account when making use of system calls?
That each system call is identified by an integer and must be entered in the “eax” register in order to use it.
What three characteristics do we have to take into account when programming a shellcode?
- A shellcode does not have a .data section, so we will have to avoid defining variables. As a consequence, we can use the stack to enter values in registers and execute system calls.
- We will have to not enter “Null characters” to prevent our shellcode from not being executedWe will have to not enter “Null characters” to prevent our shellcode from not being executed
- It has to be adapted to the space available.
References
Shellcode & syscalls · Guía de exploits
GitHub - Gallopsled/pwntools: CTF framework and exploit development library
Chapters

Previous chapter
Next chapter

💬 Comments Available
Drop your thoughts in the comments below! Found a bug or have feedback? Let me know.