Building an Adaptable Hacking Lab: Subnets, Static IPs, and Services
16 min read
September 22, 2023


Introduction: Crafting a Versatile Cybersecurity Lab in Proxmox
Welcome back to our series on building a dynamic hacking lab with Proxmox! After a brief hiatus, we’re diving deeper into the nuances of lab setup to enhance your cybersecurity practice. This chapter is all about expanding your lab’s capabilities, focusing on advanced network configurations and service deployment techniques.
We’ll explore the intricacies of subnet creation and management within Proxmox, ensuring your lab’s network is both structured and versatile. This includes assigning static IPs to machines and understanding the significance of subnets in controlled network environments.
Furthermore, we delve into the world of traffic redirection and Internet access management for subnets, using tools like iptables for effective network routing. This is crucial for simulating real-world network scenarios and for practicing various network-based attacks and defenses.
Our journey also takes us through the practical application of Proxmox firewalls. Here, you’ll learn to simulate internal network conditions, a skill essential for internal penetration testing and pivoting exercises.
Additionally, we’ll set up an Ubuntu server with essential services like SSH and web applications using Docker. This not only adds another layer to your lab but also provides a sandbox for practicing web hacking techniques, a critical skill in the arsenal of any cybersecurity enthusiast.
By the end of this chapter, you’ll have a comprehensive lab environment. It’s not just a playground for Active Directory hacking but a versatile space for practicing a wide array of cybersecurity skills, from network pivoting to web application penetration testing. Let’s get started and expand the horizons of your cybersecurity lab!
Envisioning Our Lab: A Networked Realm for Diverse Cybersecurity Practices
Hacking Lab
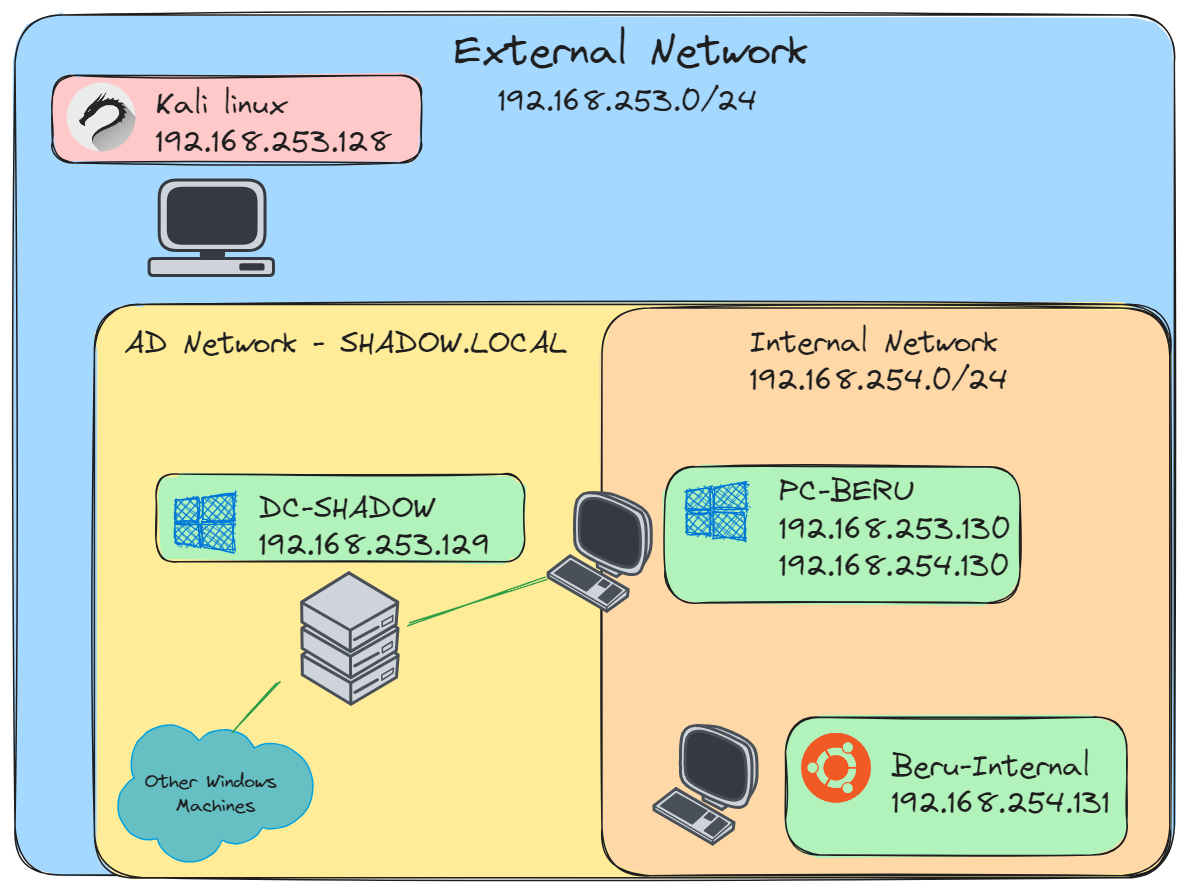
As we embark on the setup of our Proxmox-based cybersecurity lab, let’s conceptualize the network layout and its intended functionalities. Our lab will feature two primary network segments, each serving distinct purposes and hosting different sets of machines.
- The External Network: This segment forms the backbone of our lab. Here, we will host our Kali Linux machine, an essential tool for penetration testing and cybersecurity analysis. Alongside Kali, this network will house the majority of our Active Directory machines. This external setup mirrors a typical organizational network, providing a realistic environment for a broad range of cybersecurity exercises, from network scanning to Active Directory exploitation.
- The Internal Network: This is where our lab’s complexity and versatility truly shine. Within this segment, we will have a dedicated Active Directory machine, “PC-Beru” in our case, which enjoys exclusive access to this internal realm. This segregation makes “PC-Beru” a critical pivot point for practicing advanced techniques like network pivoting and lateral movement.
- The Beru-Internal Machine: As a specialized component of our internal network, the “Beru-Internal” machine is designated for hosting various web services. This setup allows us to delve into web application hacking techniques, providing a safe and controlled environment to test vulnerabilities and defensive strategies in web-based applications.
With this tripartite network structure, our lab evolves into a comprehensive training ground, catering to a wide spectrum of cybersecurity practices. From the basics of network penetration testing with Kali Linux to the complexities of internal network exploitation and web application security, our lab is poised to offer a rich learning experience. Let’s dive in and bring this cyber training arena to life!
Setting Up Subnets in Proxmox: A Practical Guide
Embarking on our network customization journey in Proxmox, we’re going to establish subnets that are both functional and pivotal for our lab setup. Let’s start by creating these subnets: we navigate to “pve -> Network” and select the option to create a new “Linux Bridge” network. Here, we’ll define our subnet details.
Selection of “Network Device”
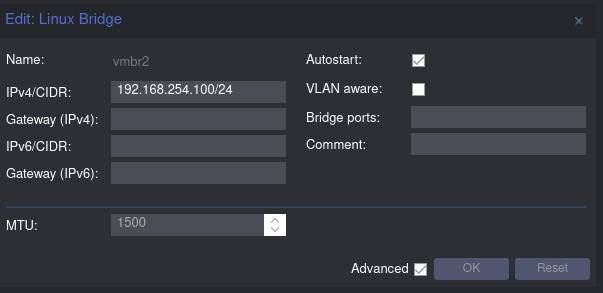
Set up subnet
For instance, I’ve set up a subnet as “192.168.254.100/24,” designating “192.168.254.100” as the gateway. Next, we’ll replicate this process for the internal network, creating the “192.168.253.100/24” subnet. After configuring these subnets, don’t forget to click “Apply Configuration” to save the changes.
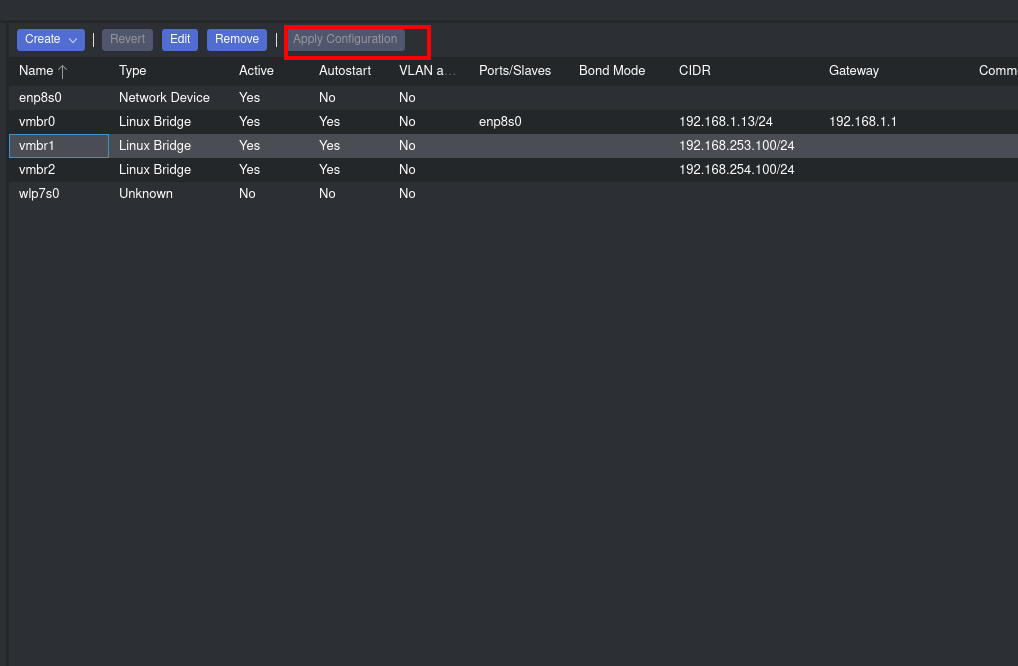
Apply Configuration
Now, while our subnets exist, they lack internet connectivity. To remedy this, we need to input some crucial code into our server’s /etc/network/interfaces file. This code, accessible through the pve shell, includes commands for IP forwarding and iptables rules for NAT (Network Address Translation). These iptables commands are critical for masquerading, which lets guests with private IP addresses access the network using the host’s IP address for outgoing traffic.
Here’s a snapshot of the code you’ll need:
 post-up echo 1 > /proc/sys/net/ipv4/ip_forward
 post-up iptables -t nat -A POSTROUTING -s '192.168.253.0/24' -o vmbr0 -j MASQUERADE
 post-down iptables -t nat -D POSTROUTING -s '192.168.253.0/24' -o vmbr0 -j MASQUERADE
 post-up iptables -t nat -A POSTROUTING -s '192.168.254.0/24' -o vmbr0 -j MASQUERADE
 post-down iptables -t nat -D POSTROUTING -s '192.168.254.0/24' -o vmbr0 -j MASQUERADE

Proxmox network configuration
In essence, these commands enable our subnets to route traffic via the vmbr0 interface, which possesses internet access. Once you’ve added these settings, you can restart the server or execute ifreload -a to apply these changes. This step ensures that our newly established subnets have access to the internet, bringing us a step closer to a fully functional lab environment.
Configuring the Domain Controller in Proxmox for a New Subnet
Transitioning the domain controller to fit into our newly created subnet in Proxmox involves a few precise steps. Here’s a straightforward guide to get your domain controller rightly configured:
Navigate to Network Settings: Start by accessing the “hardware” tab of your domain controller in Proxmox. Here, you’ll find the network device settings of the machine.

Change network interface to use
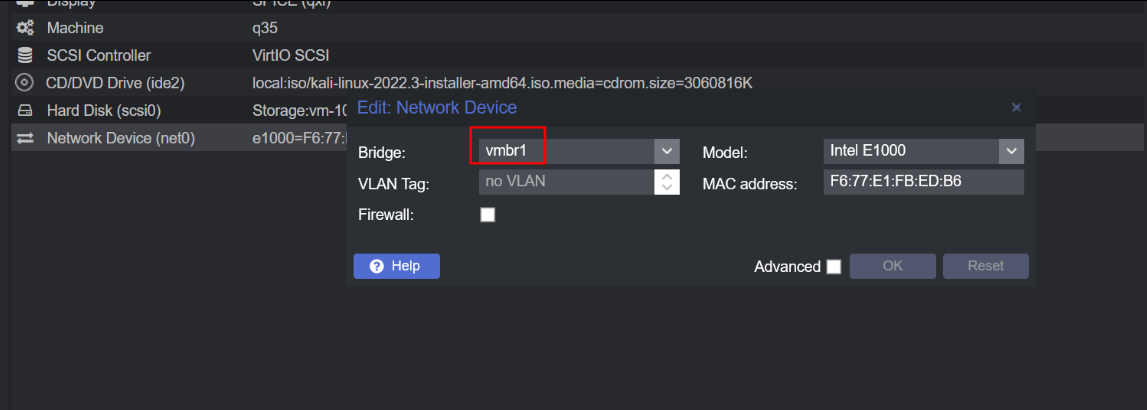
Switch Network Bridge: Change the network bridge from vmbr0 to vmbr1. This action relocates your domain controller to the new subnet we’ve set up earlier.
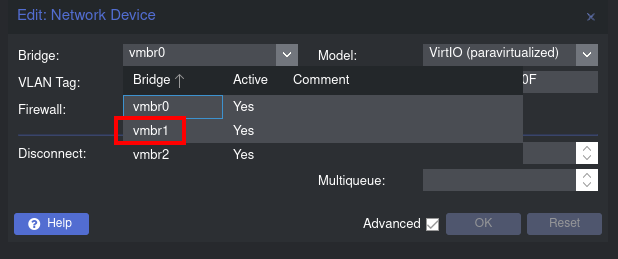
Change network interface to use the new subnetwork
Assign a Static IP: Now, it’s time to ensure your domain controller has a fixed IP within the new subnet. To do this, go to the “Network and Sharing Center” on your domain controller. Look for “Ethernet instance 0” and access its properties.
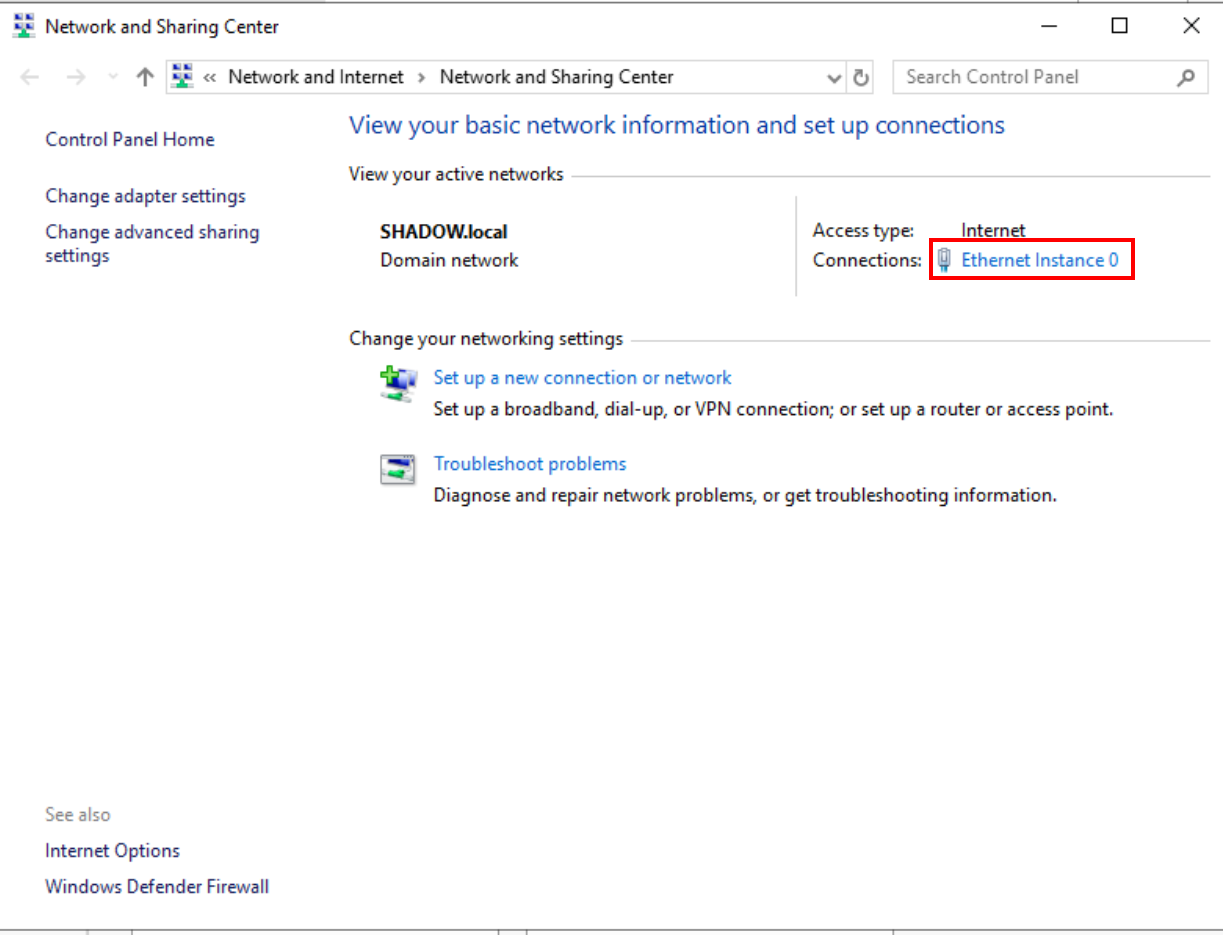
Selection of “Ethernet Instance 0”
Set the IP Address: In the “Internet Protocol Version 4” settings, assign the desired static IP address. This step is crucial as it defines the domain controller’s position within the subnet’s IP range.
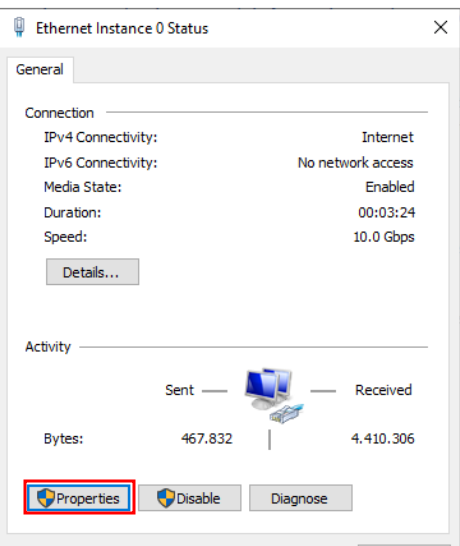
Properties
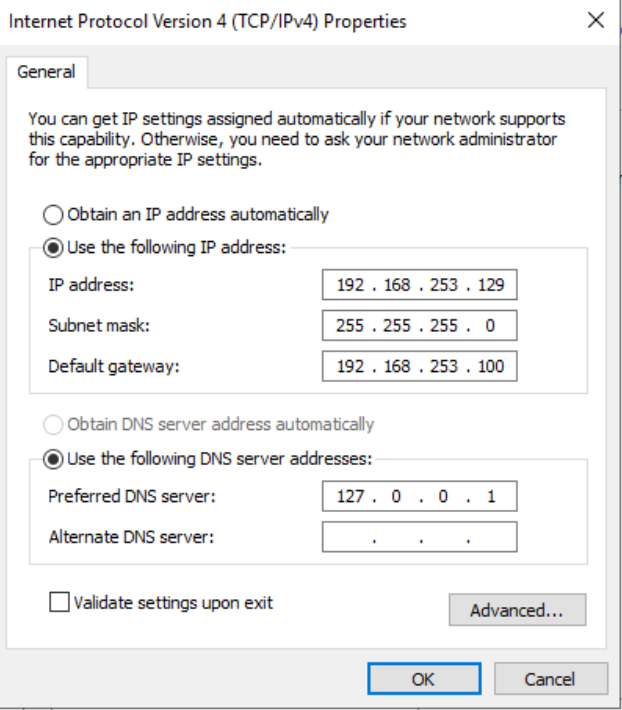
Configure the domain controller’s static IP address
Verify Internet Connectivity: After configuring the static IP, ensure that the domain controller has Internet access. If the subnets are correctly configured, your domain controller should seamlessly connect to the Internet.
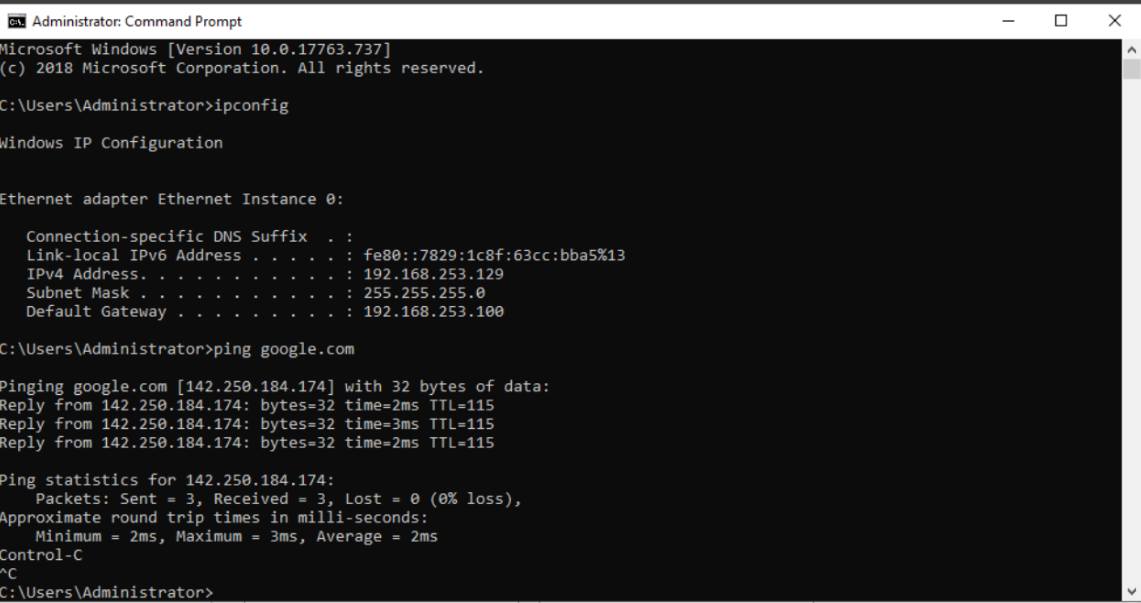
We see that we have internet connection
Configuring Windows Machines for Dual Subnet Access in Proxmox
Setting up Windows machines in Proxmox to access both internal (vmbr2) and external (vmbr1) networks is a multi-step process that involves network device configuration and IP settings. Here’s how to do it:
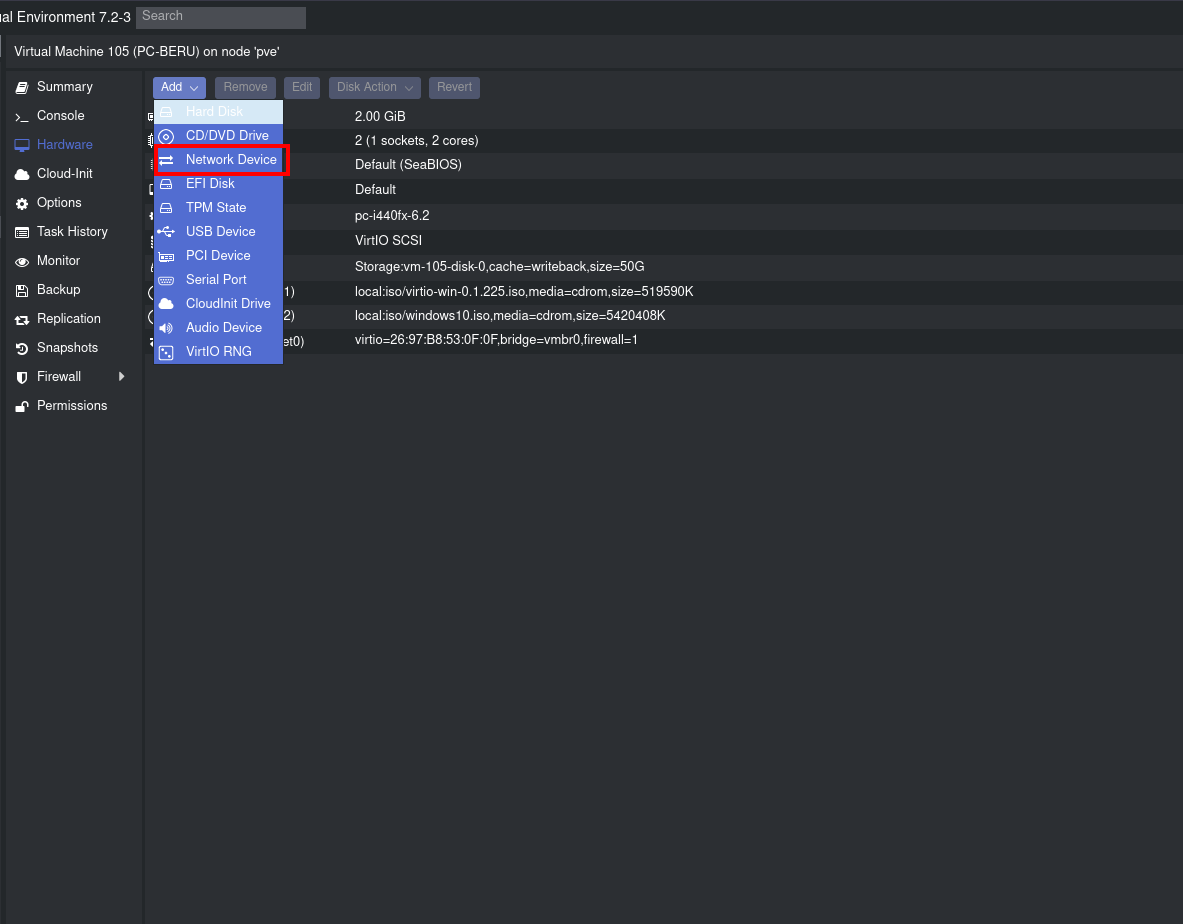
Network Device Addition: In Proxmox, select your Windows machine and navigate to the Network settings. Use the “Add” button to introduce a new network device, enabling access to the second subnet.
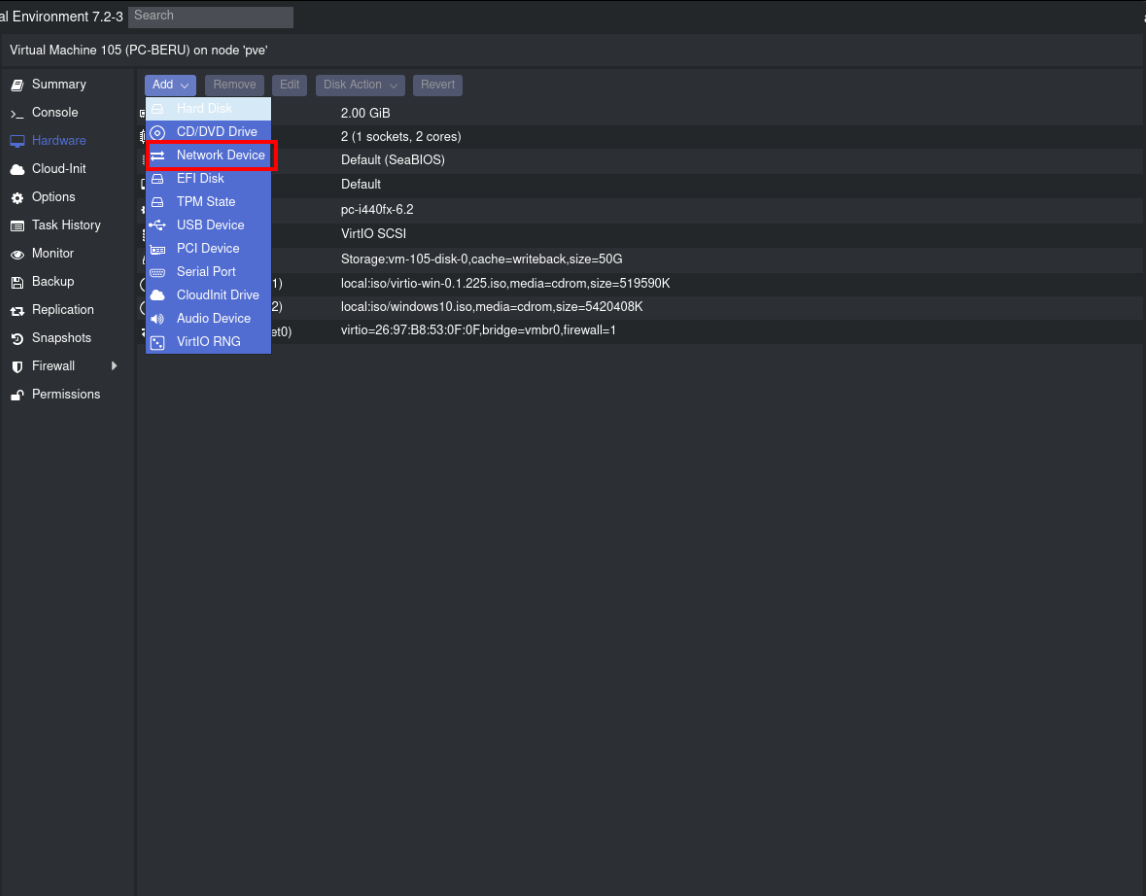
Add a new network device
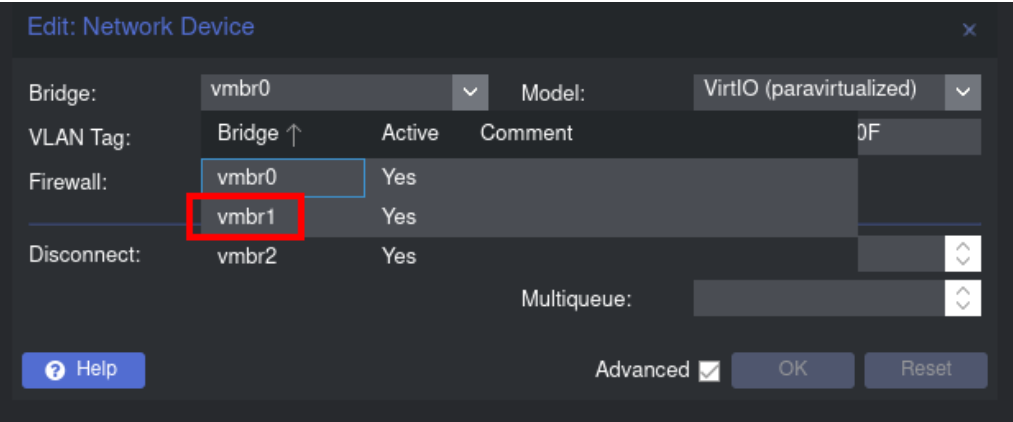
Assigning to Subnets: Configure the newly added network device for the internal network (vmbr2). This setup ensures the Windows machine can access both the internal and external networks, making it pivotal for network pivoting exercises.
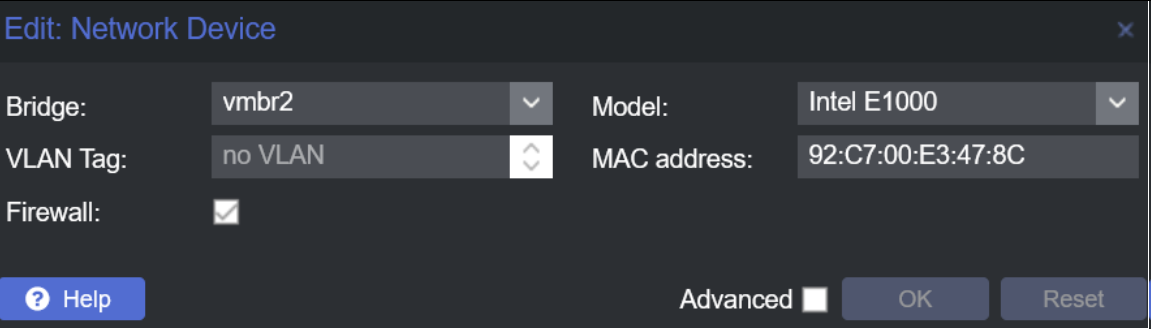
Select vmbr2 for the second interface
First Network Device Configuration: The first network device should be set to the external network (vmbr1). This arrangement allows the machine to communicate with other devices on the external network.
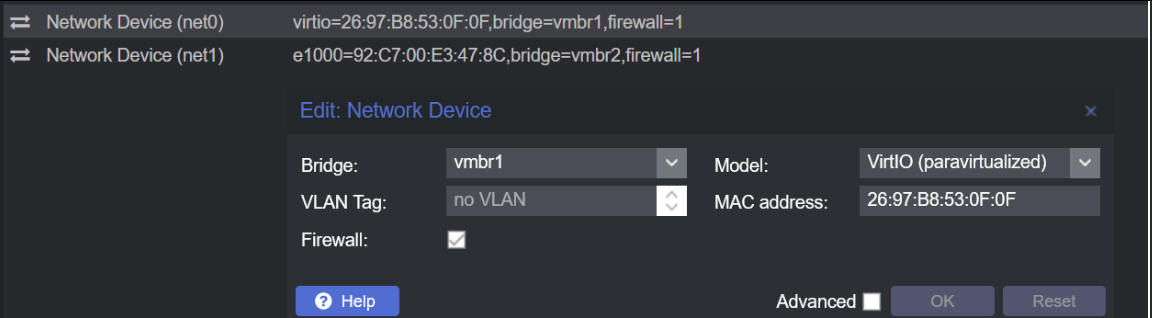
Select vmbr1 from the first interface
DNS Configuration: On the first Ethernet setting in Windows, ensure the DNS is set to the IP of your domain controller. This step is crucial for the machine to recognize and interact with the domain established in your lab.
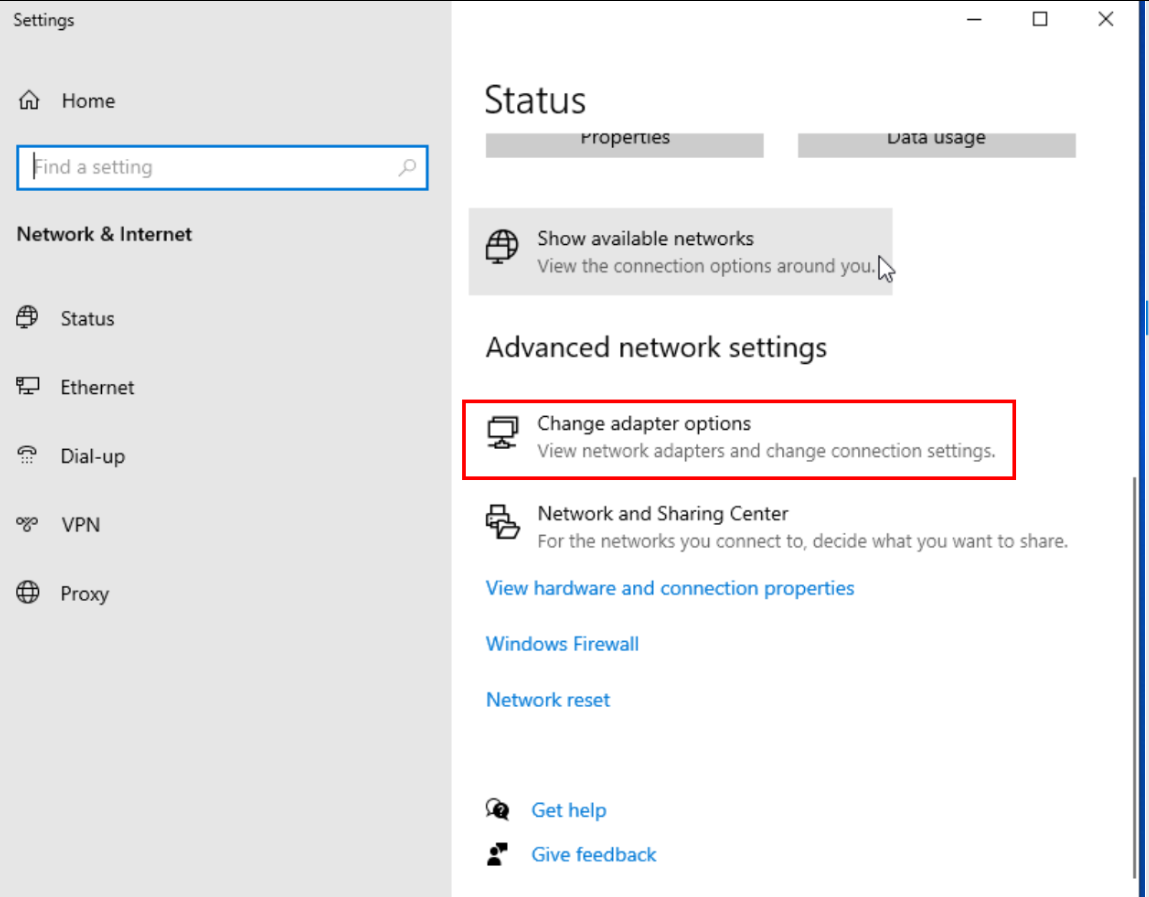
Change adapter options
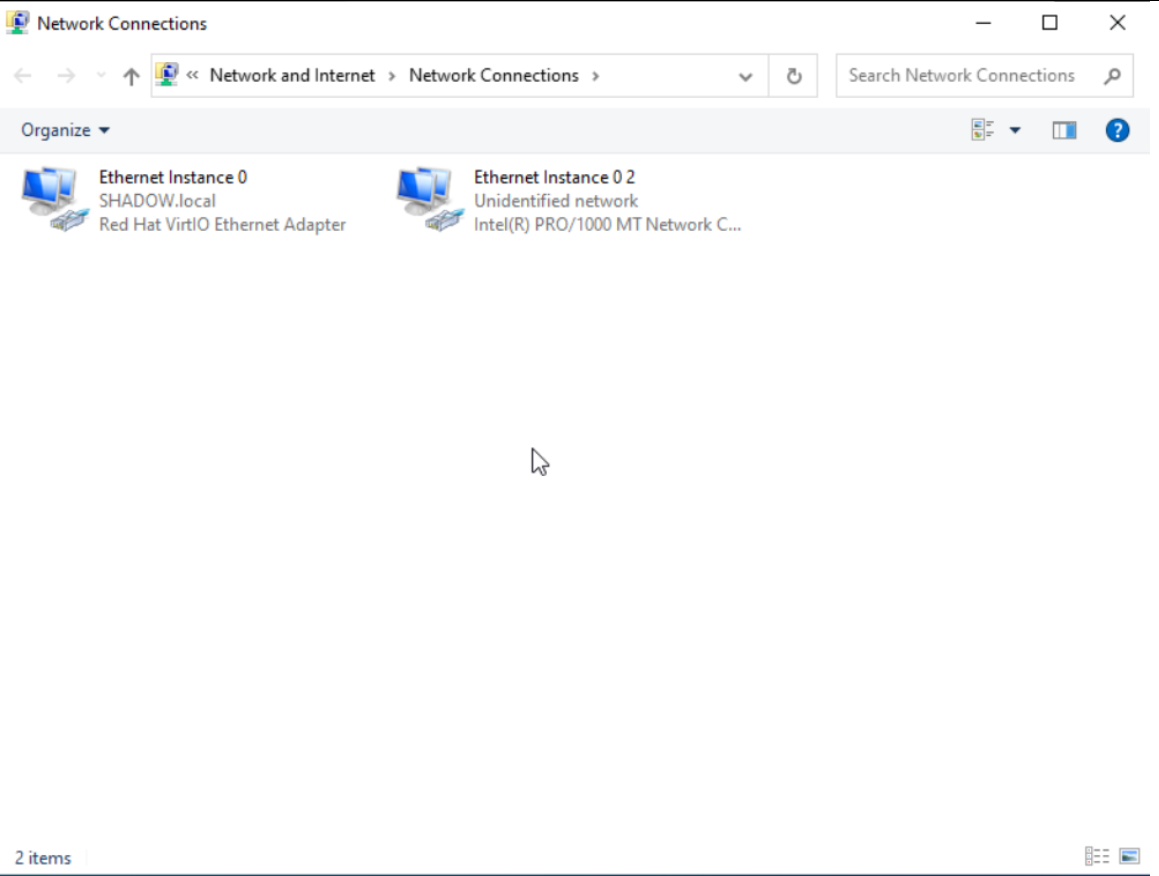
Instances that we have previously configured
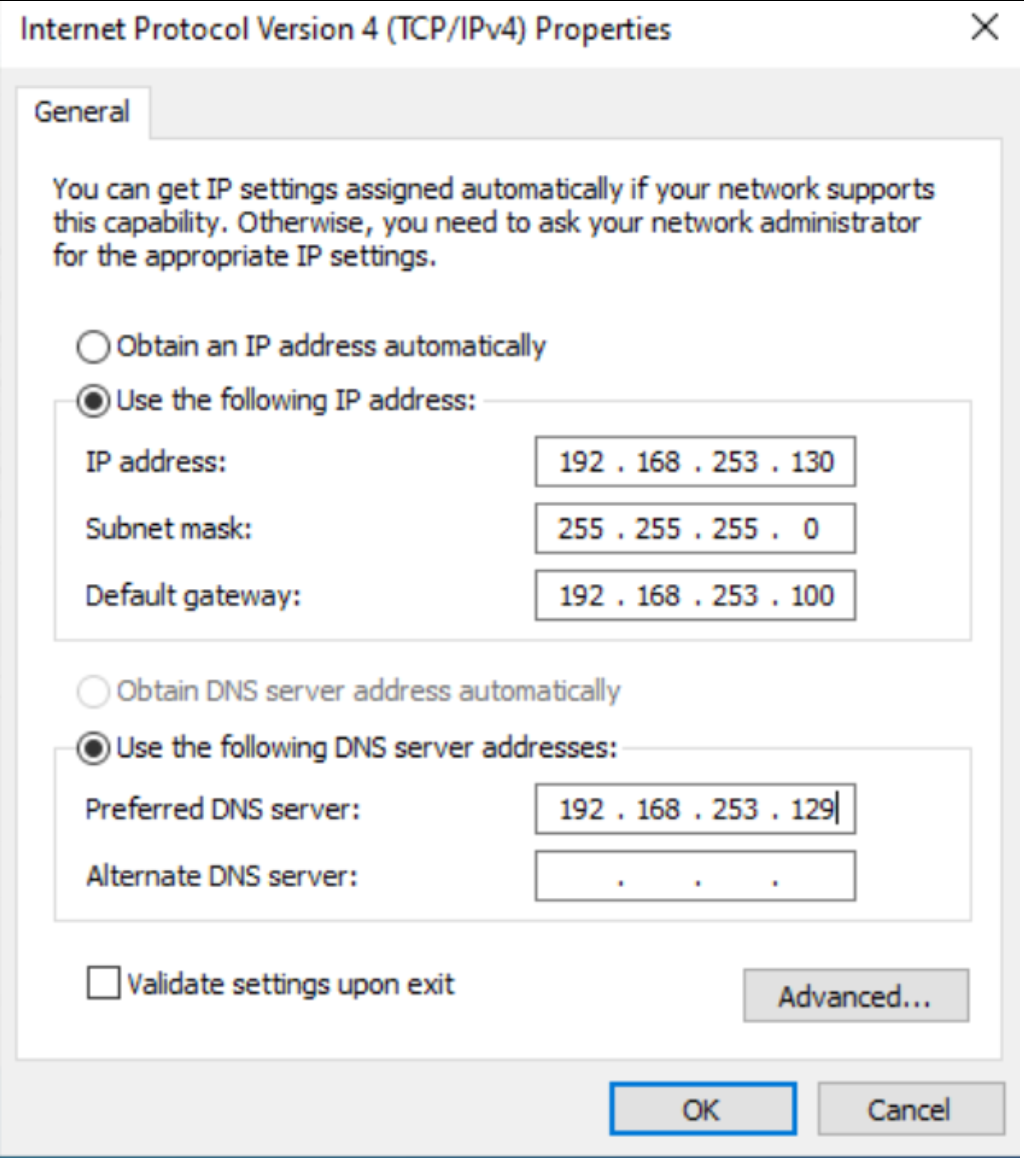
Static IP configuration of Windows machine of the first interface
Second Network Interface Setup: Configure the second network interface with an appropriate static IP but leave the gateway field blank. This omission prevents network conflicts with the first interface.
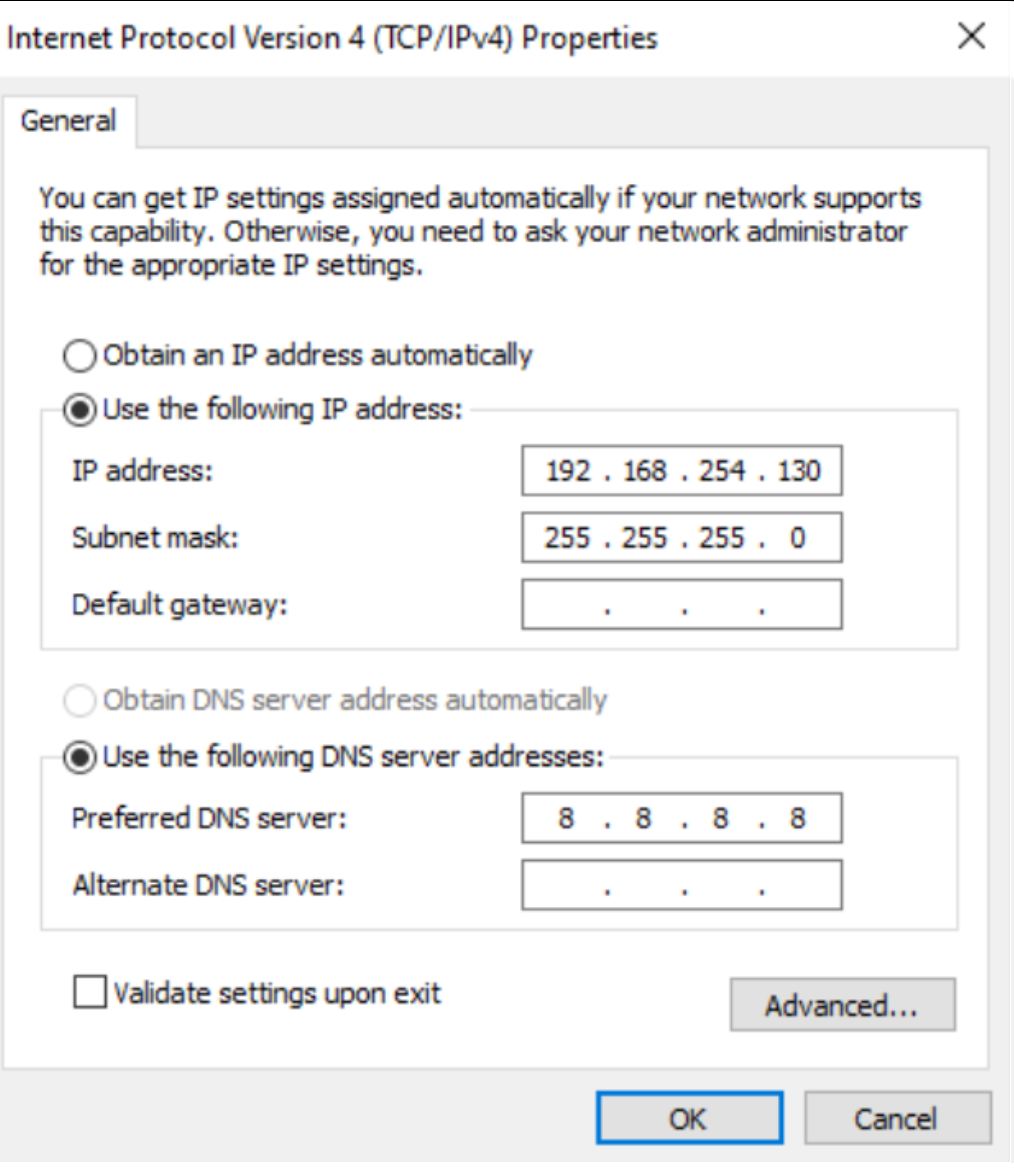
Static IP configuration of Windows machine of the second interface
Final Verification: After completing these configurations, verify that the Windows machine has access to both the Internet and the domain. Successful access indicates a correct setup and readiness for network-related exercises, including pivoting.

We see that we have both internet and domain access
Configuring Kali Linux in Proxmox for External Network Access
Setting up Kali Linux for external network access in Proxmox is a straightforward process, primarily focusing on the network interface configuration. Here’s a step-by-step guide:
Select Network Interface: In Proxmox, choose the Kali Linux machine and navigate to its network settings. Select the option to place the machine on the external network, which is usually denoted as vmbr1 in Proxmox.
Select the external network interface
Modify Network Configuration File: Access the Kali Linux machine and open the /etc/network/interfaces file. This file contains the configuration for network interfaces.
Static IP Configuration: Edit the file to set a static IP address for the primary network interface (typically eth0). For example:
┌──(rsgbengi㉿kali)-[~]
└─$ cat /etc/network/interfaces
# This file describes the network interfaces available on your system
# and how to activate them. For more information, see interfaces(5).

source /etc/network/interfaces.d/*

# The loopback network interface
auto lo
iface lo inet loopback

auto eth0
iface eth0 inet static
 address 192.168.253.128
 netmask 255.255.255.0
 gateway 192.168.253.100
This configuration assigns a static IP (192.168.253.128) to Kali Linux, with the appropriate netmask and gateway settings for external network access.
Restart for Changes to Take Effect: Once the configuration file is updated, restart the Kali Linux machine to apply the new network settings.
Setting Up an Ubuntu Server in Proxmox for Internal Network Simulation
To simulate that we have a computer in the internal network, let’s create an Ubuntu Server machine that has web and ssh services. Here are a couple of screenshots of the configuration that I have done:
Initial Setup and Configuration: In Proxmox, create a new virtual machine and choose Ubuntu Server as the operating system. Configure the general options, OS, system, disk, CPU, memory, and importantly, set the network to connect to your internal network (typically vmbr2 in Proxmox).
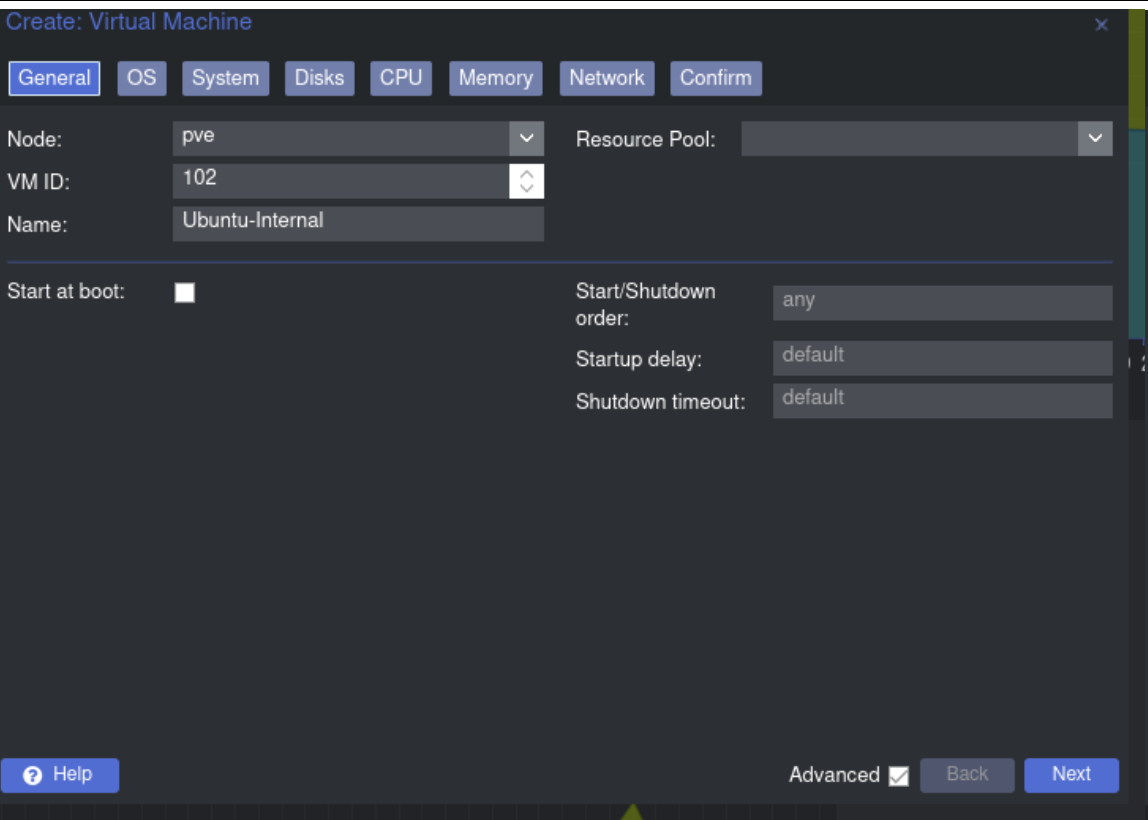
General options
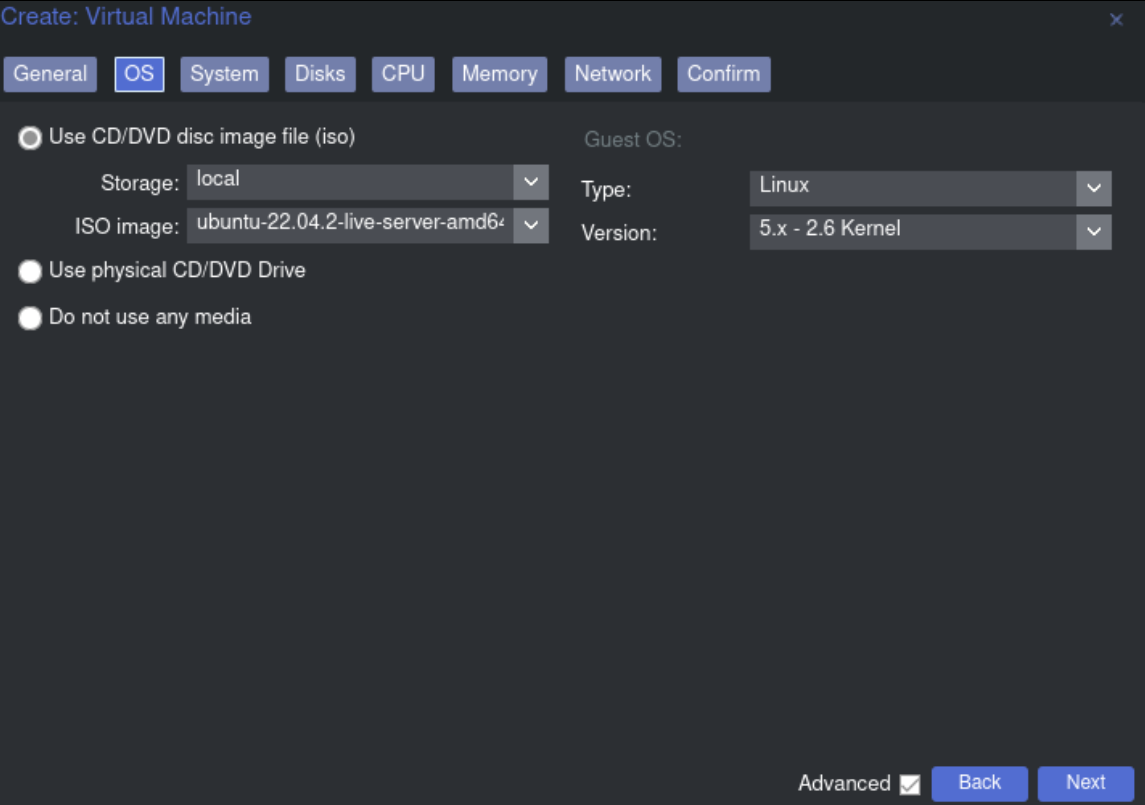
OS options
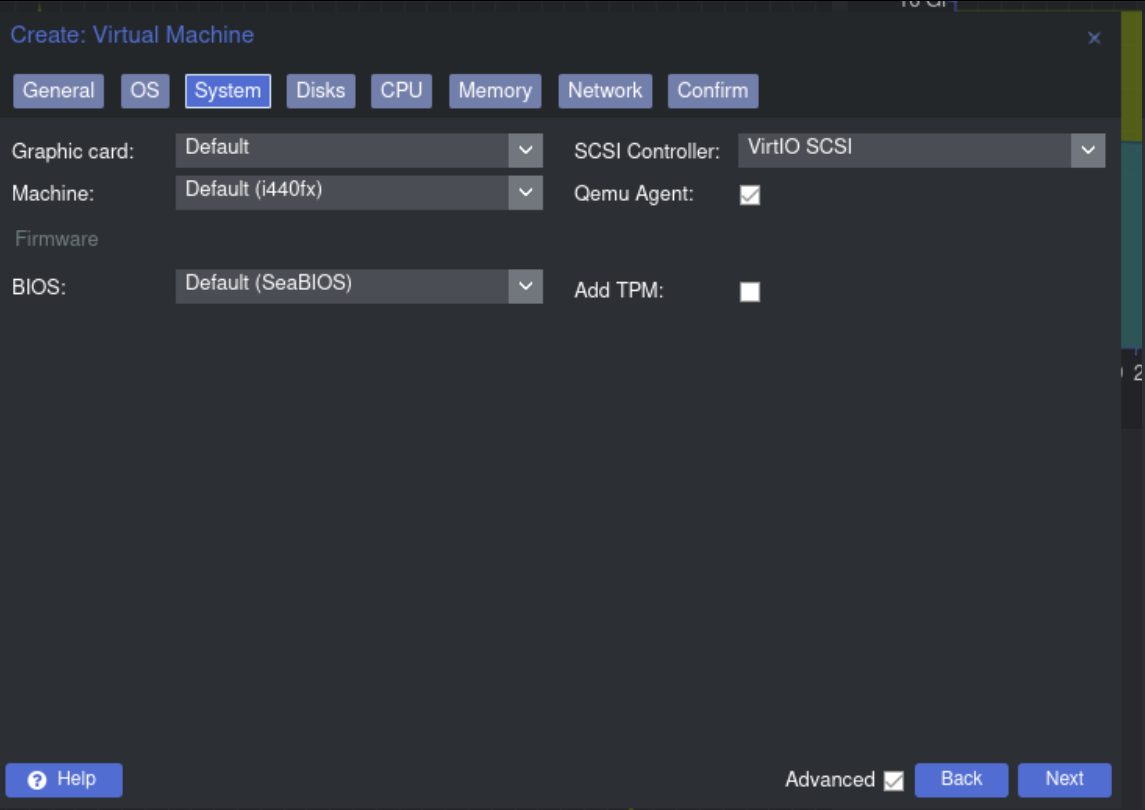
System options
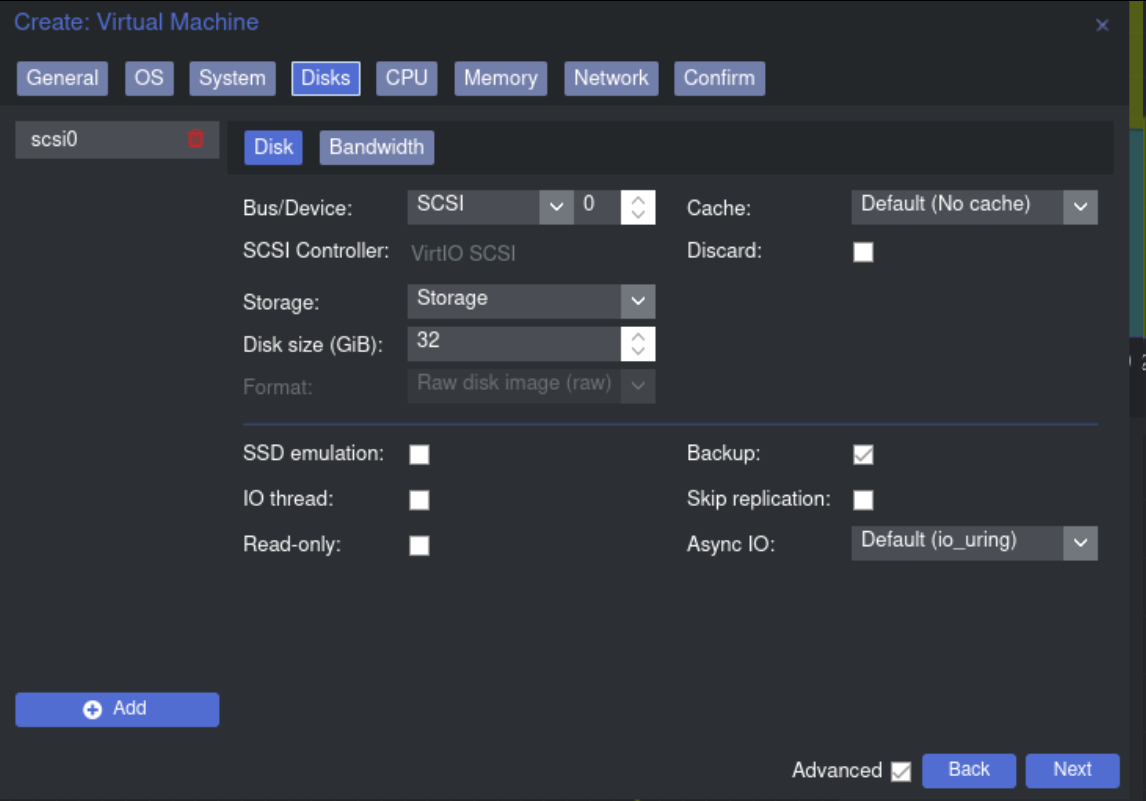
Disks options

CPU options
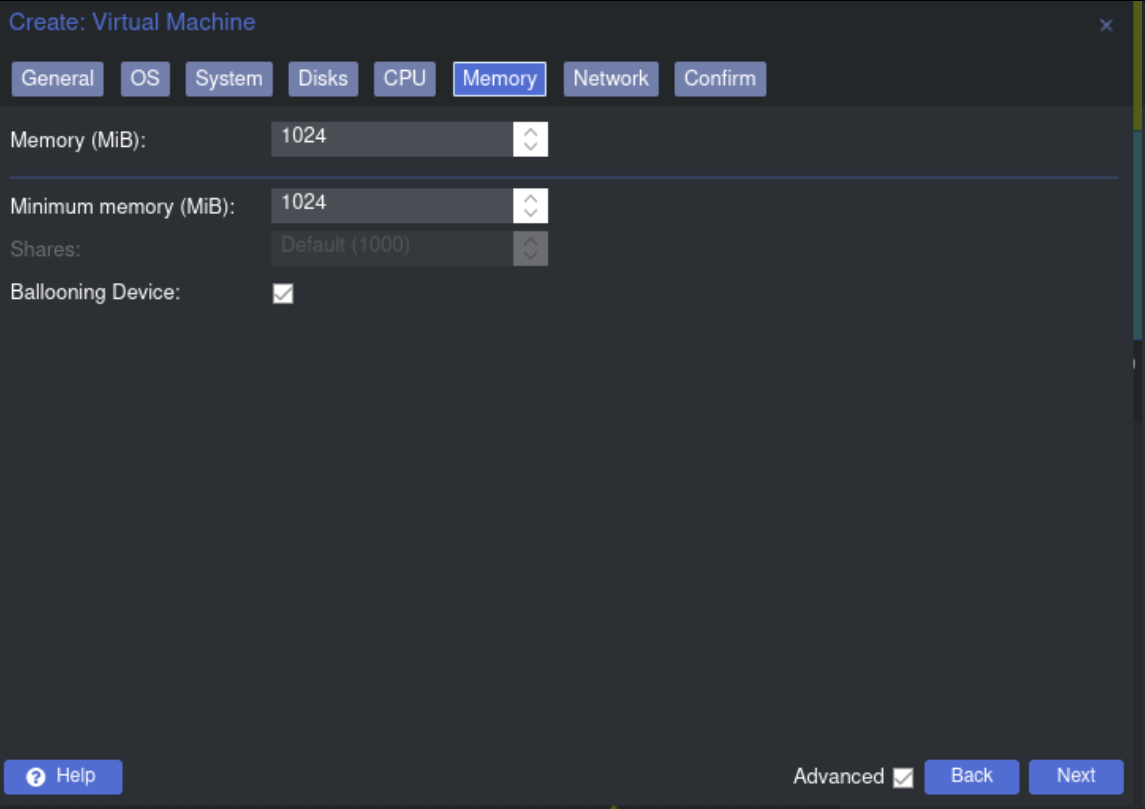
Memory options
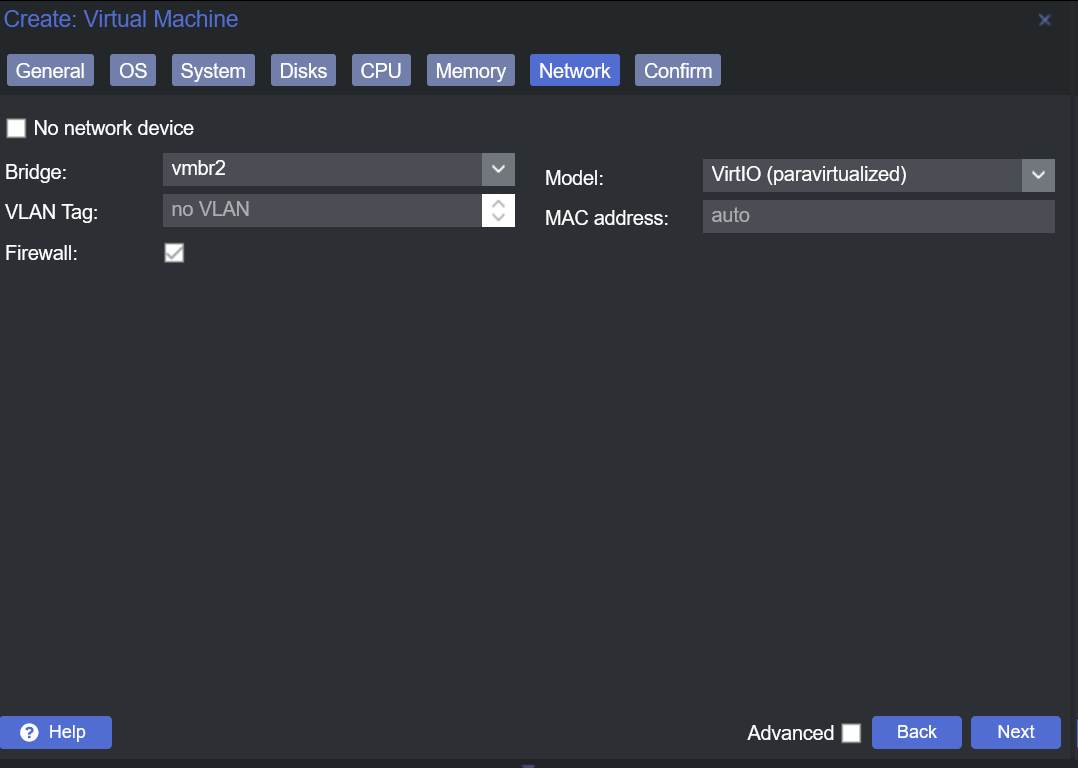
Network options (vmbr2)
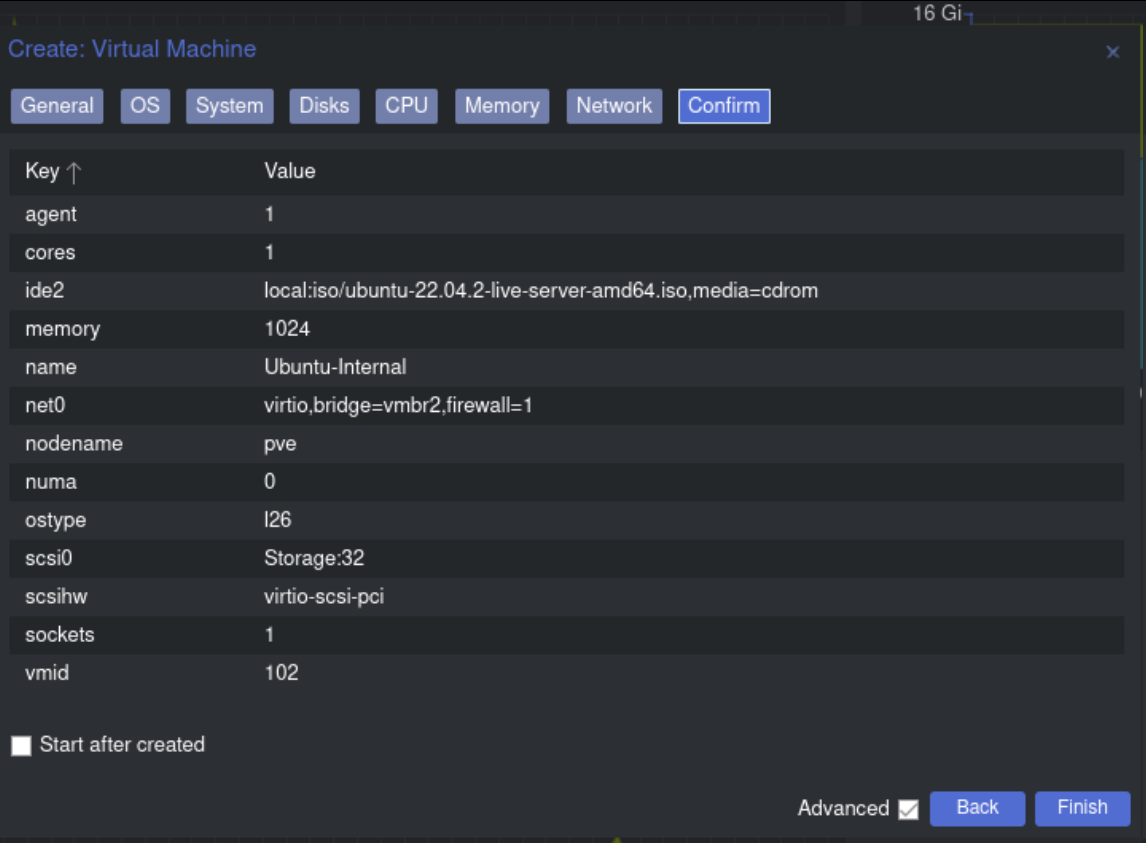
Confirm the creation of the virtual machine
Language and Keyboard Configuration: Start the Ubuntu Server machine and select the preferred system and keyboard language during the initial setup process.
Language selection
Keyboard selection
Network Configuration: Assign a static IP address to the Ubuntu Server to ensure it resides within your internal subnet. This step is crucial for the server to have Internet access and to be reachable within the internal network.
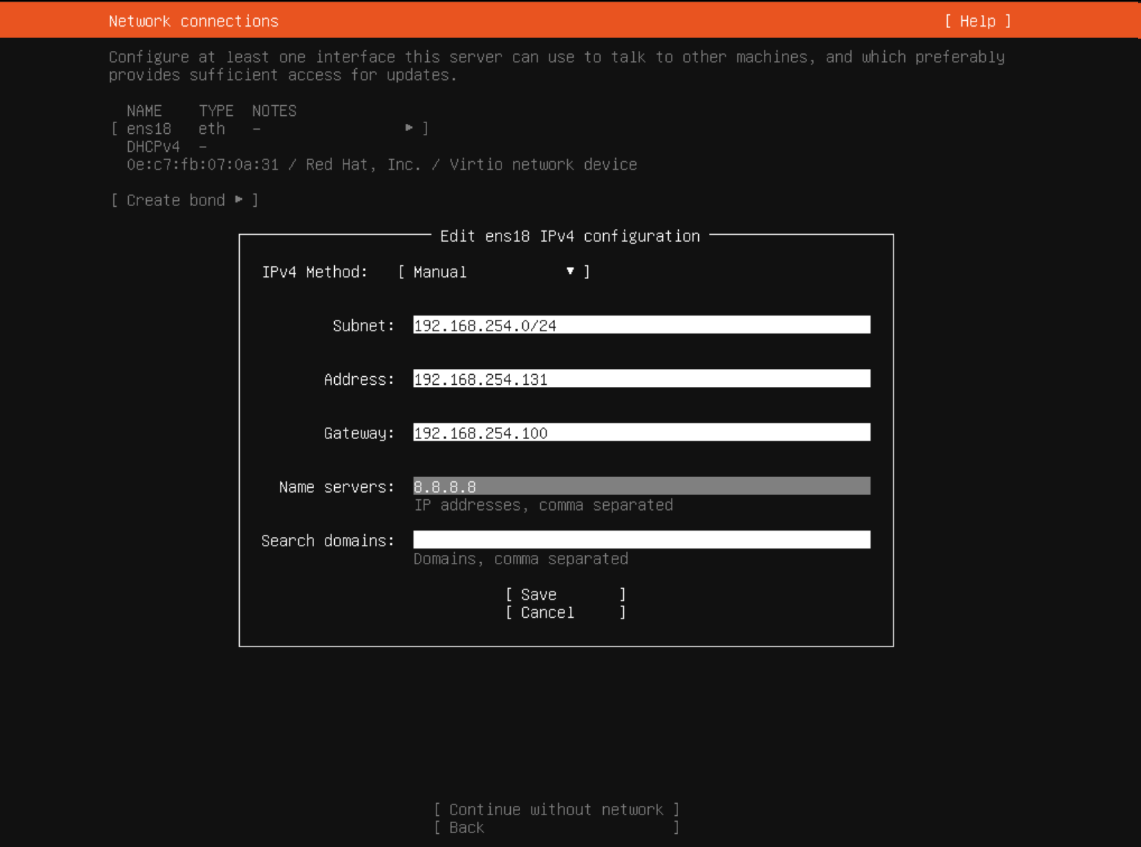
Network configuration
Default File System and Disk Space: Proceed with the default file system setup and allocate the required disk space for the server.
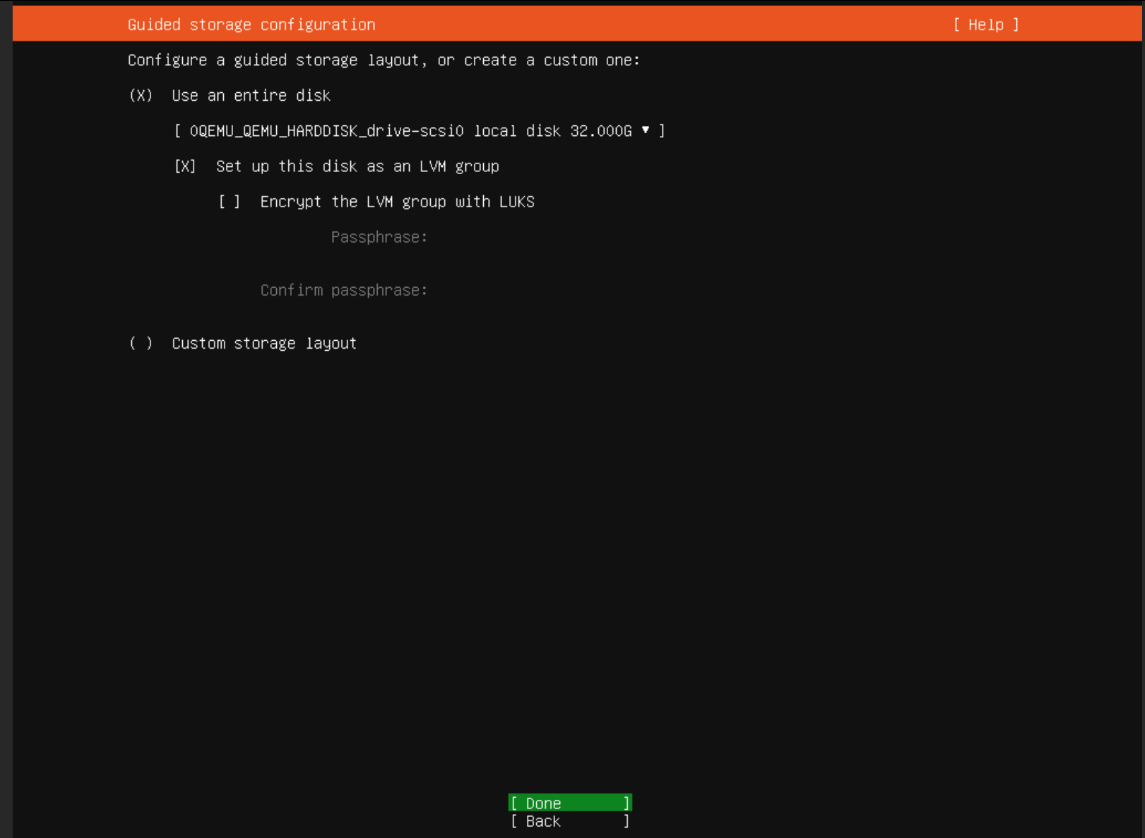
Default file system
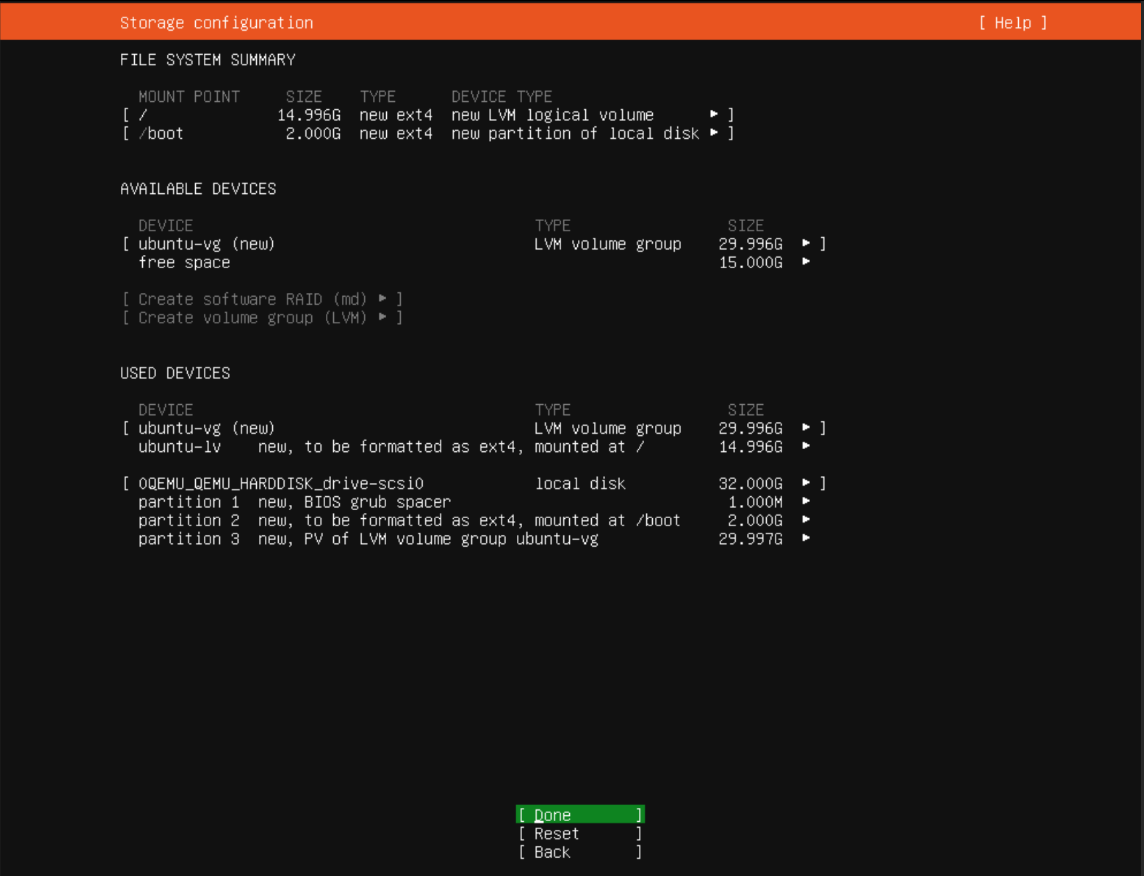
File system data
User Creation and Machine Naming: Create a primary user for the server and set a hostname for easy identification within the network.
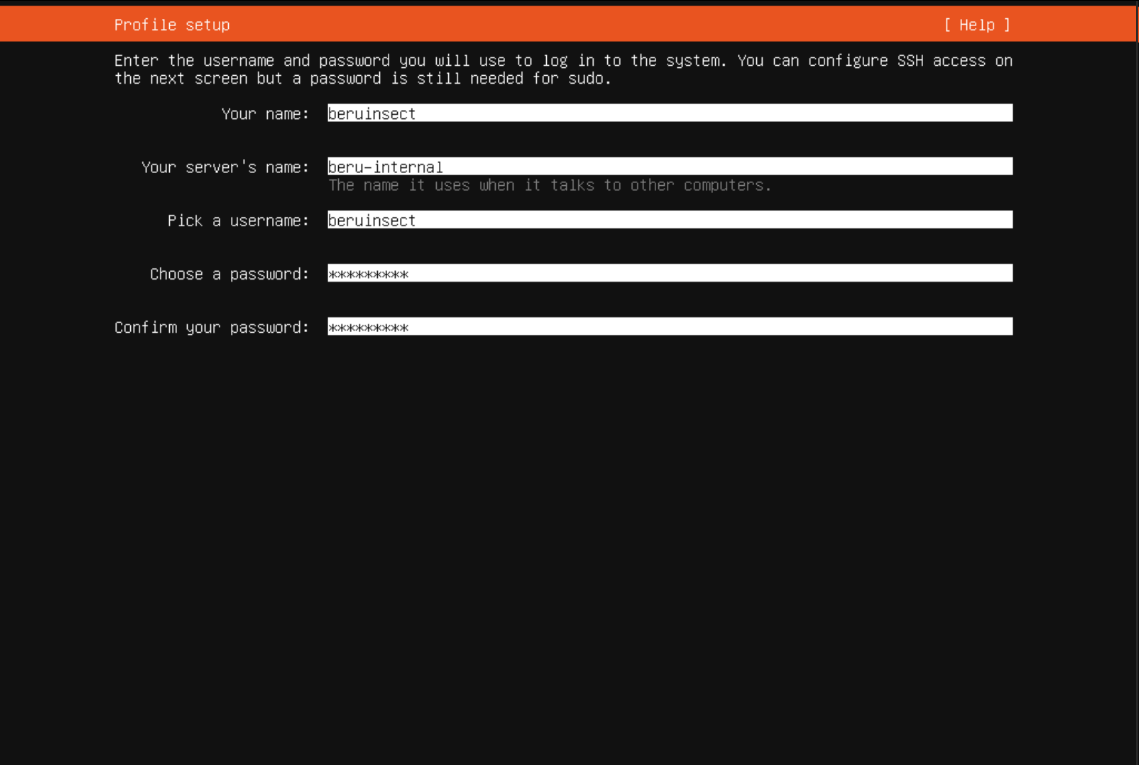
User configuration
Installing OpenSSH: During the setup process, select the option to install OpenSSH. This allows for remote access to the server via SSH, which is essential for managing the server and deploying services.
Complete the installation process, and once the server is up and running, verify that it has proper connectivity to both the internal network and the Internet.
Firewall Configuration: Simulating an Internal Network
Creating an effective internal network simulation involves utilizing Proxmox’s firewall capabilities. Start by navigating to “Firewall -> Options” in Proxmox and switch the firewall setting from “No” to “Yes”. This change sets the stage for more specific network control.
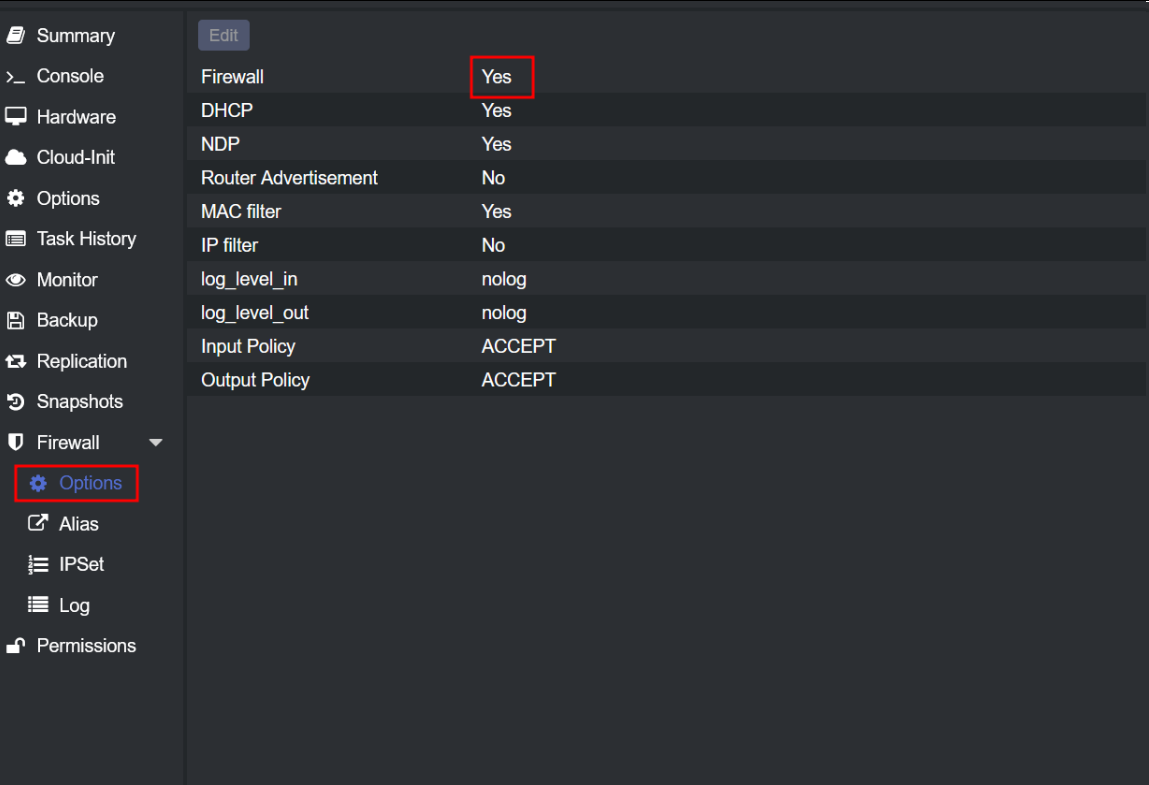
Enable the firewall
Next, dive into the rule creation process by adding new rules. The first rule is designed to block all TCP traffic originating from the external network, specifically the 192.168.253.0/24 subnet. This rule is crucial for ensuring that only desired traffic reaches our internal network.
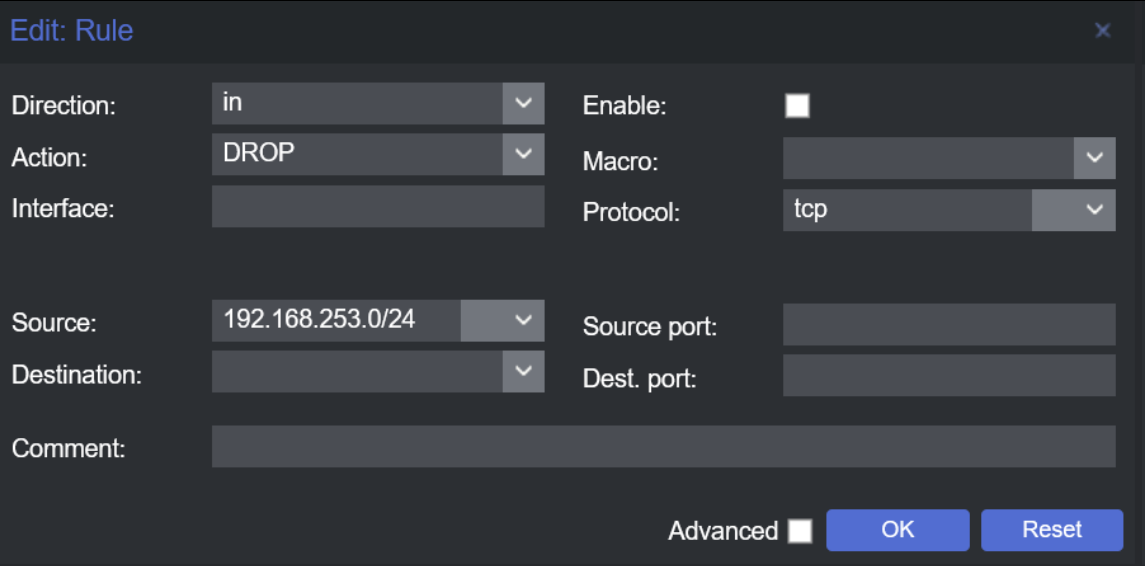
Deny inbound TCP traffic
In addition to the TCP traffic block, implement a rule to deny ICMP traffic. This step further tightens our network’s security, preventing standard ping requests from reaching the internal network.
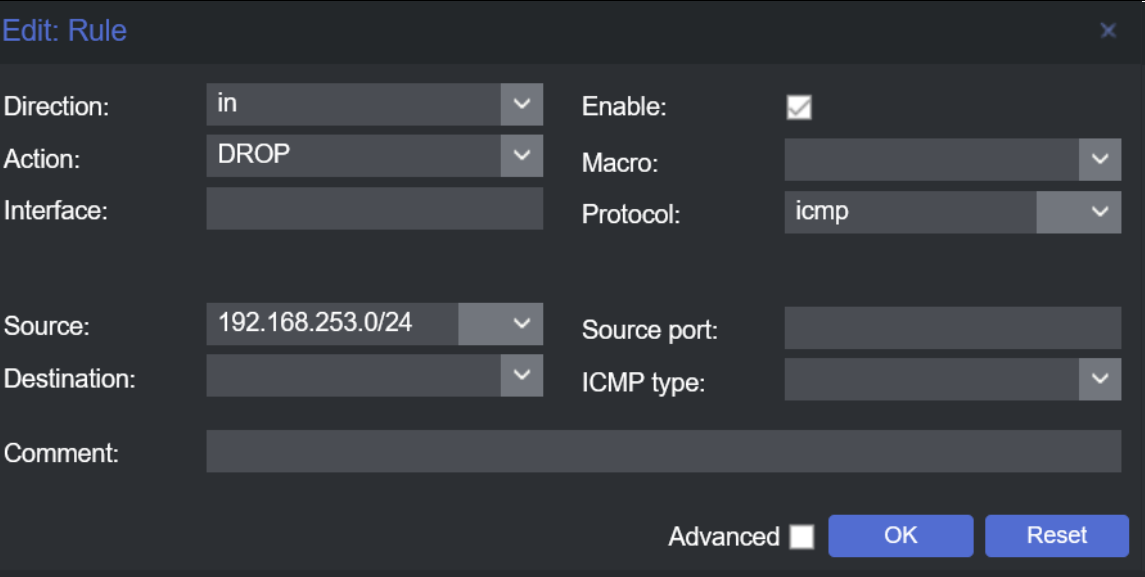
Deny inbound ICMP traffic
After establishing these rules, the Proxmox firewall section should display the configurations clearly, signifying the successful implementation of your firewall settings.
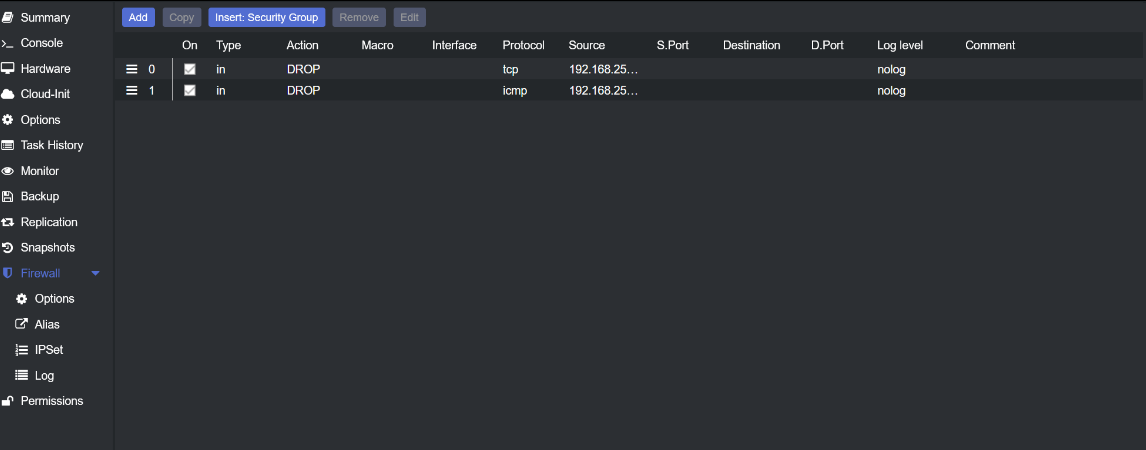
Firewall control panel
To confirm the effectiveness of these firewall rules, conduct a simple test. Try pinging from the Kali machine to the Ubuntu machine, both with and without the ICMP rule activated. This test will demonstrate the firewall’s impact on network traffic. Additionally, verify that the Windows machine, which is connected to both the internal and external networks, has proper access as expected. This comprehensive approach ensures your internal network simulation is functioning as intended, providing a realistic environment for network management and security testing.
Docker Installation and Configuration for Web Services
With the firewall configured, our next step is to install Docker on the Ubuntu machine. Docker simplifies the process of deploying various services. For a streamlined installation, use the script available on GitHub, specifically designed for Docker installation.
GitHub Repository: Docker/docker-install This repository provides an automated Docker installation script, making the setup process more efficient.
Post-installation, ensure your user has the necessary permissions to deploy containers by adding them to the Docker group. Execute the following command:
sudo usermod -aG docker $USER
After adding the user to the Docker group, reboot the system to apply the changes.
Now, let’s deploy a web service for practicing web hacking techniques. For this tutorial, we’ll use “Juice Shop,” a deliberately vulnerable web application. Install and run Juice Shop using the following Docker commands:
docker pull bkimminich/juice-shop`
docker run --rm -p 3000:3000 bkimminich/juice-shop
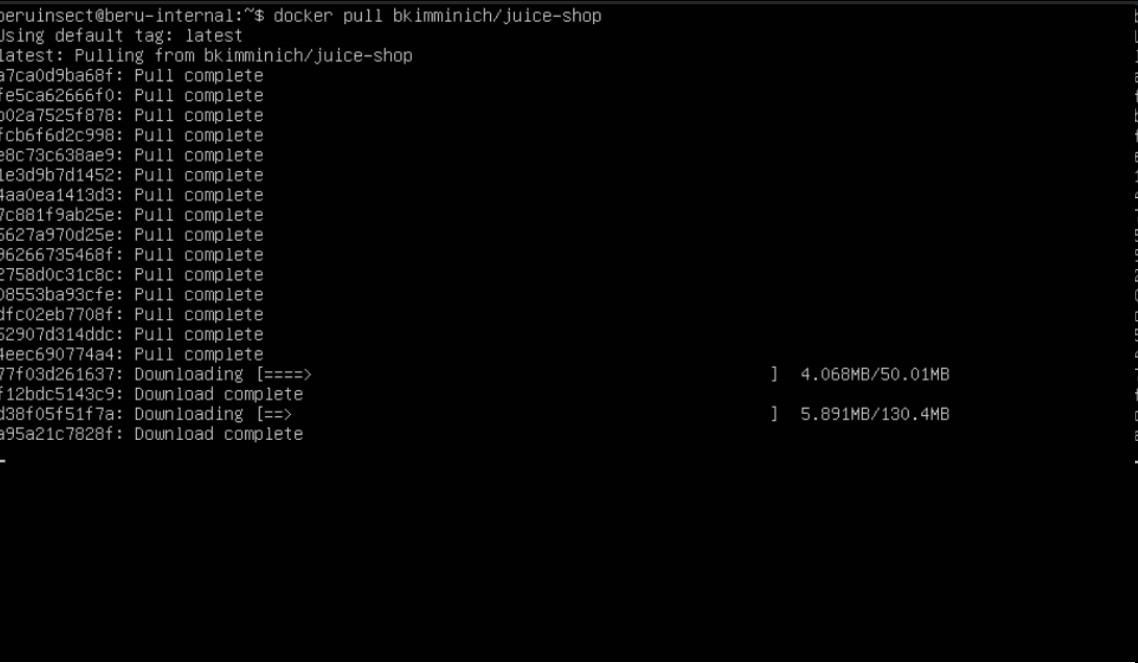
Downloading juice-shop
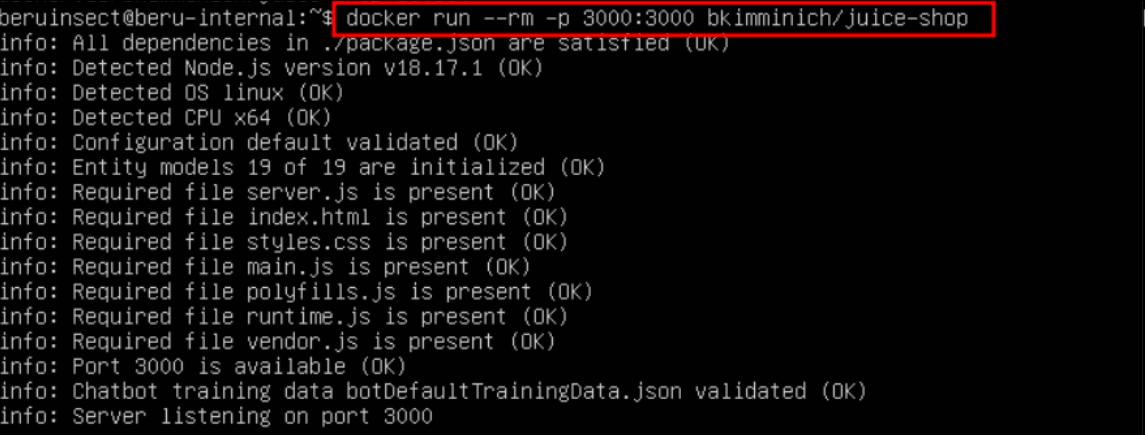
Execution of the container
These commands pull the Juice Shop image from Docker Hub and run it on port 3000. With Juice Shop up and running, you should be able to access it from the Windows machine within your network. If necessary, like in this scenario, you can temporarily disable the TCP firewall rule to test access from other machines, such as Kali Linux.
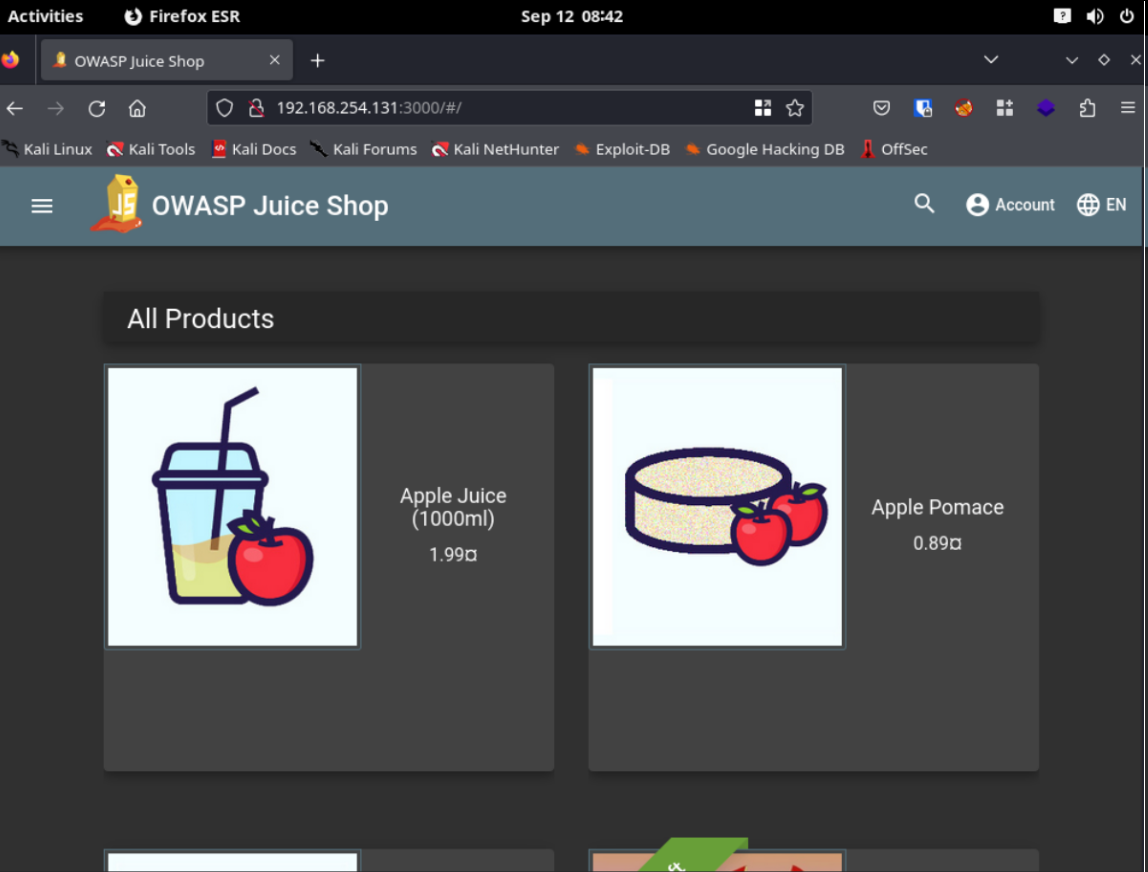
Page accessed from Kali
This setup provides a practical environment to hone your web hacking skills, using Juice Shop as a safe, legal platform for testing and learning. Remember, you can install other web hacking labs on this machine to diversify your practice scenarios.
Conclusion: Building a Comprehensive Lab for Diverse Cybersecurity Practices
In this guide, we’ve taken significant strides in creating a robust, versatile cybersecurity lab within Proxmox. Our journey included configuring subnets to ensure network segmentation and implementing static IP assignments across various machines. This setup not only aids in organizing our lab but also plays a crucial role in network management and security.
The introduction of firewall rules in Proxmox was a crucial step. It not only provided an additional layer of security but also enabled us to simulate more realistic network environments. These environments are essential for practicing advanced cybersecurity techniques like pivoting and internal network attacks.
The installation and configuration of Docker on Ubuntu added another dimension to our lab, allowing for the deployment of various services with ease. By setting up Juice Shop, we created an environment to practice web hacking safely and legally, an invaluable resource for sharpening penetration testing skills.
This comprehensive setup, encompassing both Active Directory hacking and web application vulnerabilities, paves the way for a well-rounded cybersecurity practice. Whether you’re honing your skills in network pivoting, exploring web vulnerabilities, or testing Active Directory attacks, this lab provides a solid foundation for a wide range of cybersecurity exercises.
As we progress, the lab will continue to evolve, adapting to new challenges and techniques in the ever-changing landscape of cybersecurity. Happy hacking!
Tips of the article
What do I have to do in proxmox if I want my subnets to have internet access ?
 post-up echo 1 > /proc/sys/net/ipv4/ip_forward
        post-up iptables -t nat -A POSTROUTING -s '192.168.253.0/24' -o vmbr0 -j MASQUERADE
        post-down iptables -t nat -D POSTROUTING -s '192.168.253.0/24' -o vmbr0 -j MASQUERADE
        post-up iptables -t nat -A POSTROUTING -s '192.168.254.0/24' -o vmbr0 -j MASQUERADE
        post-down iptables -t nat -D POSTROUTING -s '192.168.254.0/24' -o vmbr0 -j MASQUERADE
I have to redirect the traffic of the subnets created by the interface that does have access to Ethernet. In the above example, it would be vmbr0. In order to perform this action, I have to make use of iptables to raise network rules that allow me to forward traffic so that the machine works as if it were a router.
What do I have to do to make a machine belong to a new subnet?
First, I have to select in the Proxmox network configuration of the machine that I want to use the network interface corresponding to the subnet where I want to add it.
Once this is done, I have to statically configure the IP of the machine. On Windows machines this is done through the network configuration menus, while on Linux machines it is mostly done in /etc/network/interfaces.
How can I simulate a private network in a simple way?
I can make use of the Proxmox Firewall to create different firewall rules that allow me to choose which traffic I want to reach a certain machine. For example, I can create rules that deny TCP traffic to a certain subnet or ICMP traffic, thus making other machines unable to ping.
How can I install docker in a simple way in linux and what do I have to do so that my user can create containers without being root ?
I can use the following script to automate the installation of docker:I can use the following script to automate the installation of docker:
GitHub - docker/docker-install: Docker installation script
On the other hand, for my user to be able to run containers without being root, I have to add him to the docker group. I can do this with the following command:On the other hand, for my user to be able to run containers without being root, I have to add him to the docker group. I can do this with the following command:
sudo usermod -aG docker $USER
Resources
Network Configuration - Proxmox VE
Chapters

Previous chapter
💬 Comments Available
Drop your thoughts in the comments below! Found a bug or have feedback? Let me know.